Step 10: Building the Treehouse Platform
A Treehouse-Pro shows you how to build a platform:
✔ Over 10 different treehouse platforms
✔ The best solutions for 1, 2, 3, 4 or more trees
✔ Real-life examples with our GTS Treehouse Hardware Kits
✔ Avoid beginner's mistakes and save time!
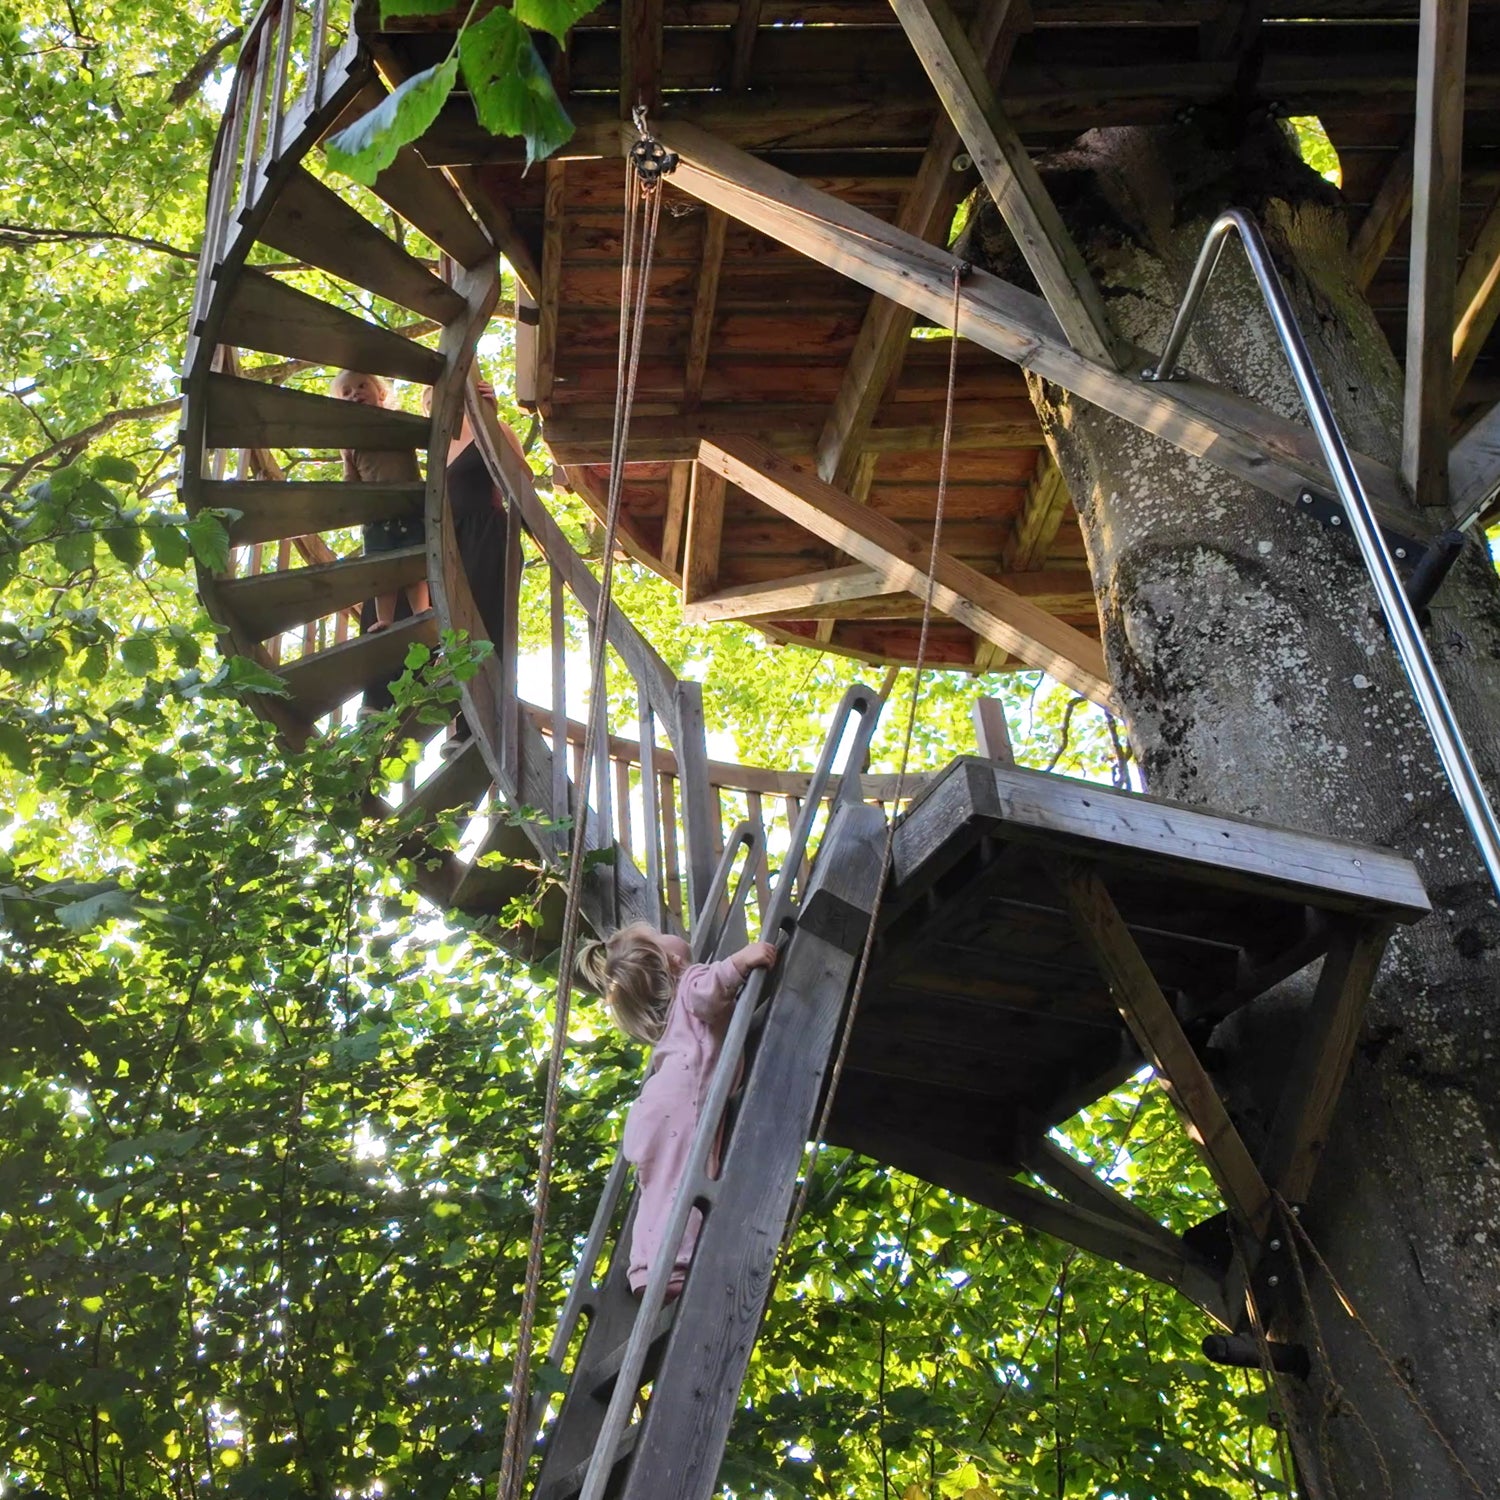
Building instructions and professional tips for building a treehouse platform
Assembling the sturdy platform is the most challenging part of building a treehouse – the supreme discipline!
Once you have mastered this step, the actual construction of the treehouse on top is a piece of cake.
We start with simple platforms and small wooden decks in one tree and work our way up to huge platforms measuring around 40 m² (430 ft²) in several trees.
Have fun!
1. How to attach a treehouse to a tree (single tree)
The most beautiful trees are often located directly on the property line between neighbours. In this case, the platform must extend further on one side, or a combination of tree fastening and extension with stilts must be built.
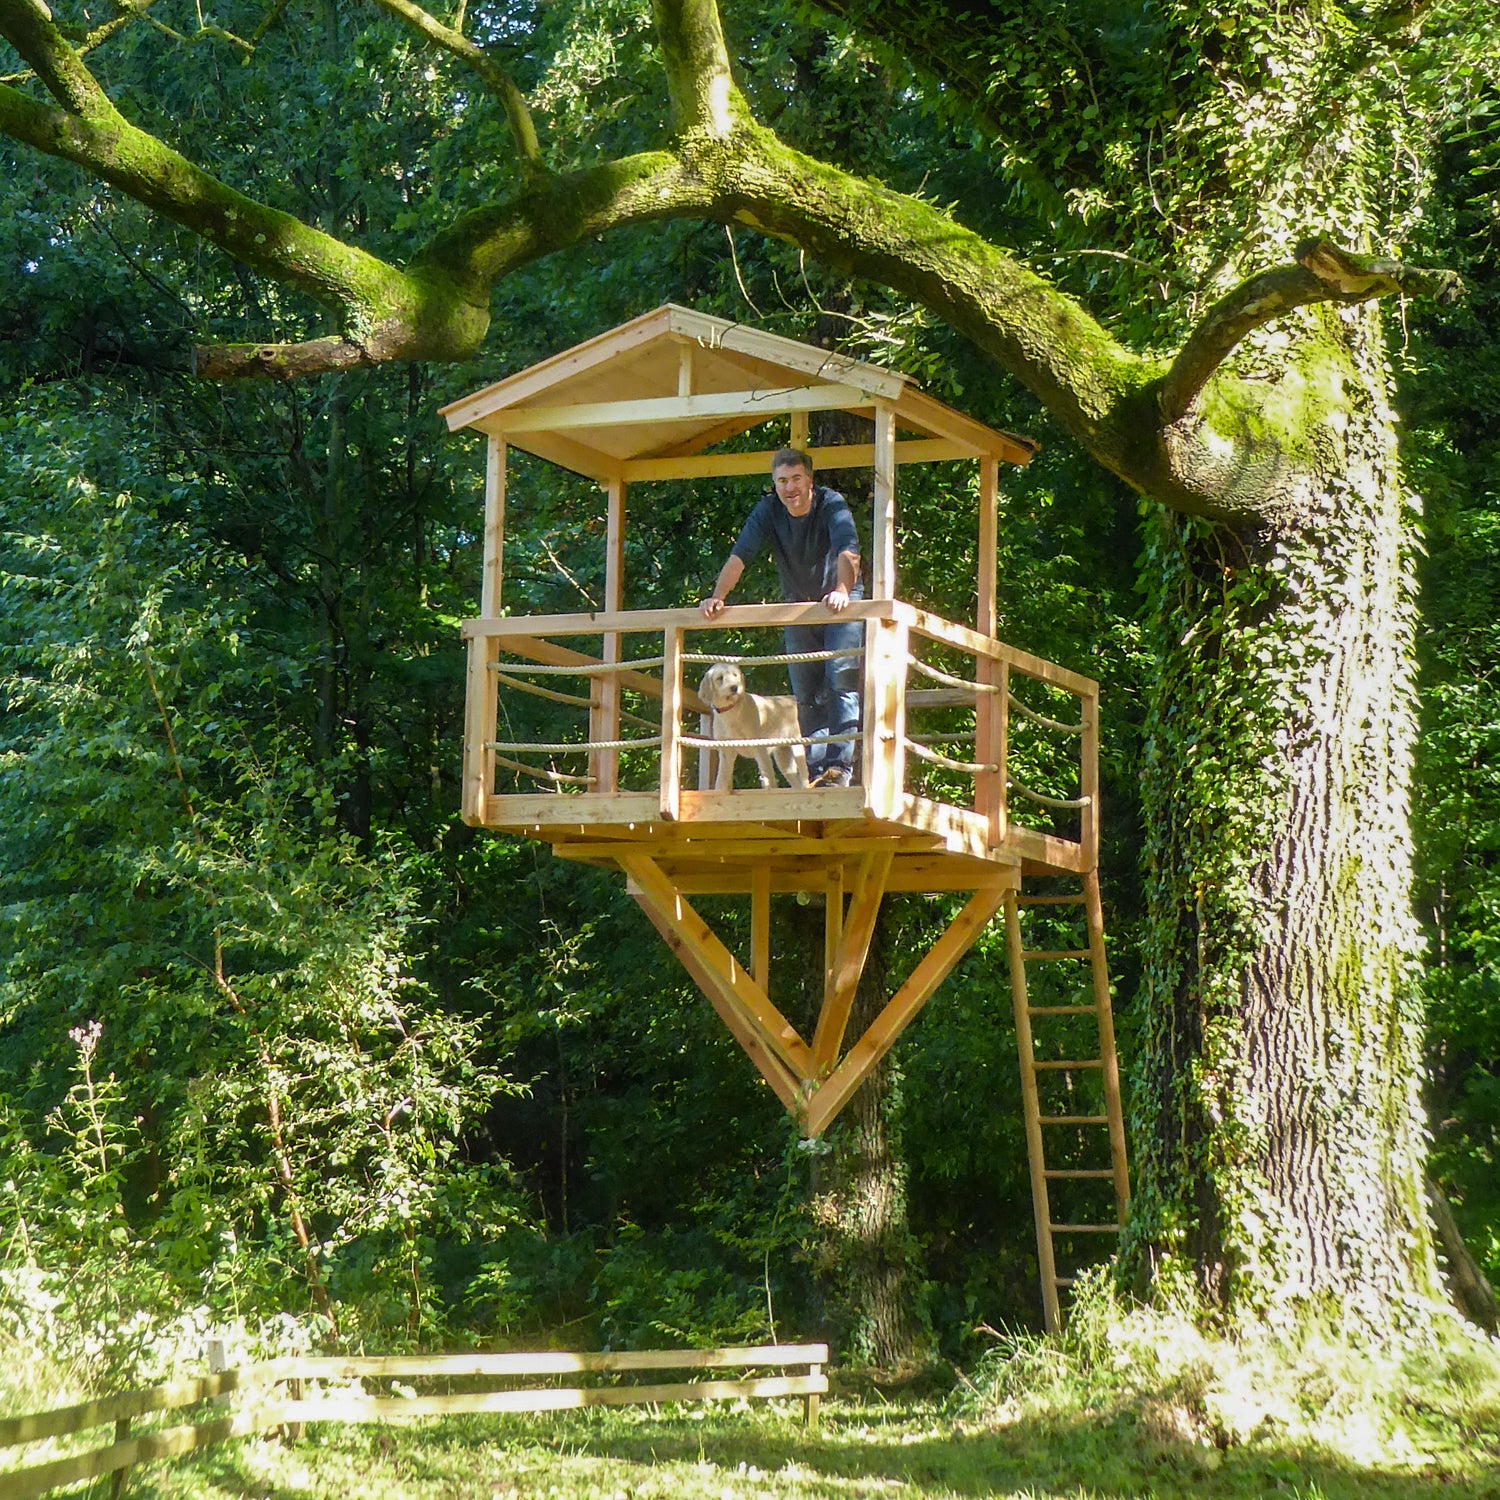
Single-sided platform in a tree (solitary)
If the platform is only fastened to the tree on one side, note the following:
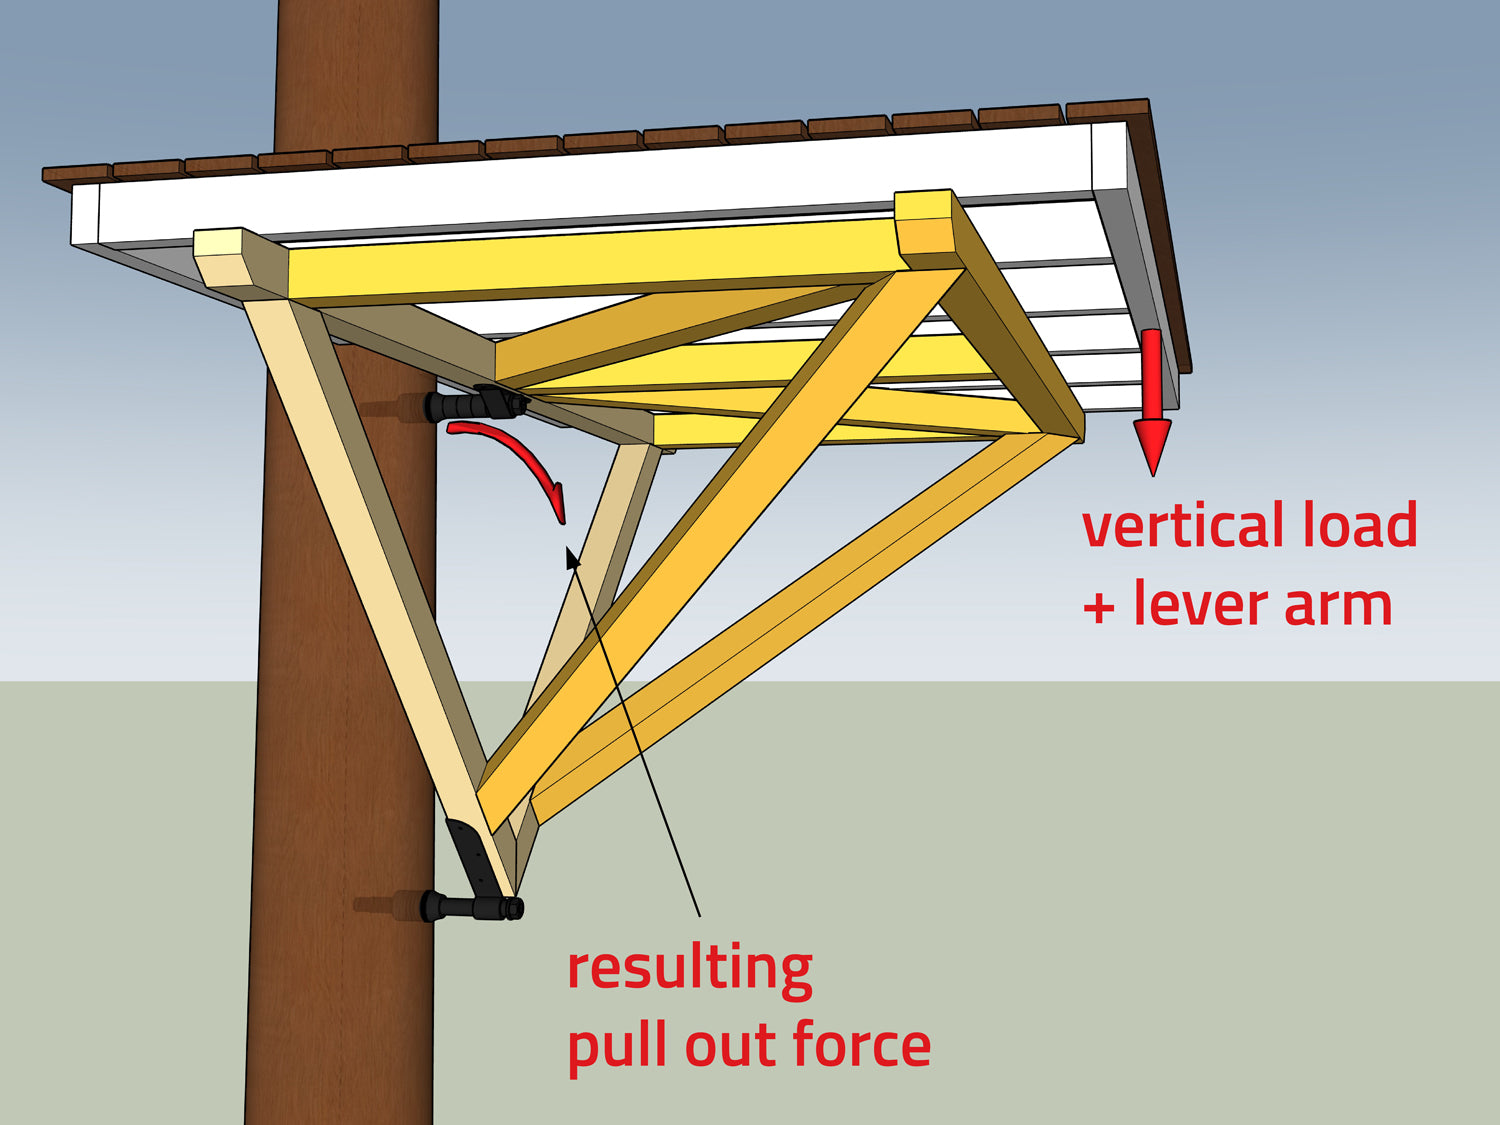
Be aware of leverage!
A single triangle tends to tip over when the lever arm is long and the load is vertical – the upper GTS could loosen under heavy loads and additional lateral movement (red arrow).
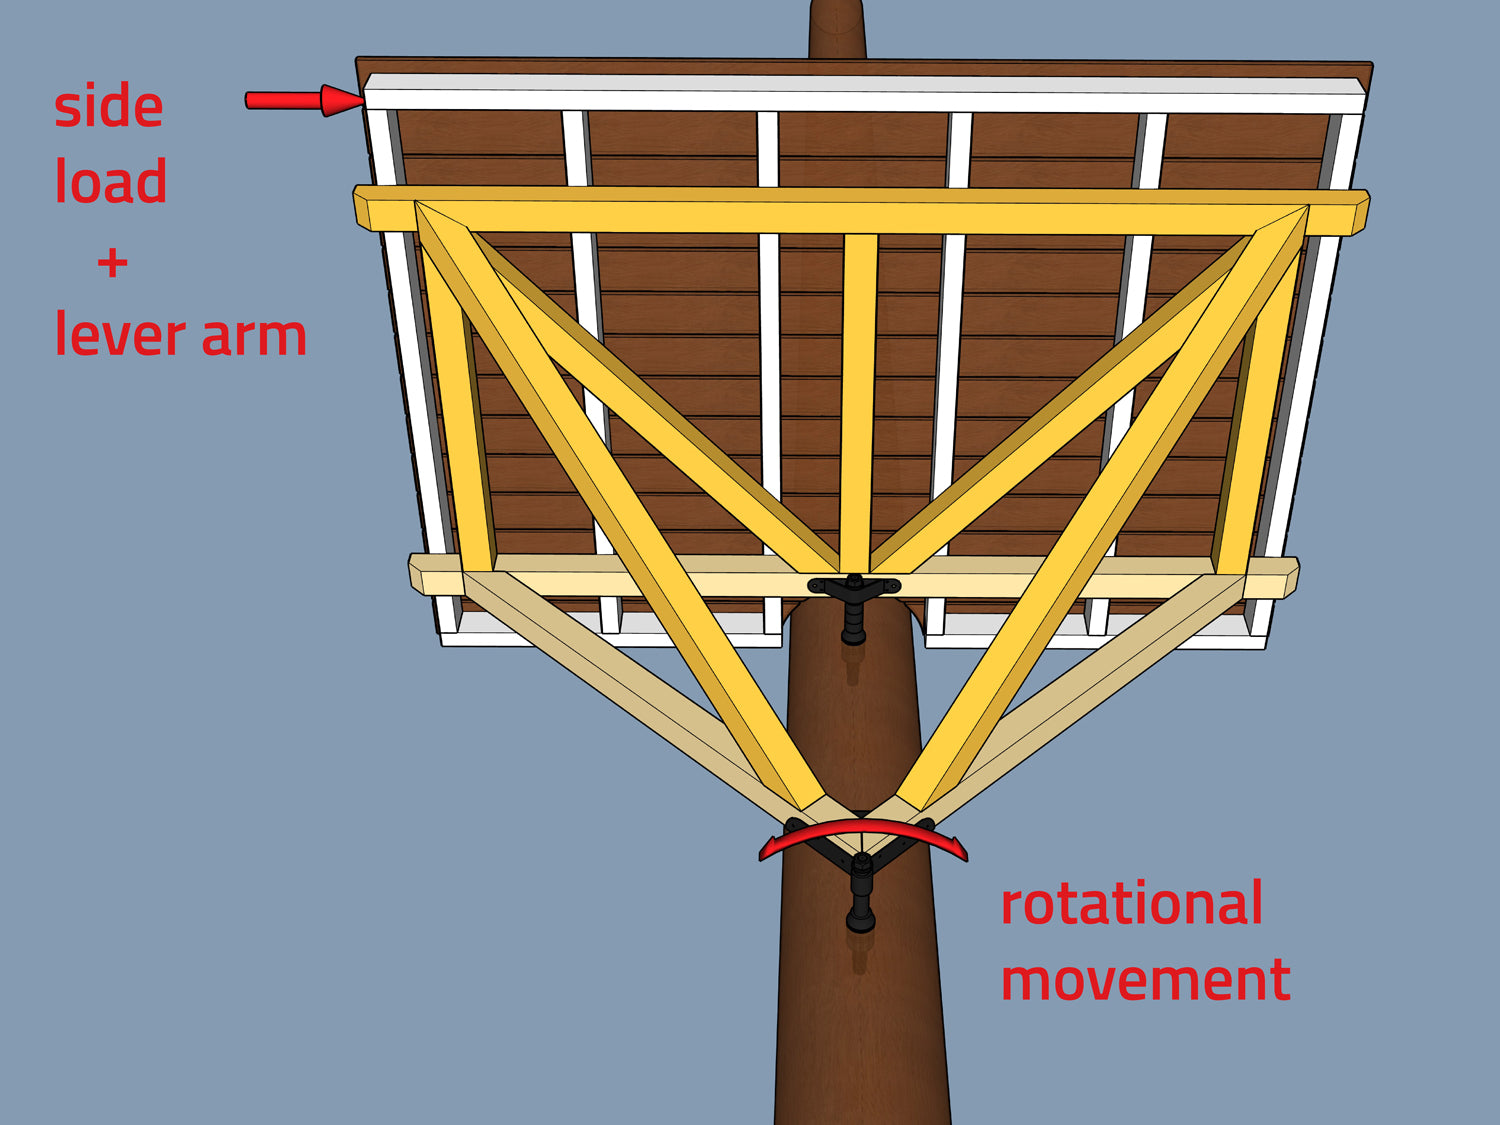
Avoid lateral rotation
Lateral loads, on the other hand, cause rotation around the trunk. The larger the triangle and the longer the lever arm, the more unstable the load! GTS+ bolts are primarily designed for vertical loads; under lateral loads, the load capacity is only about 1/3.
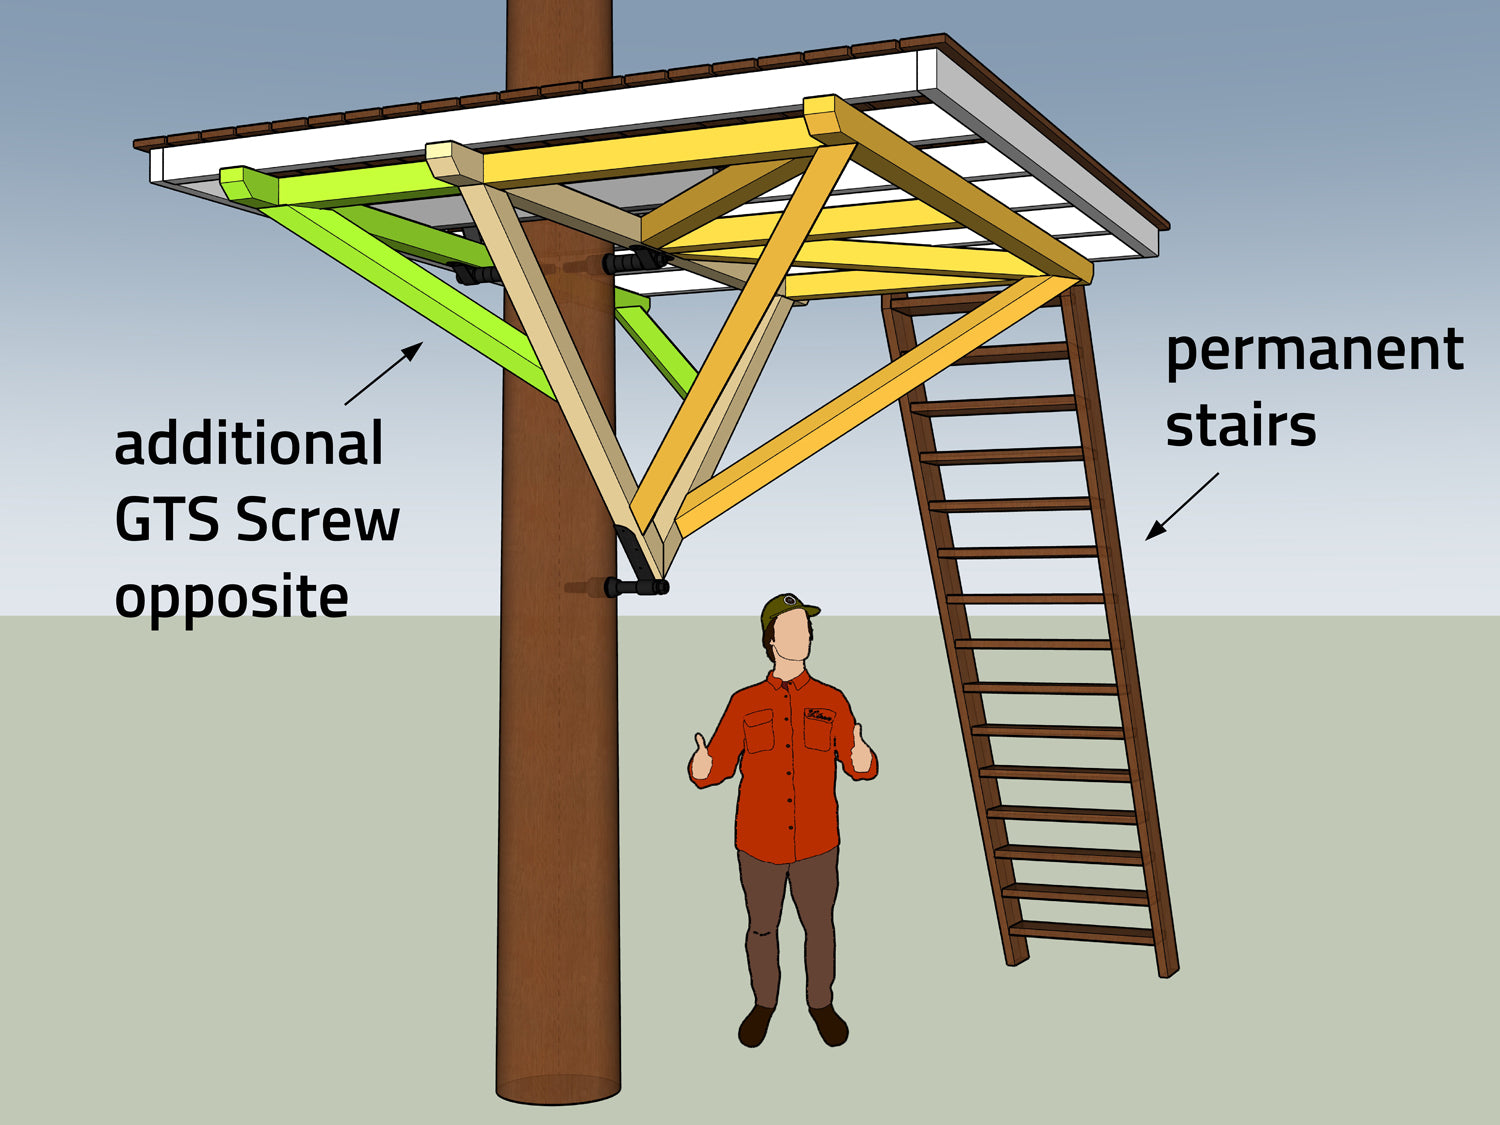
Constructive solutions
To ensure the stability of a triangle projecting on one side, rotational and tilting movements must be minimised as far as possible. This is best achieved with a counter bearing (e.g. GTS mounted opposite). A firmly anchored staircase or similar also provides additional rigidity to the construction.
Expert tip
Platforms fixed on one side should not protrude more than 2.5 m (8.2 ft) from the trunk, otherwise the platform will sway and swing uncomfortably.
We recommend stiffening the platform, preferably with a second, opposite tree bolt at the top or with a staircase set in concrete, a wooden support or similar.
Double platforms in a tree (solitary)
Two opposing triangles are the classic treehouse construction. The tree bolts wedge and stiffen each other, allowing very large platforms to be built:
✔ The tree must have a sufficient trunk diameter at the height of the platform to accommodate two tree bolts.
✔ The load should be distributed as evenly as possible.
✔ Avoid uneven loads, long lever arms and twisting!
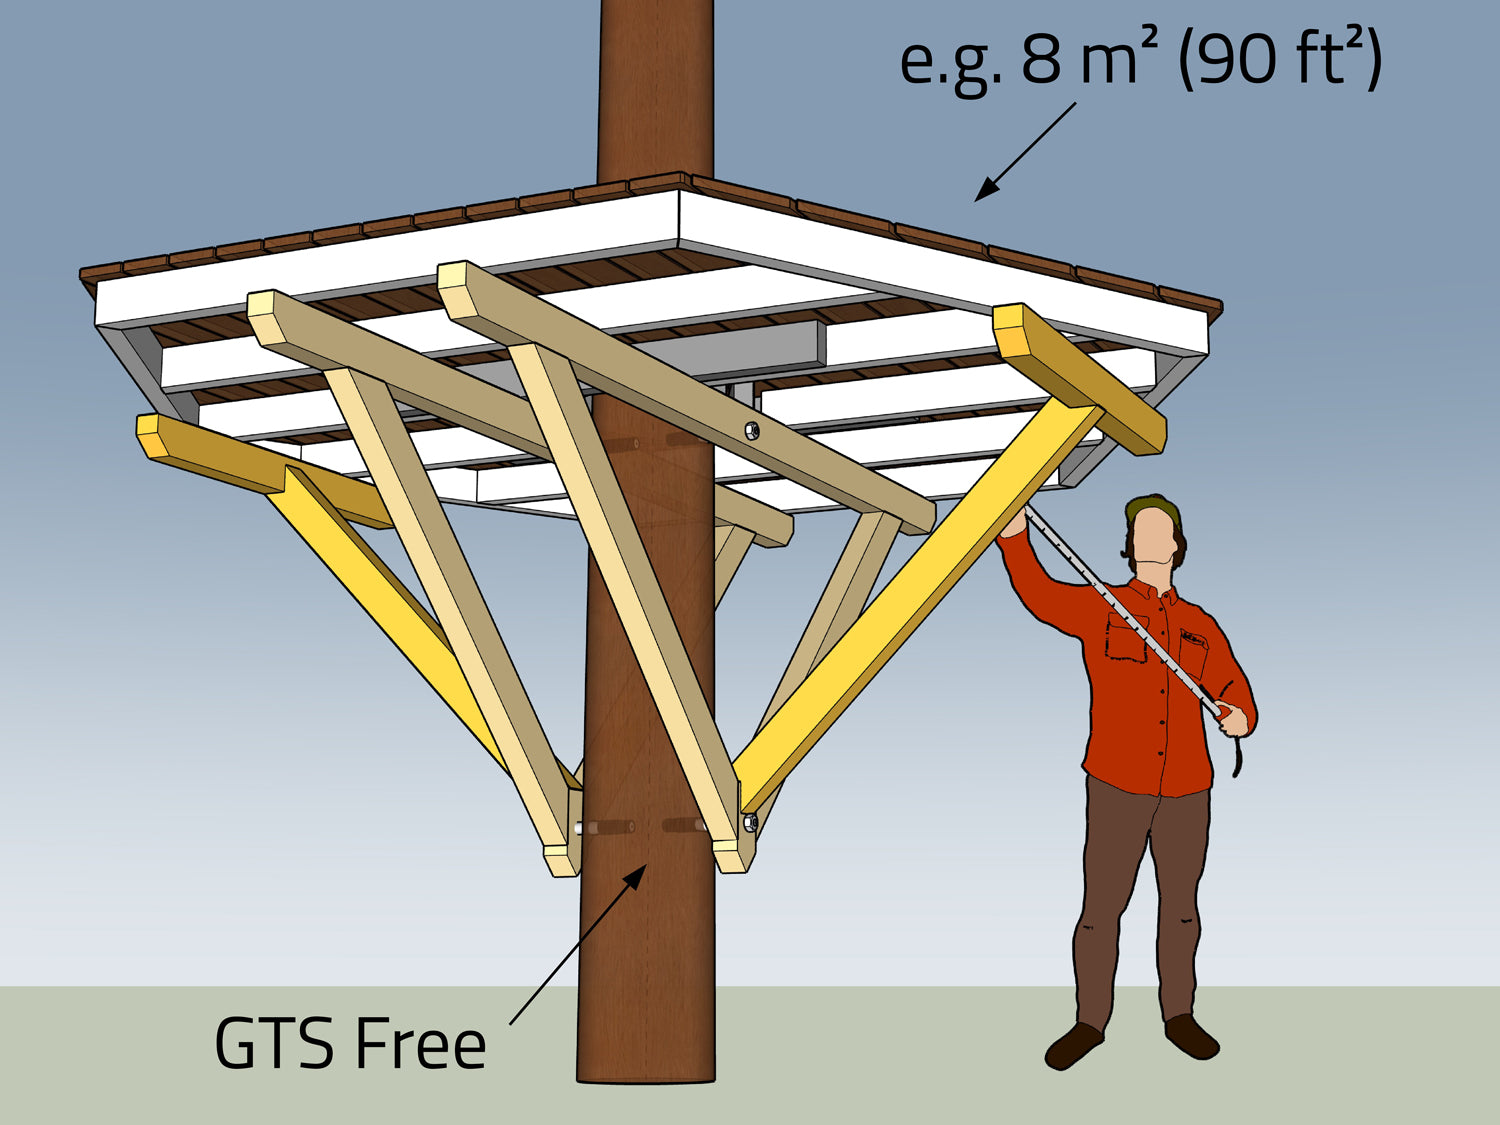
Small, lightweight platforms in a tree
Our smallest XS Treehouse Hardware Kit: Free Kids is only intended for lightweight children's playhouses in thin trees with a diameter of 30 to 35 cm (11.8 in):
✔ Lightweight construction, uninsulated
✔ Platform size < 10 m² (107,6 ft²)
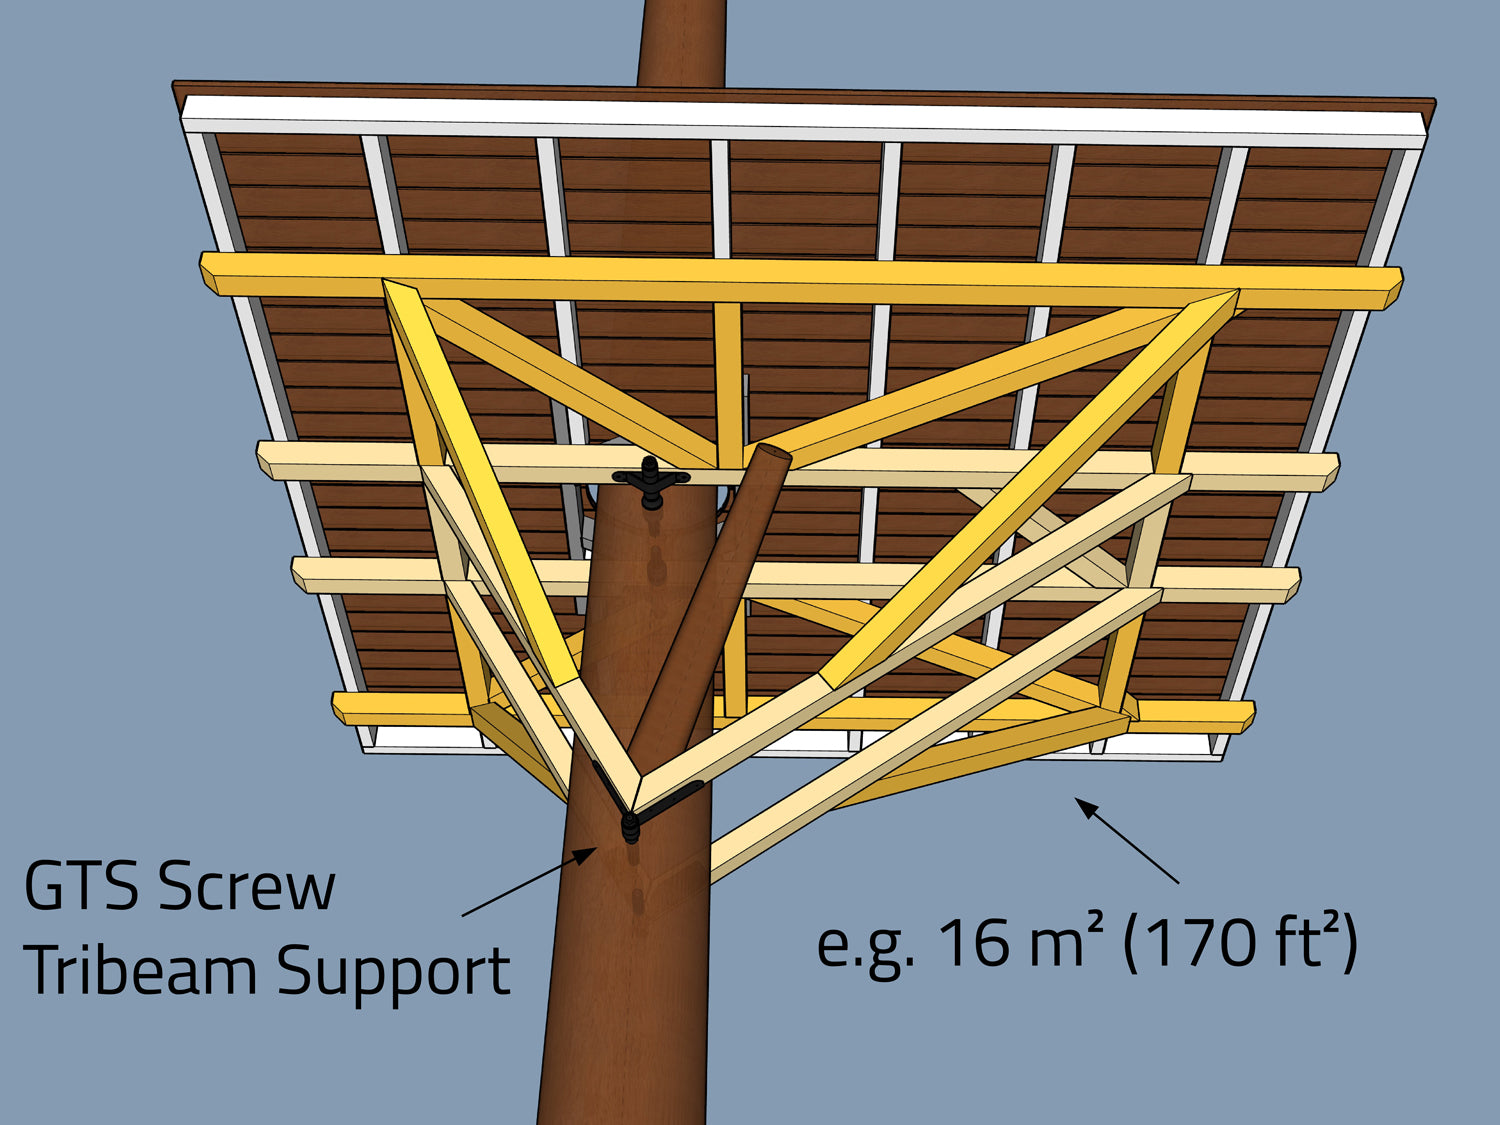
Middle platform in a tree
Larger tree bolts with accessories allow for larger platforms. The tree trunk should be at least 40 cm (15.7 in) thick for two GTS Allstar:
✔ Simple treehouse
✔ Platform size 10 < 20 m² (107,6 ft²)
Pro tip for thin trees
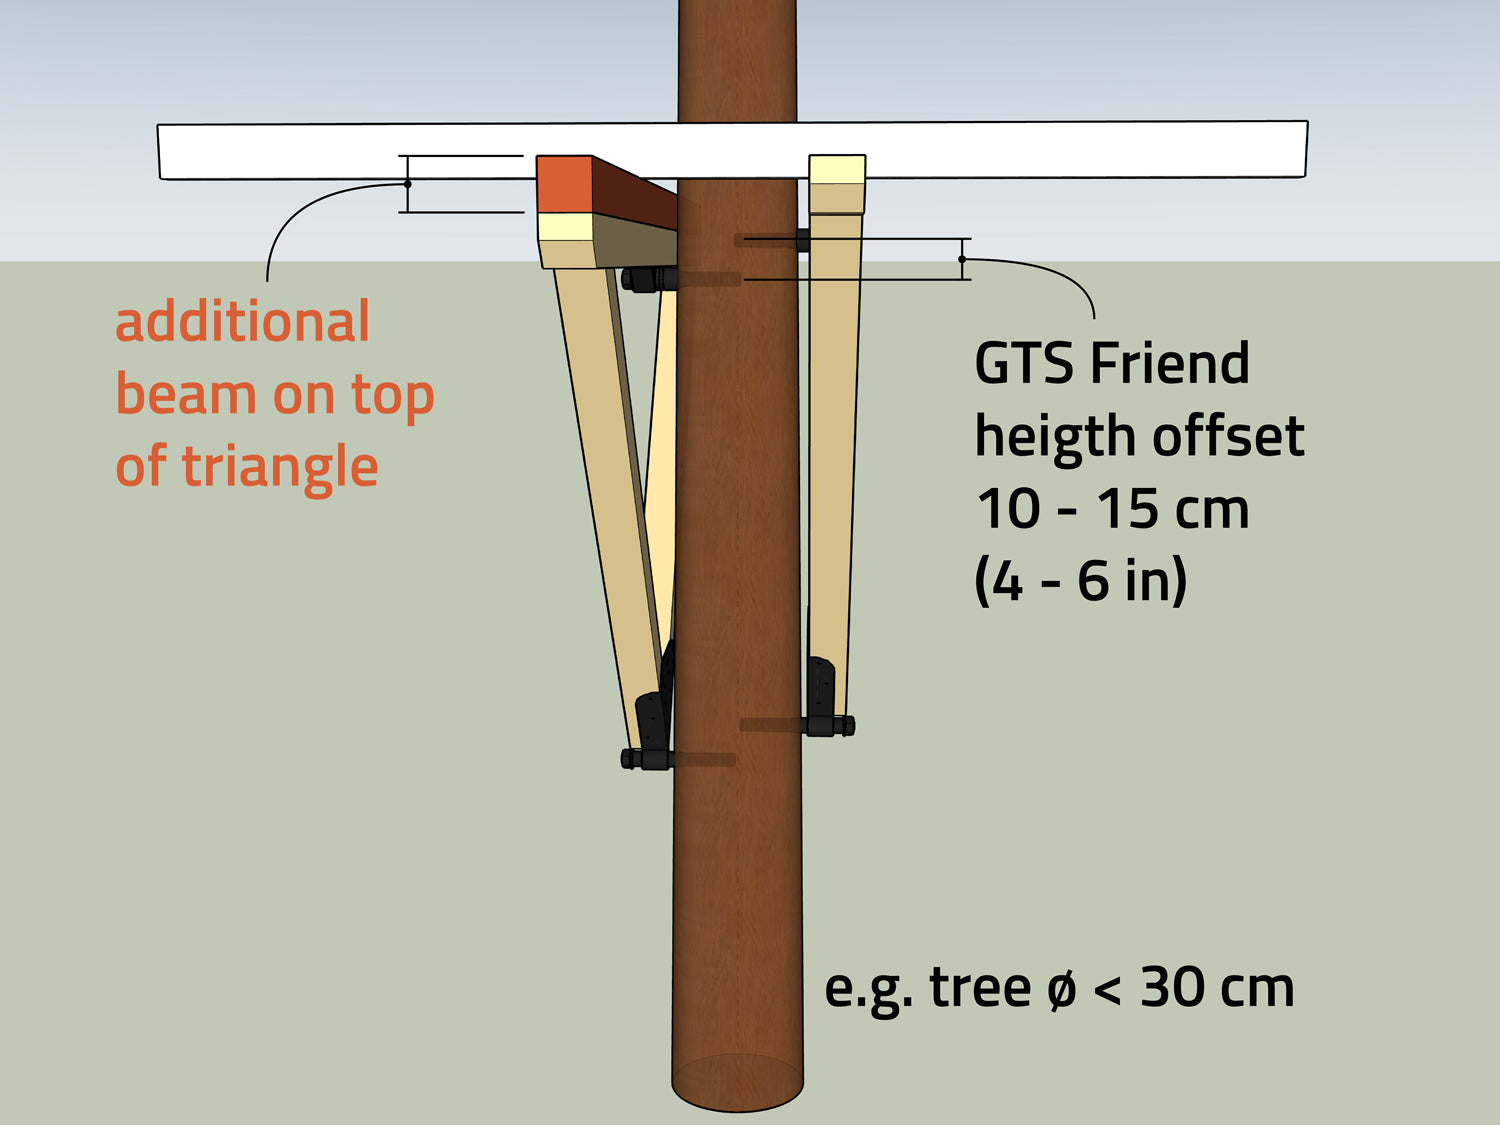
If your tree trunk is too thin in the area of the platform to attach two Tree Bolts opposite each other, you can offset the bolts by 10 to 15 cm (5.9 in) in height. This will prevent them from colliding in the middle of the tree.
Caution: Your tree trunk should never be thinner than 25 cm (9.8 in)! Wind fluctuations are too unpredictable and the risk of injury from the screw holes is too high.
Building a treehouse in a tree + stilts
If the tree is too close to the neighbour's property or if the treehouse is to be built in a specific direction, stilts are an excellent solution as they offer maximum design freedom for the platform.
However, the concrete footings (ø 40 x 70, frost-proof depth) should be at least 1.5 m away from the trees so as not to damage the large roots.
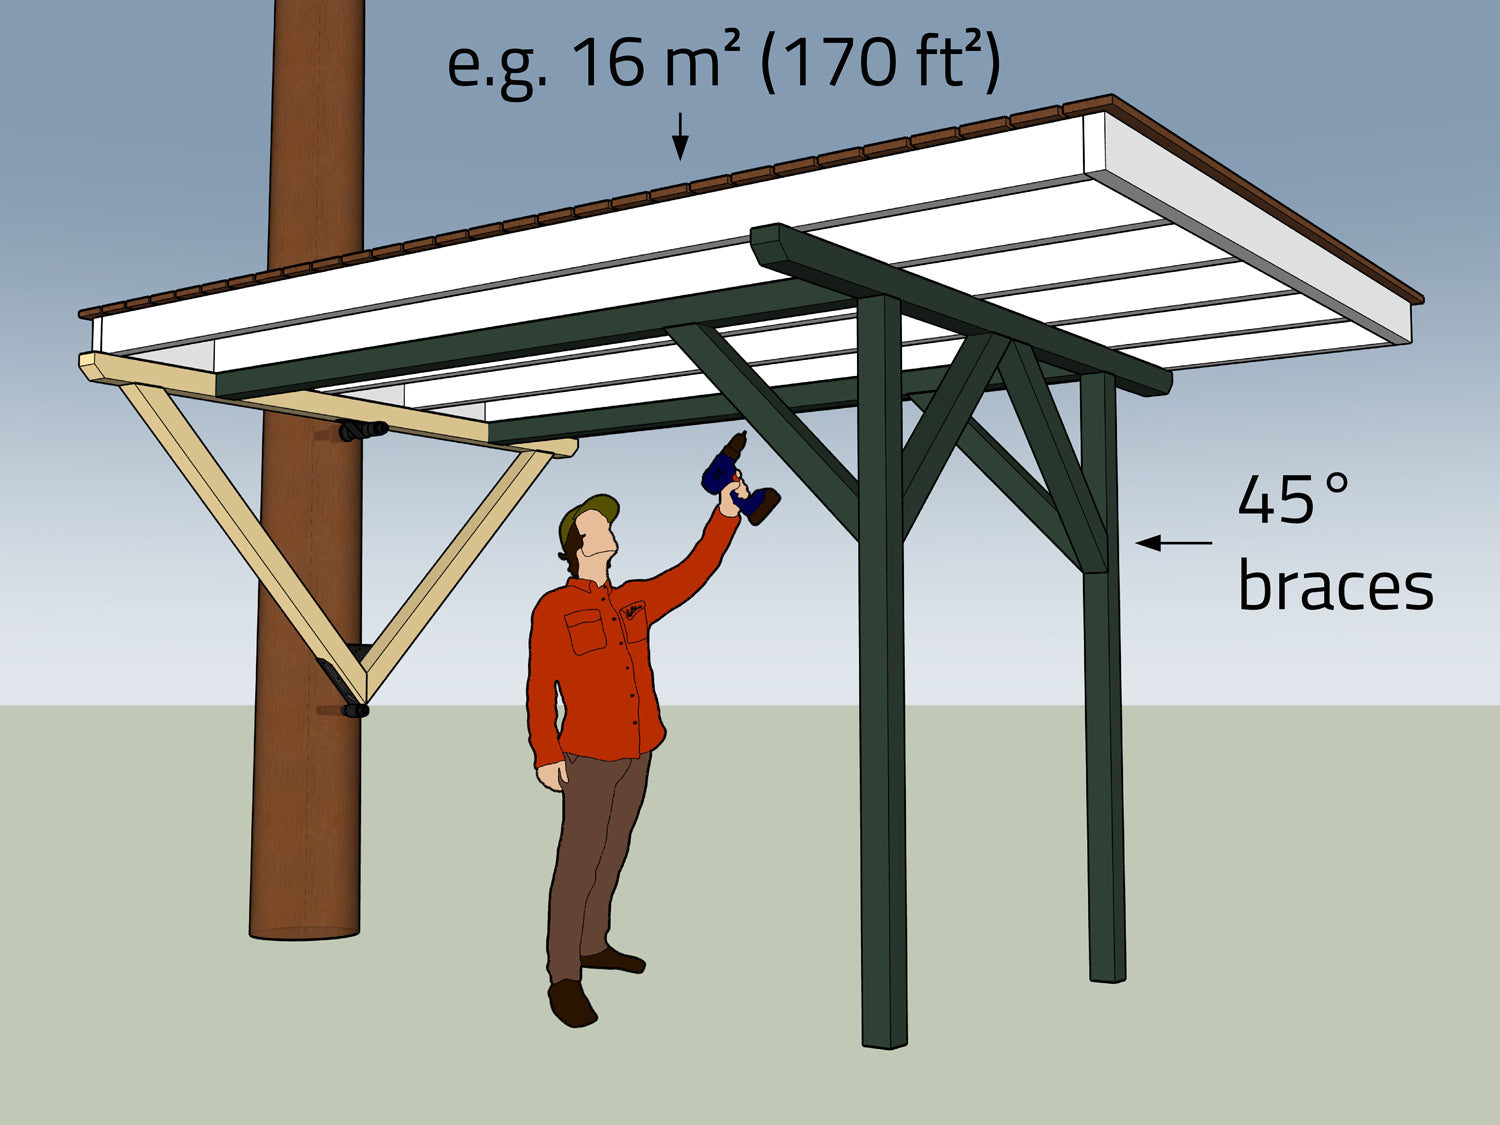
Platform with triangle on tree + stilts
✔ The triangle is firmly mounted to the tree.
✔ The wooden beams (dark green) should have a cross-section of at least 10x10 cm.
✔ From a length of 2 m (6.6 ft), reinforce with additional timber knee braces.
✔ Small movements of the tree are easily cushioned by the platform.
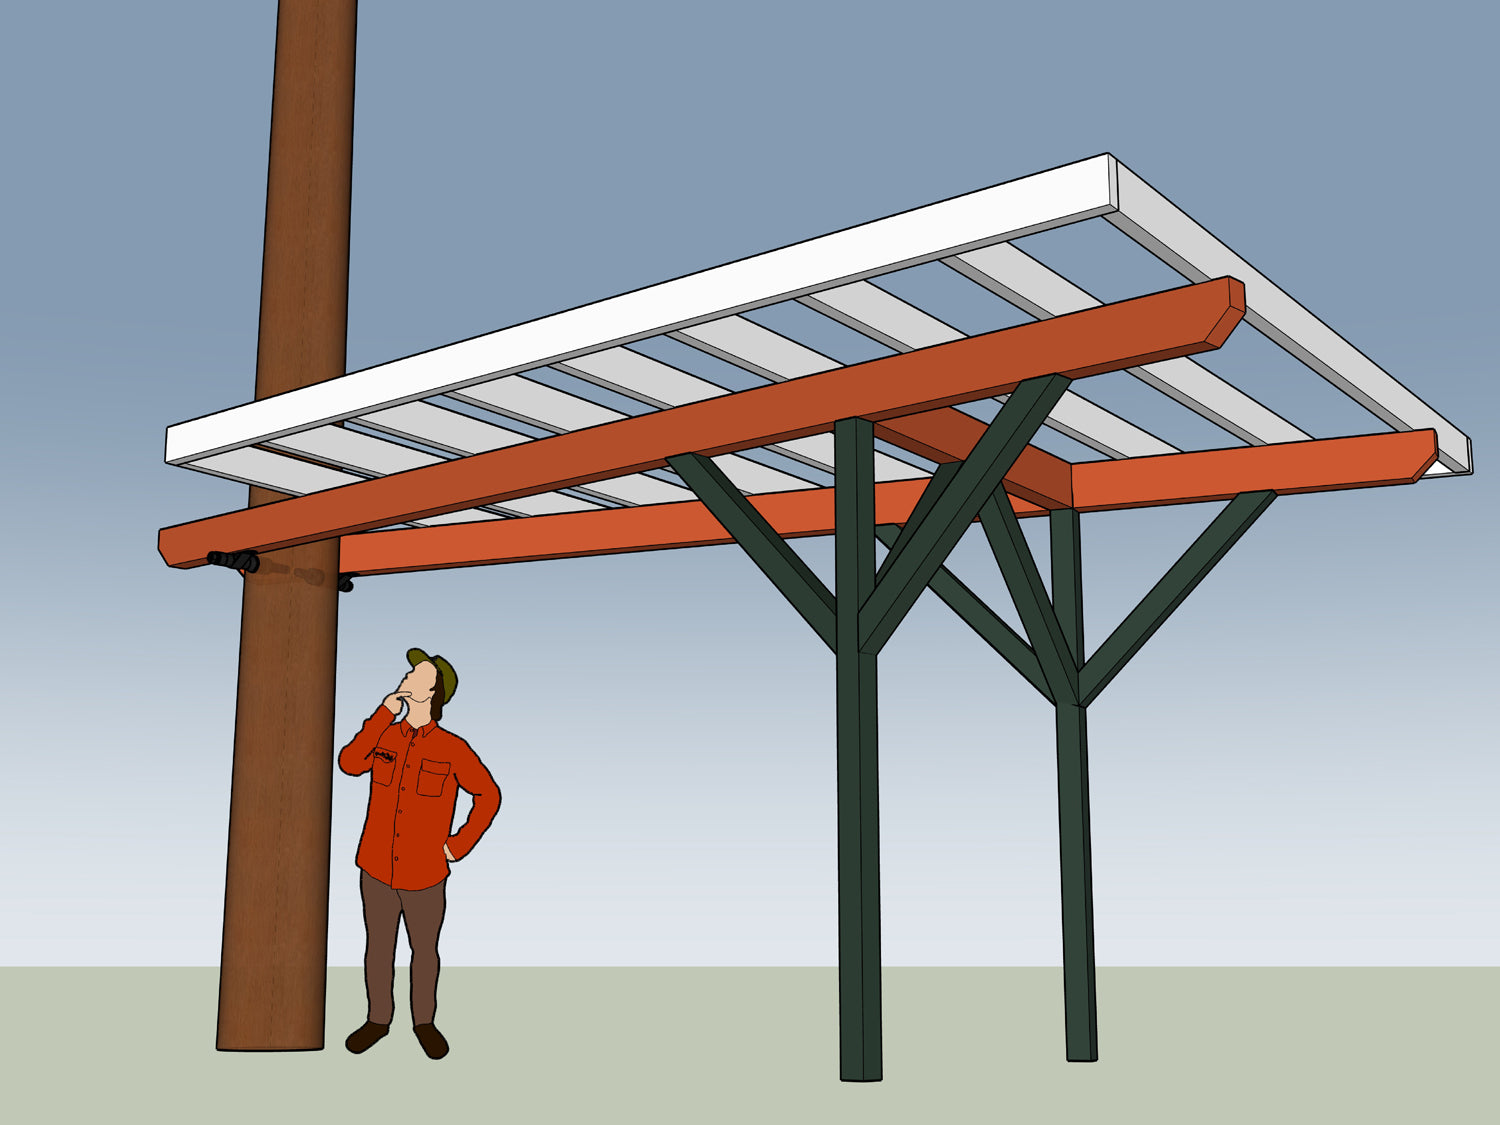
Side-mounted support beams vs. Tribeam Attachment
You can also attach two longitudinal beams (red) directly to the tree. Without the triangle, you will have more space under the tree.
However, the narrow contact surface is much more unstable and the tree trunk must be thicker so that the opposing tree bolts have enough space.
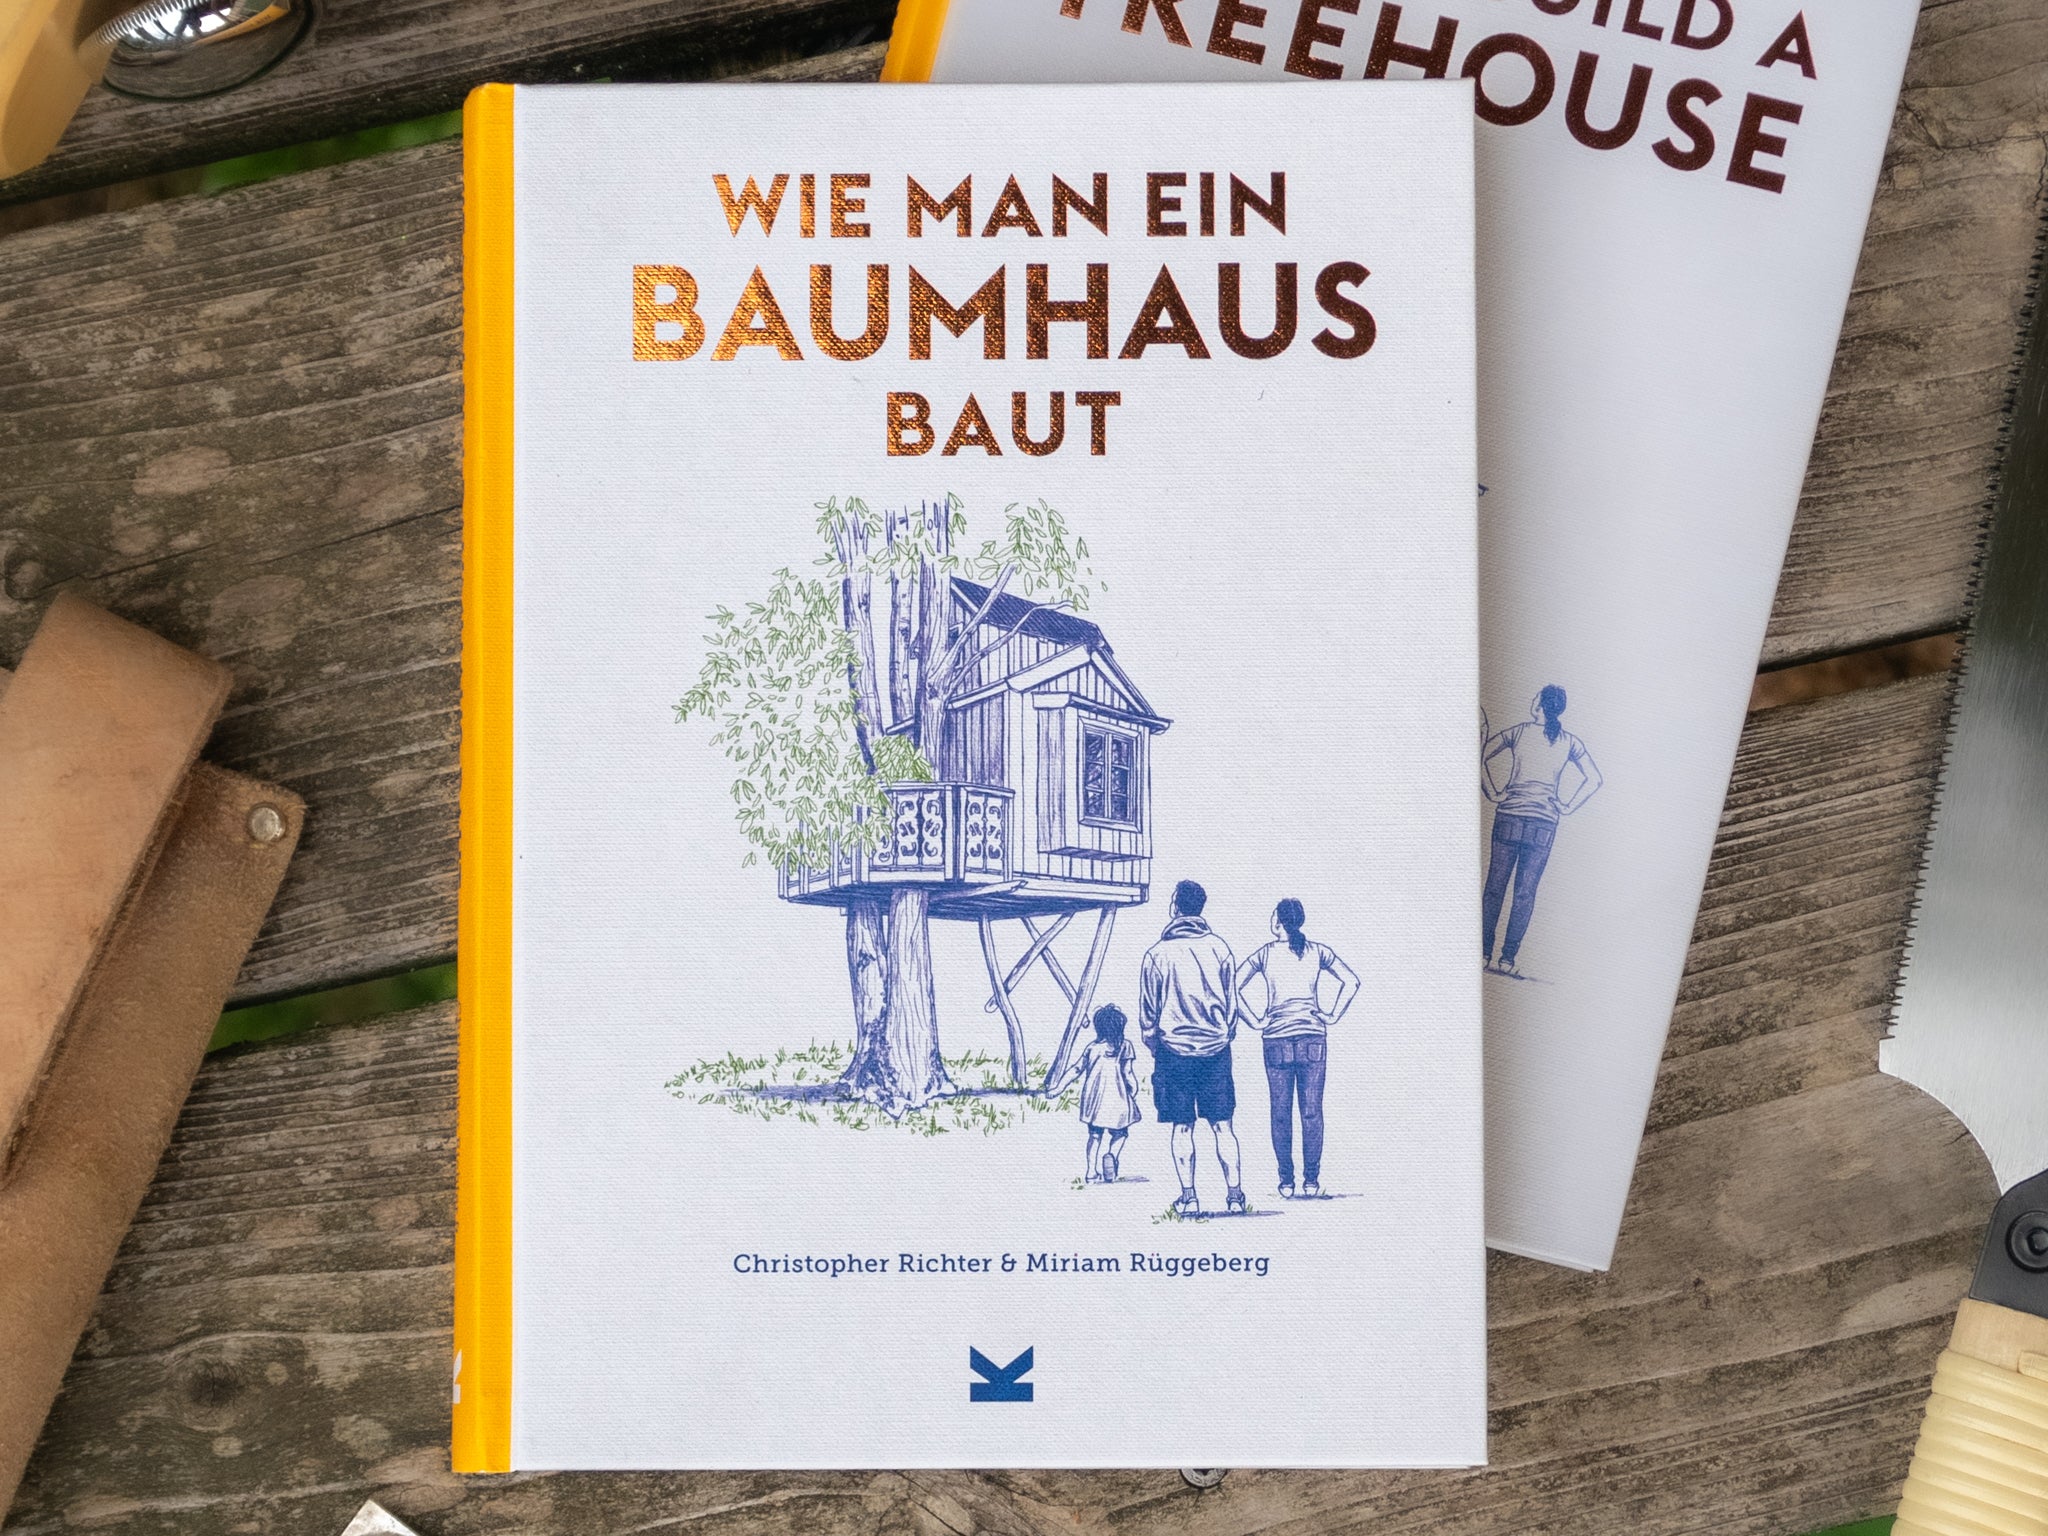
Building instructions from the experts!
In the book ‘How to Build a Treehouse’, you will find the perfect instructions for building a treehouse with trees and stilts.
The book uses natural round robinia wood as support posts – not only do they look great, they can also be set directly in concrete without post shoes.
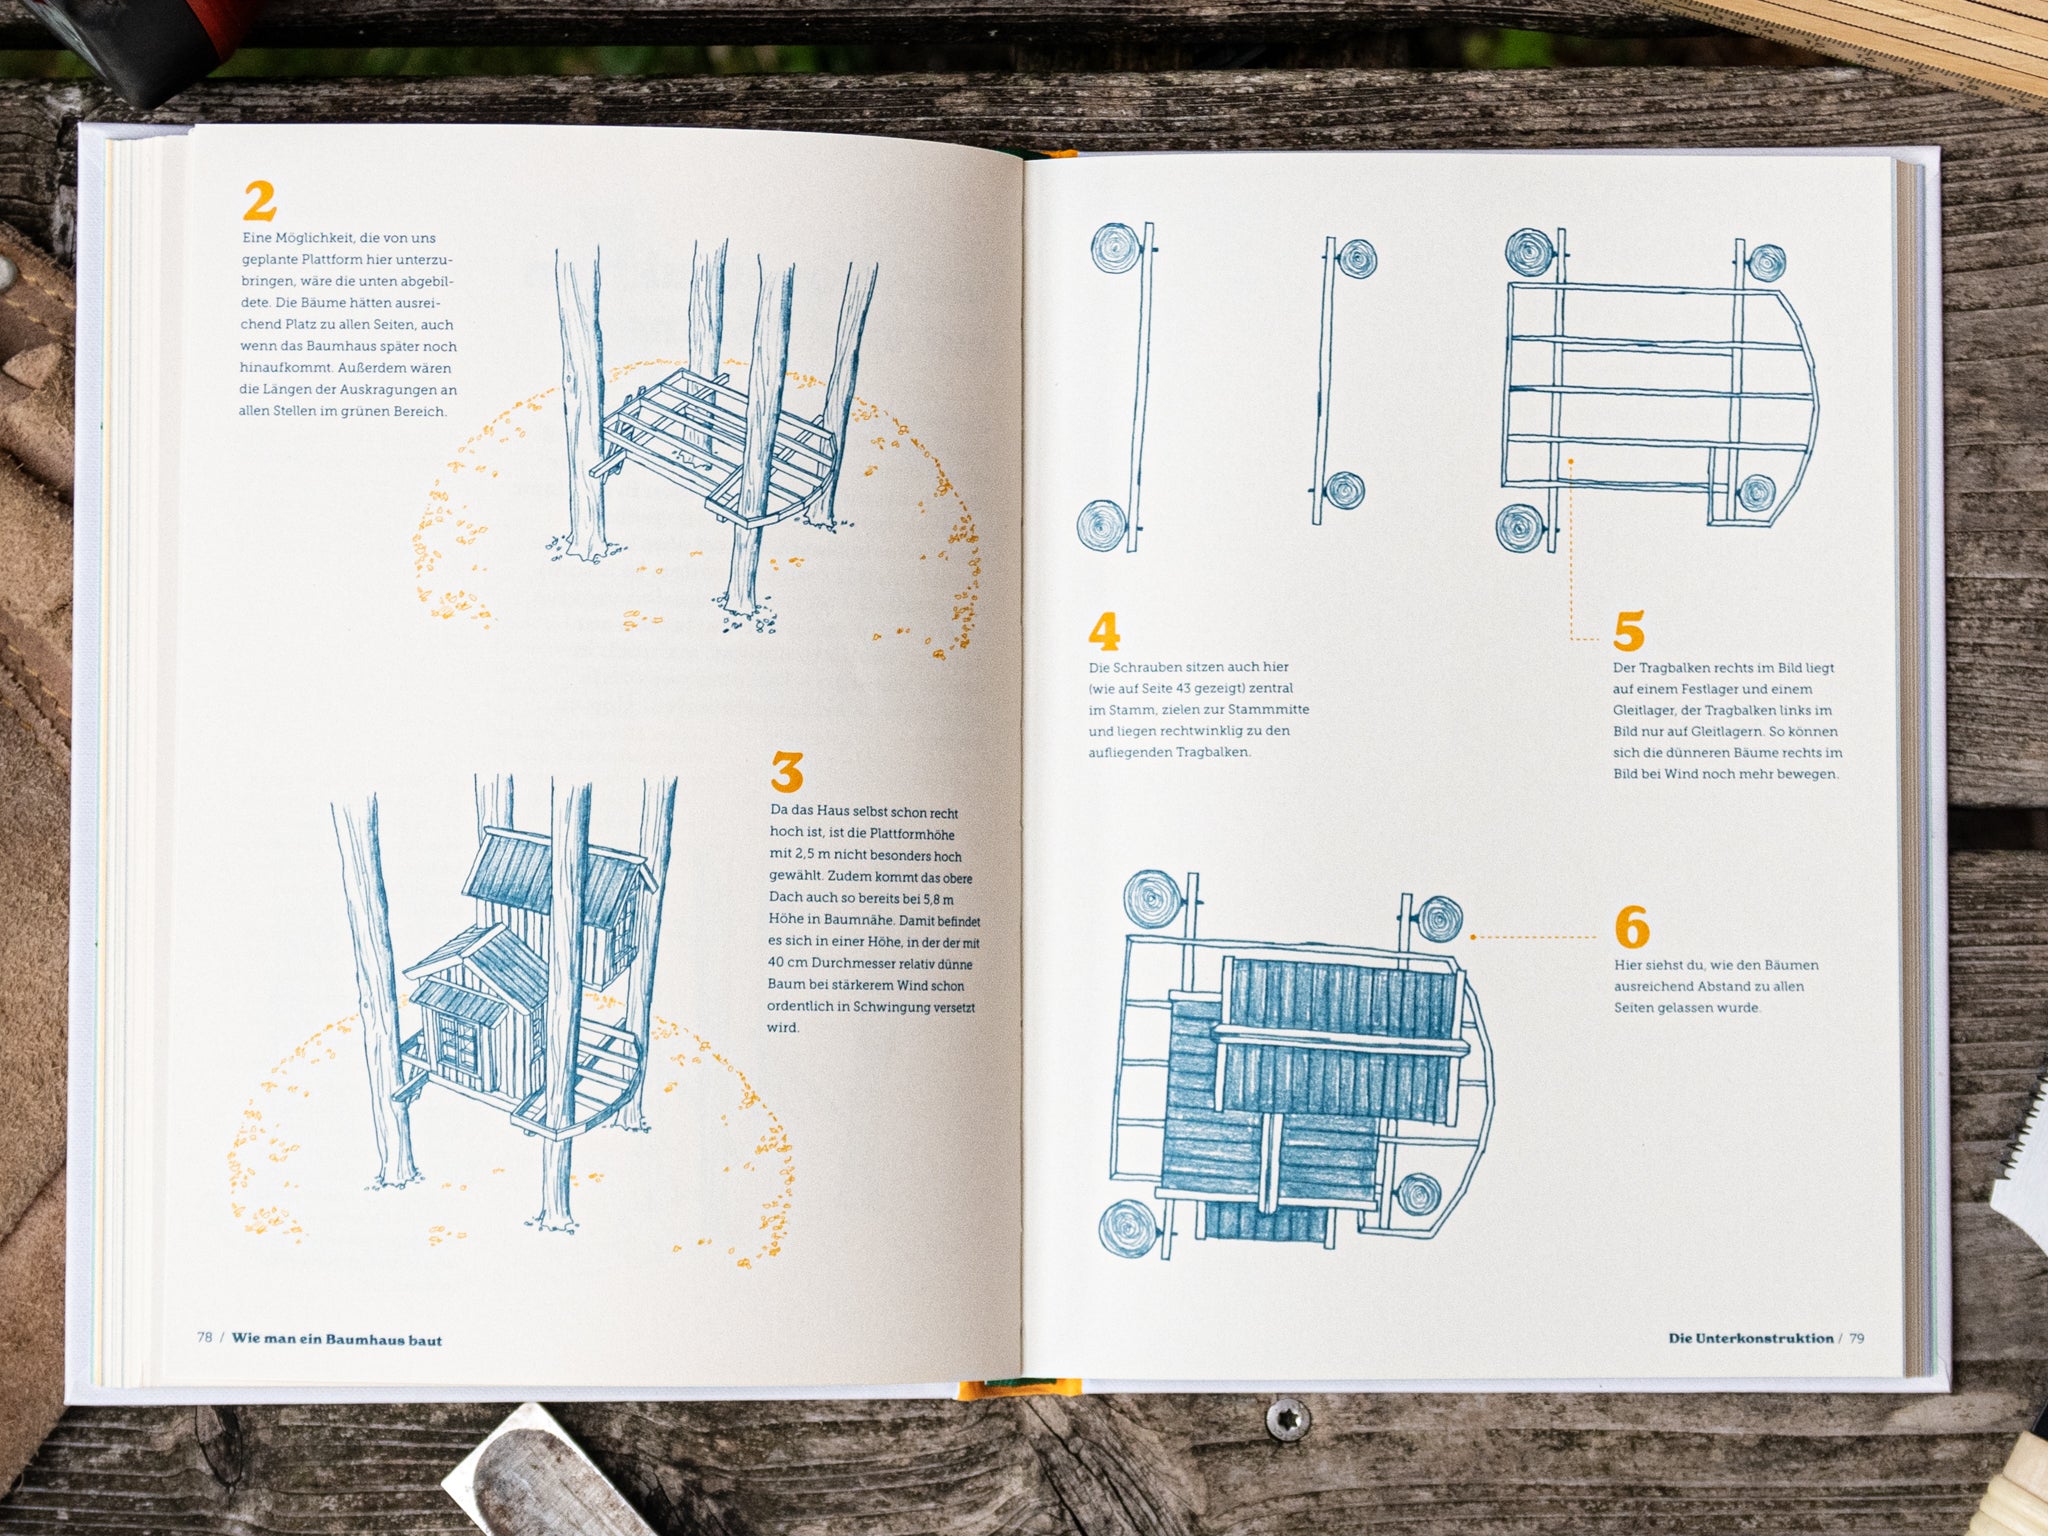
Book ‘How to Build a Treehouse’
If you want to build a treehouse, you should definitely get this book first! Our friends Chris and Miriam from baumbaron have summarised their decades of experience as professional treehouse builders in 192 pages! It is a masterpiece and currently the most comprehensive book you could wish for as a treehouse builder!
Buy treehouse books!2. How to fasten a treehouse between two trees
The more trees, the better – now you can get creative and use all your knowledge of treehouse support structures (Step 9)!
However, more trees also mean that you have to plan for the movement of the trees in storms. Trees are like ‘bad dance partners’, i.e. each one dances on its own and swings independently of the others in the direction the wind takes it.
To avoid tension and damage to the support structure and the tree, trees that sway heavily must be decoupled.
2. How to fasten a treehouse between two trees
The more trees, the better – now you can get creative and use all your knowledge of treehouse support structures (Step 9)!
However, more trees also mean that you have to plan for the movement of the trees in storms. Trees are like ‘bad dance partners’, i.e. each one dances on its own and swings independently of the others in the direction the wind takes it.
To avoid tension and damage to the support structure and the tree, trees that sway heavily must be decoupled.
Beam between two trees – fixed or dynamic bracket?
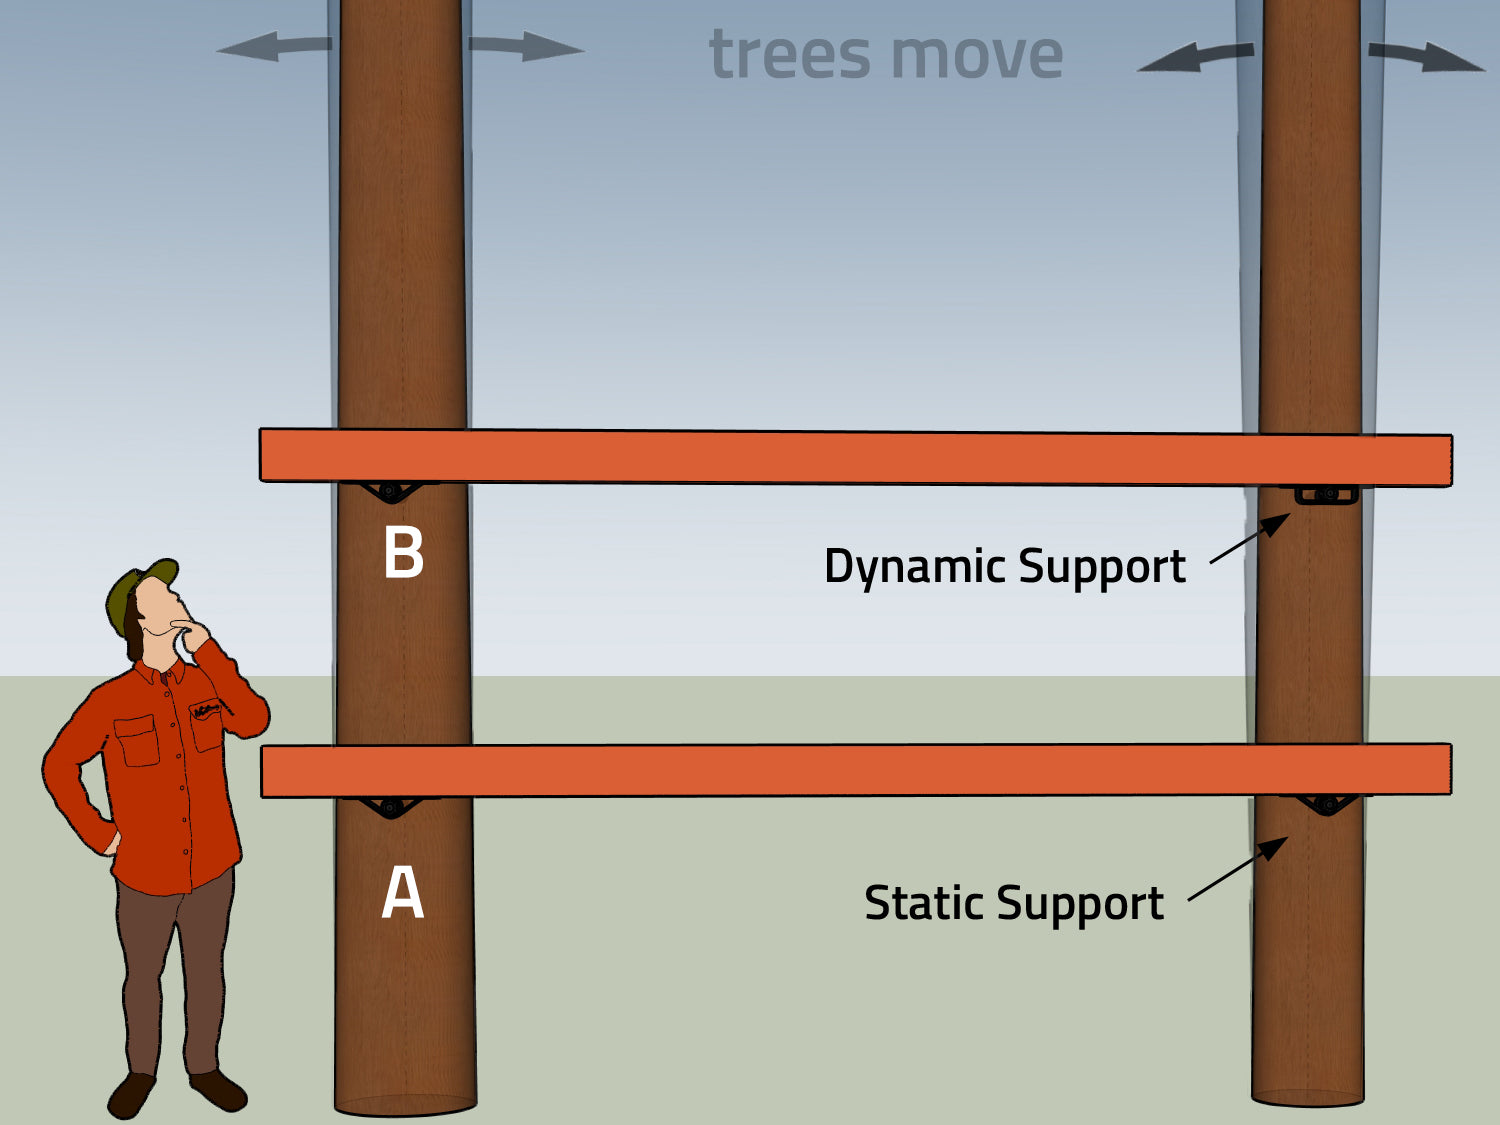
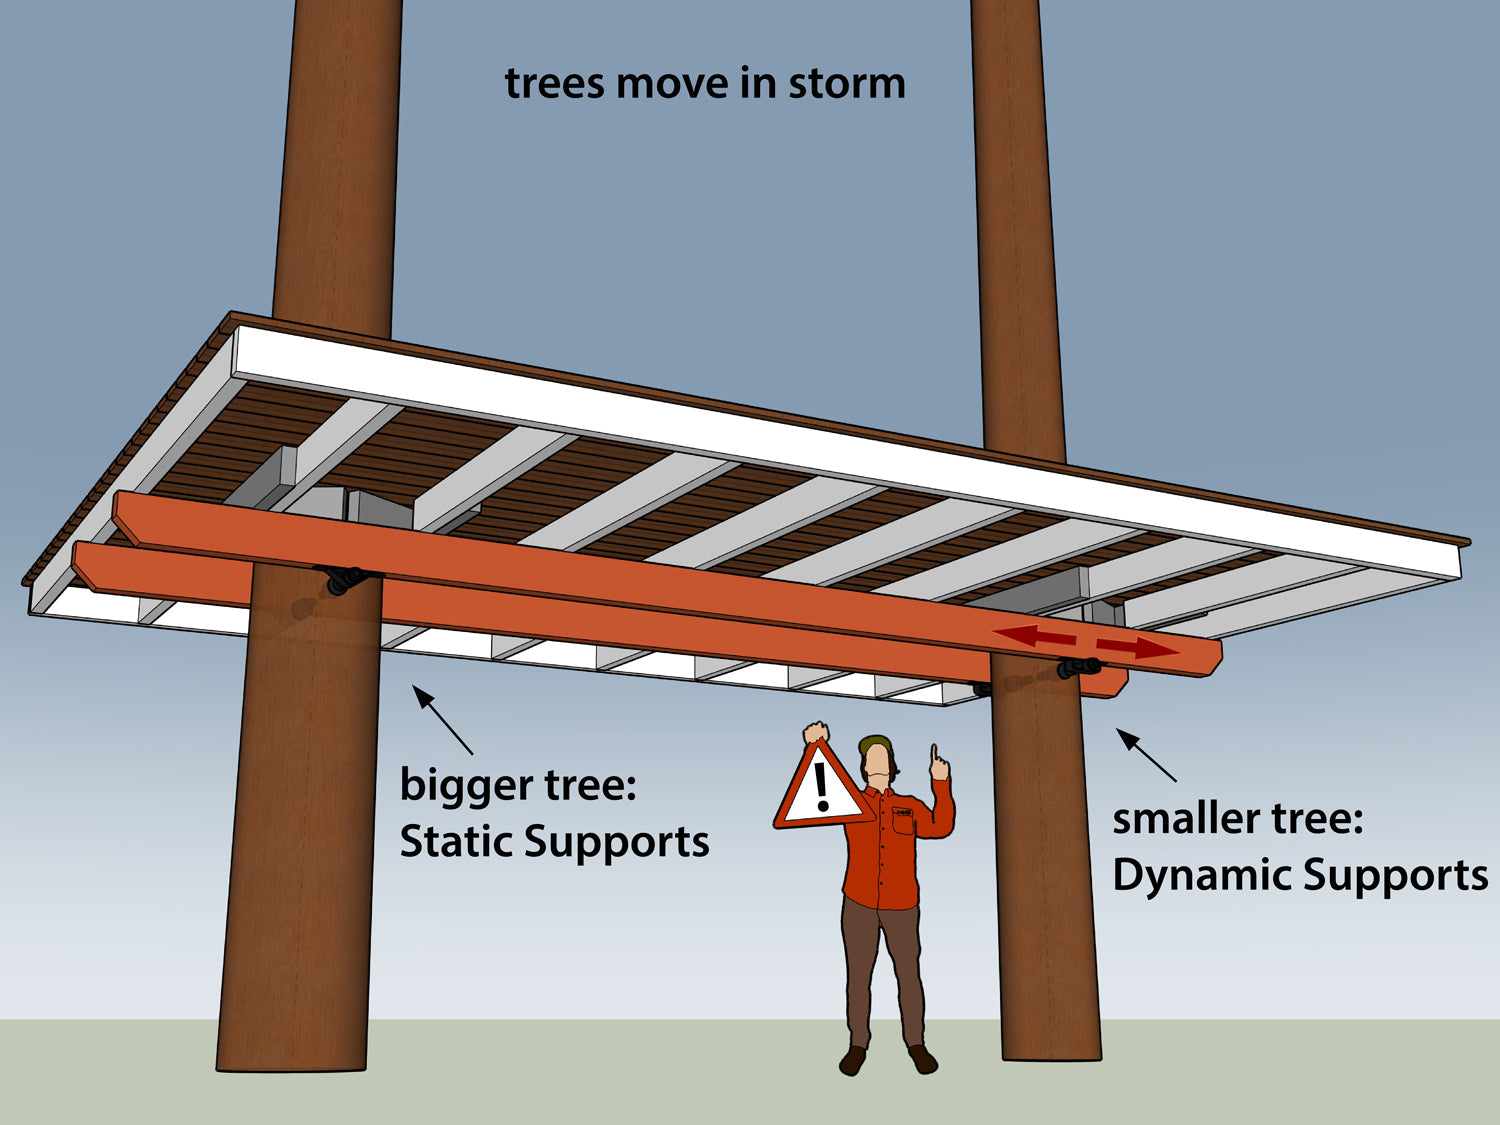
Trees move during storms. This movement increases the thinner the tree trunk is and the higher up you want to build your platform:
✔ If you attach a beam just above the ground (A), you can install 2 fixed beam brackets.
✔ If you attach the beam higher up (B), you will need one fixed and one dynamic bracket. This allows the trees to move freely and prevents tension.
At least one fixed point!
A support structure spanning several trees always requires a fixed point, otherwise the platform will slide around uncontrollably.
✔ Minor movements of the trees < 5 cm can be easily cushioned by the wooden construction – everything can be firmly connected here.
✔ For larger movements > 5 cm, the trees should be decoupled.
✔ The fixed bracket is usually always mounted on the thickest tree.
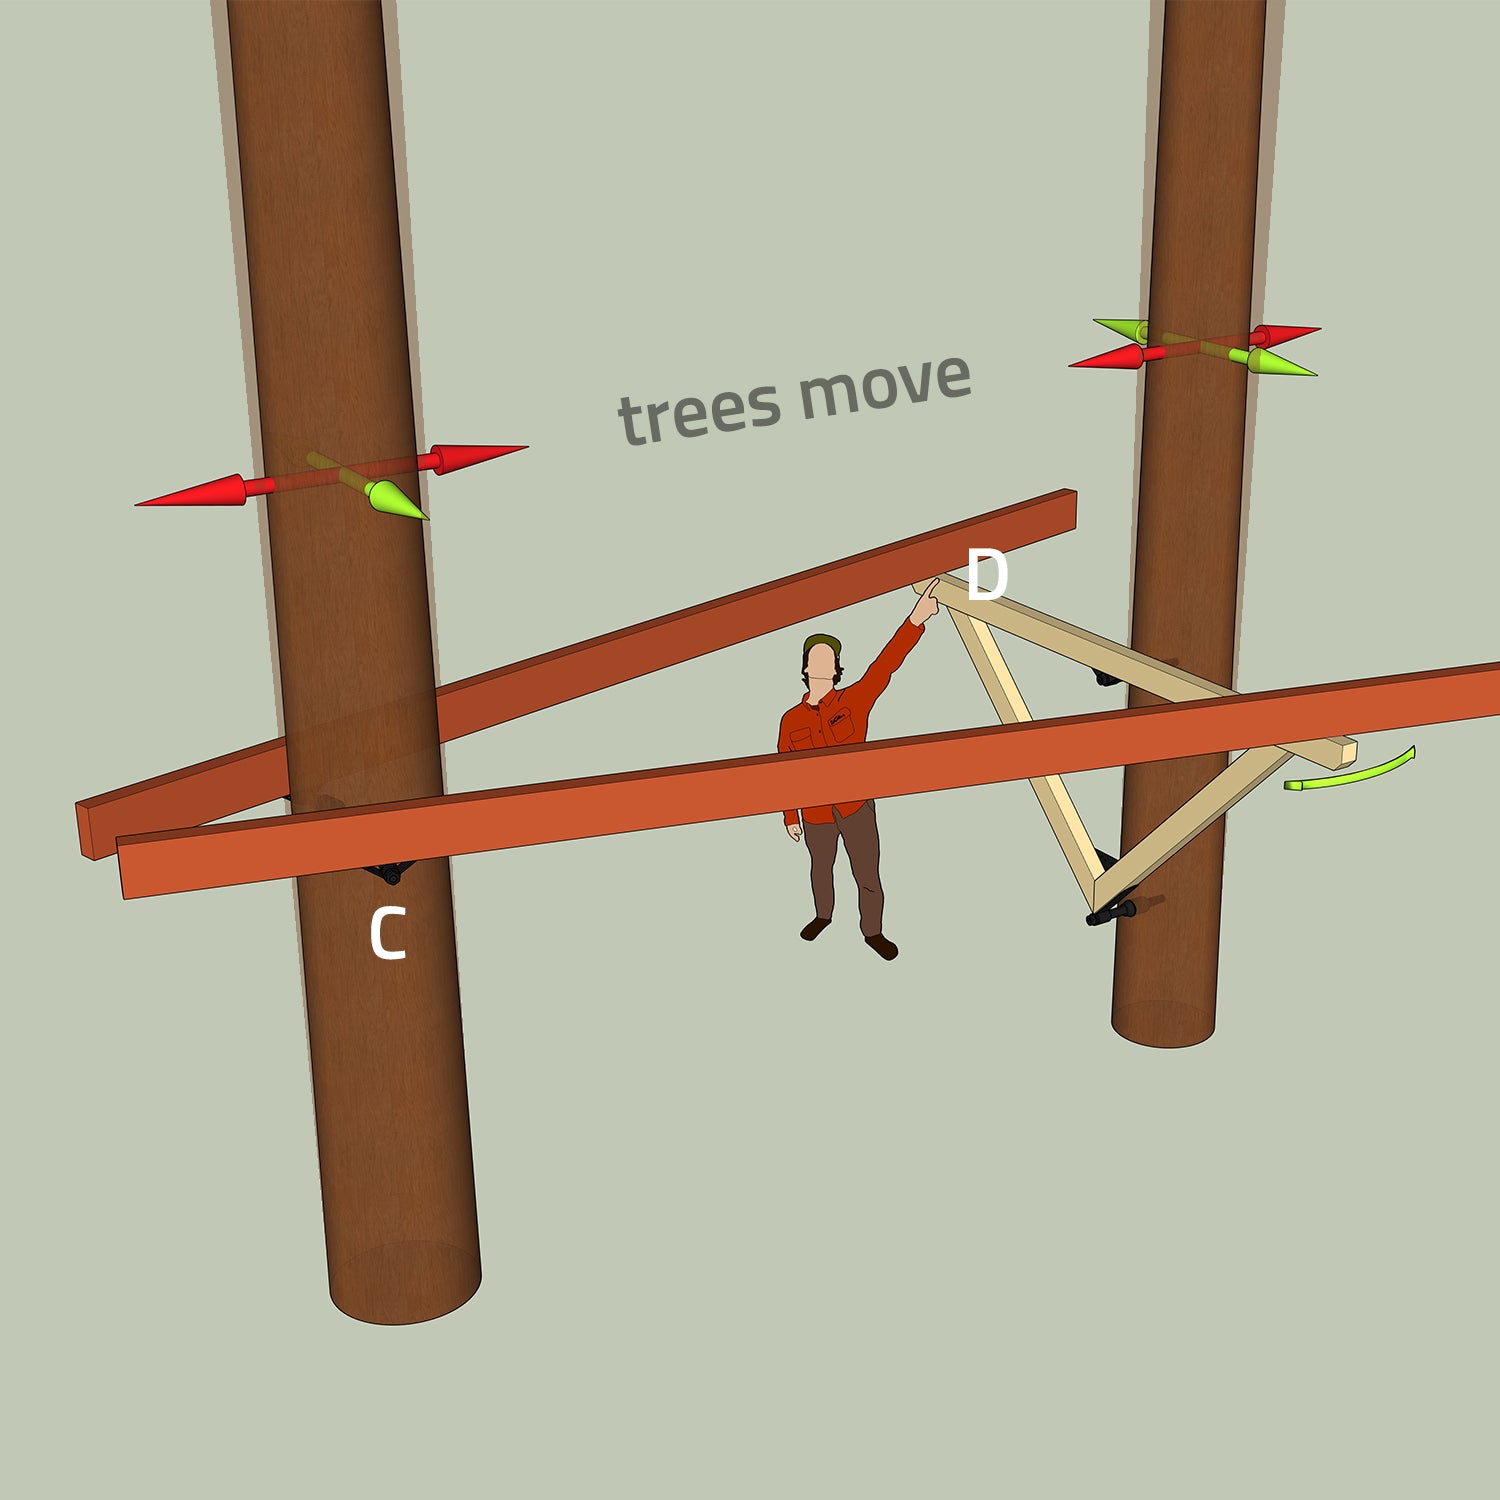
Mix of triangle and direct attachment to the tree
Triangles (beige) have some play on the GTS screws and can easily absorb slight trunk movements of up to 5 cm.
✔ Lateral movements (green arrows) are well absorbed by the wooden structure.
✔ Only in the event of larger movements (> 5 cm) along the red arrows should the support beams (red) be decoupled:
✔ Solution for very high movement: Instead of fixed brackets (at C), two dynamic beam brackets are used.
✔ Important: The brackets must be secured at the sides with Position-Rings, otherwise the platform will slide back and forth uncontrollably.
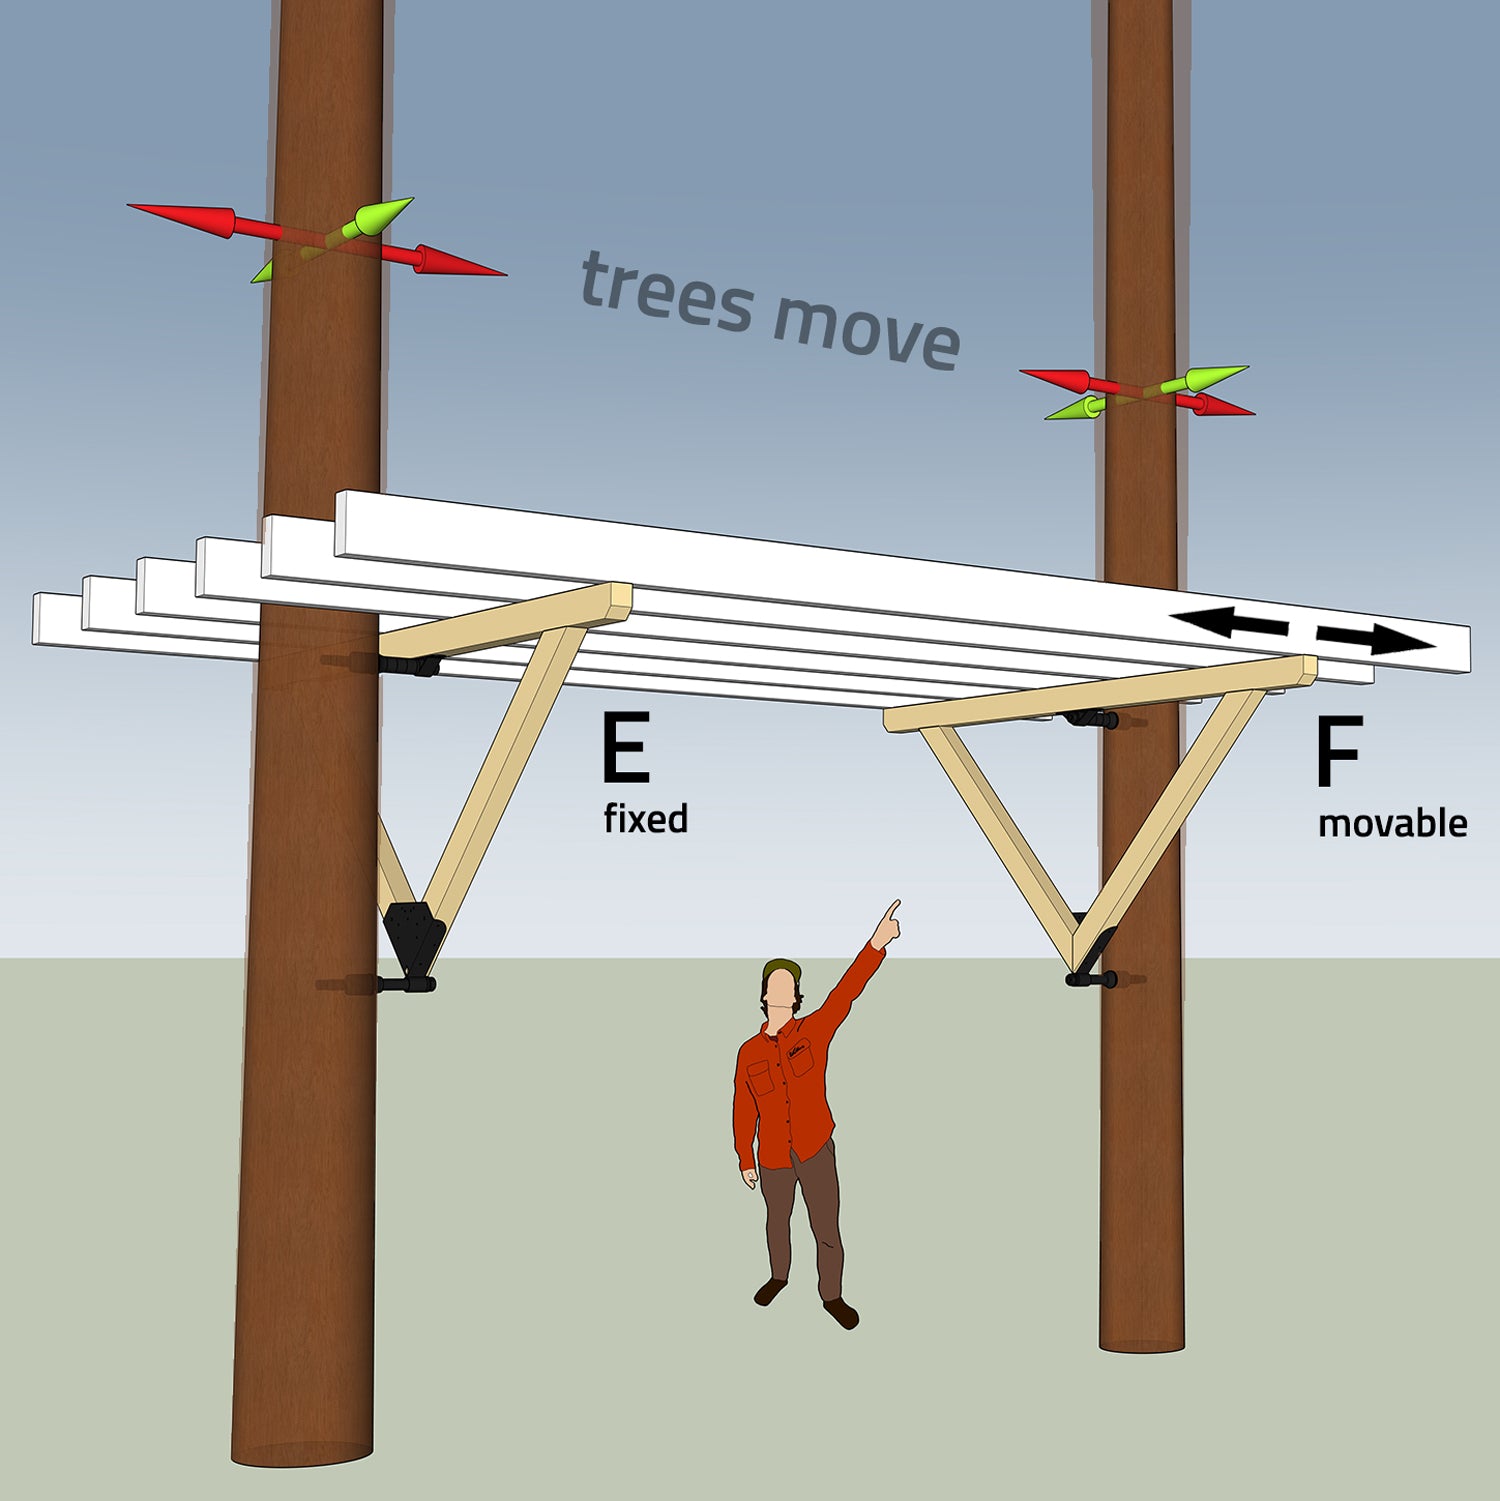
Platform on two triangles in two trees – avoid tension.
In constructions with two triangles, the floor joists (white) are often placed directly on the triangles.
If there is significant movement (> 5 cm) in the direction of the red arrows, high stresses can occur – in this case, the floor joists should be decoupled on one side:
✔ Solution 1 – little movement: Mount the triangle at F without Position-Rings in the centre of the GTS shank.
✔ Solution 2 – significant movement: To fully decouple the support structure, the platform beams (white) should be mounted so that they can move on the triangle (e.g. with sliding plates).
Further examples of platforms between two trees

Endless possibilities
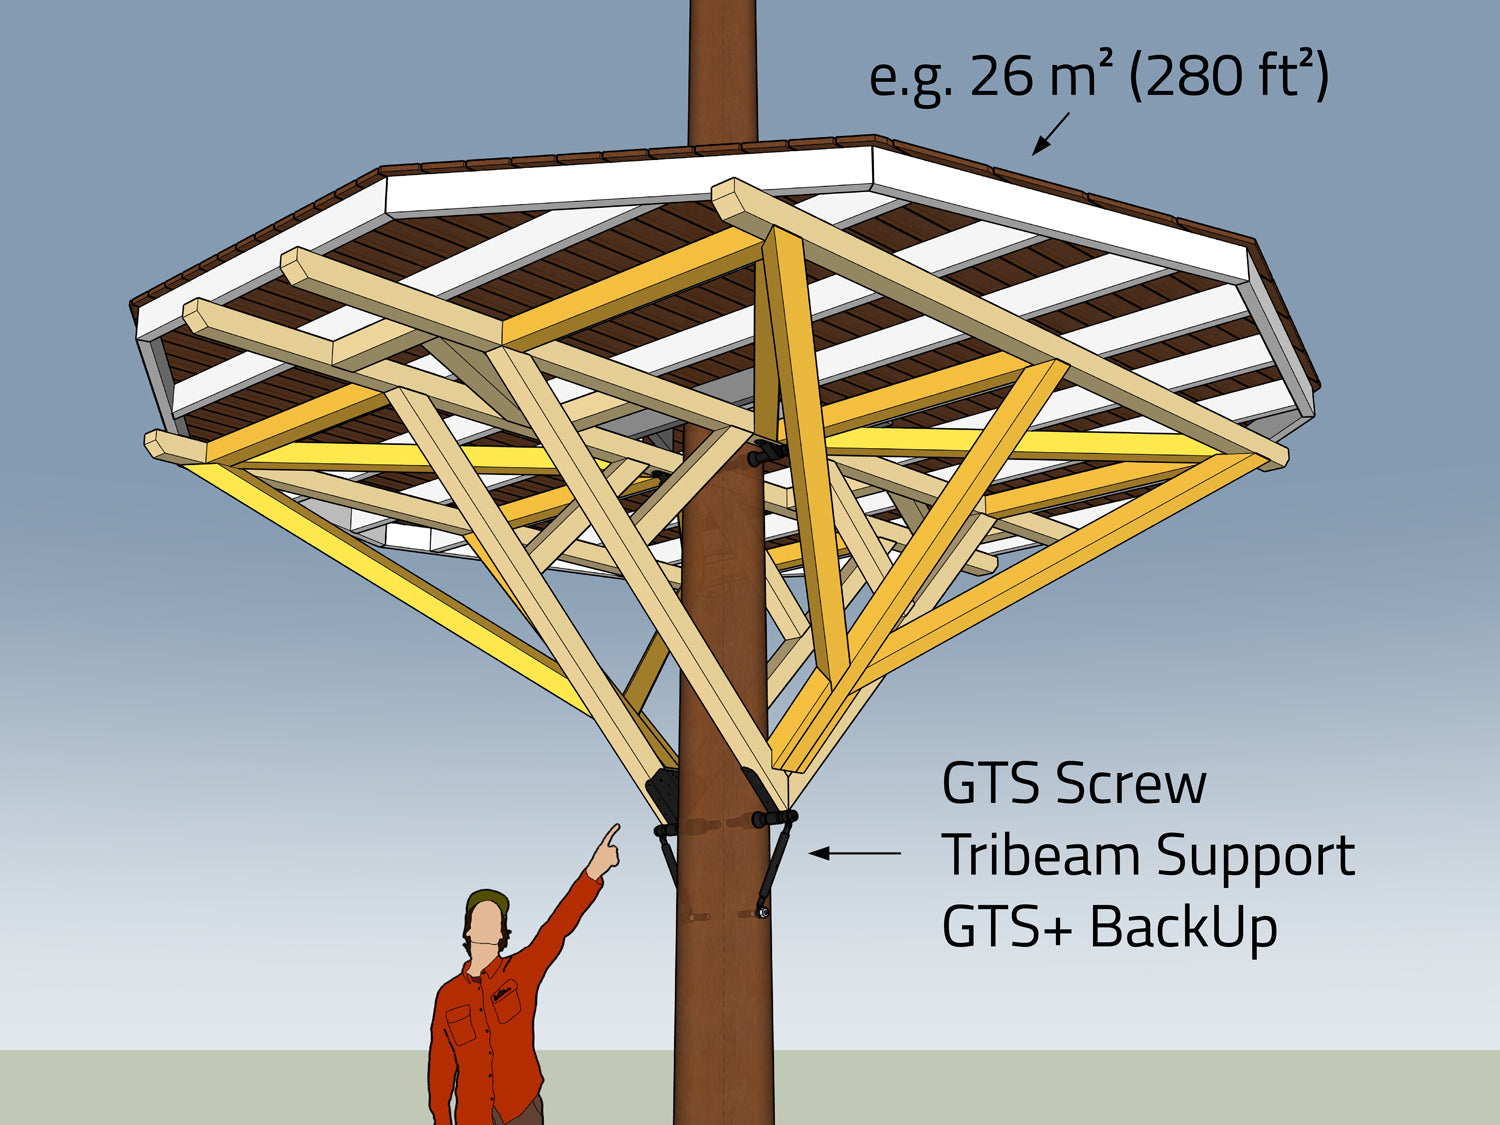
With 3D-Tribeams, platforms of any size can be realised. The loads are well distributed via the additional struts and transferred to the lower GTS+ bolts, whereby the load presses the bolt into the tree and further increases the load capacity.
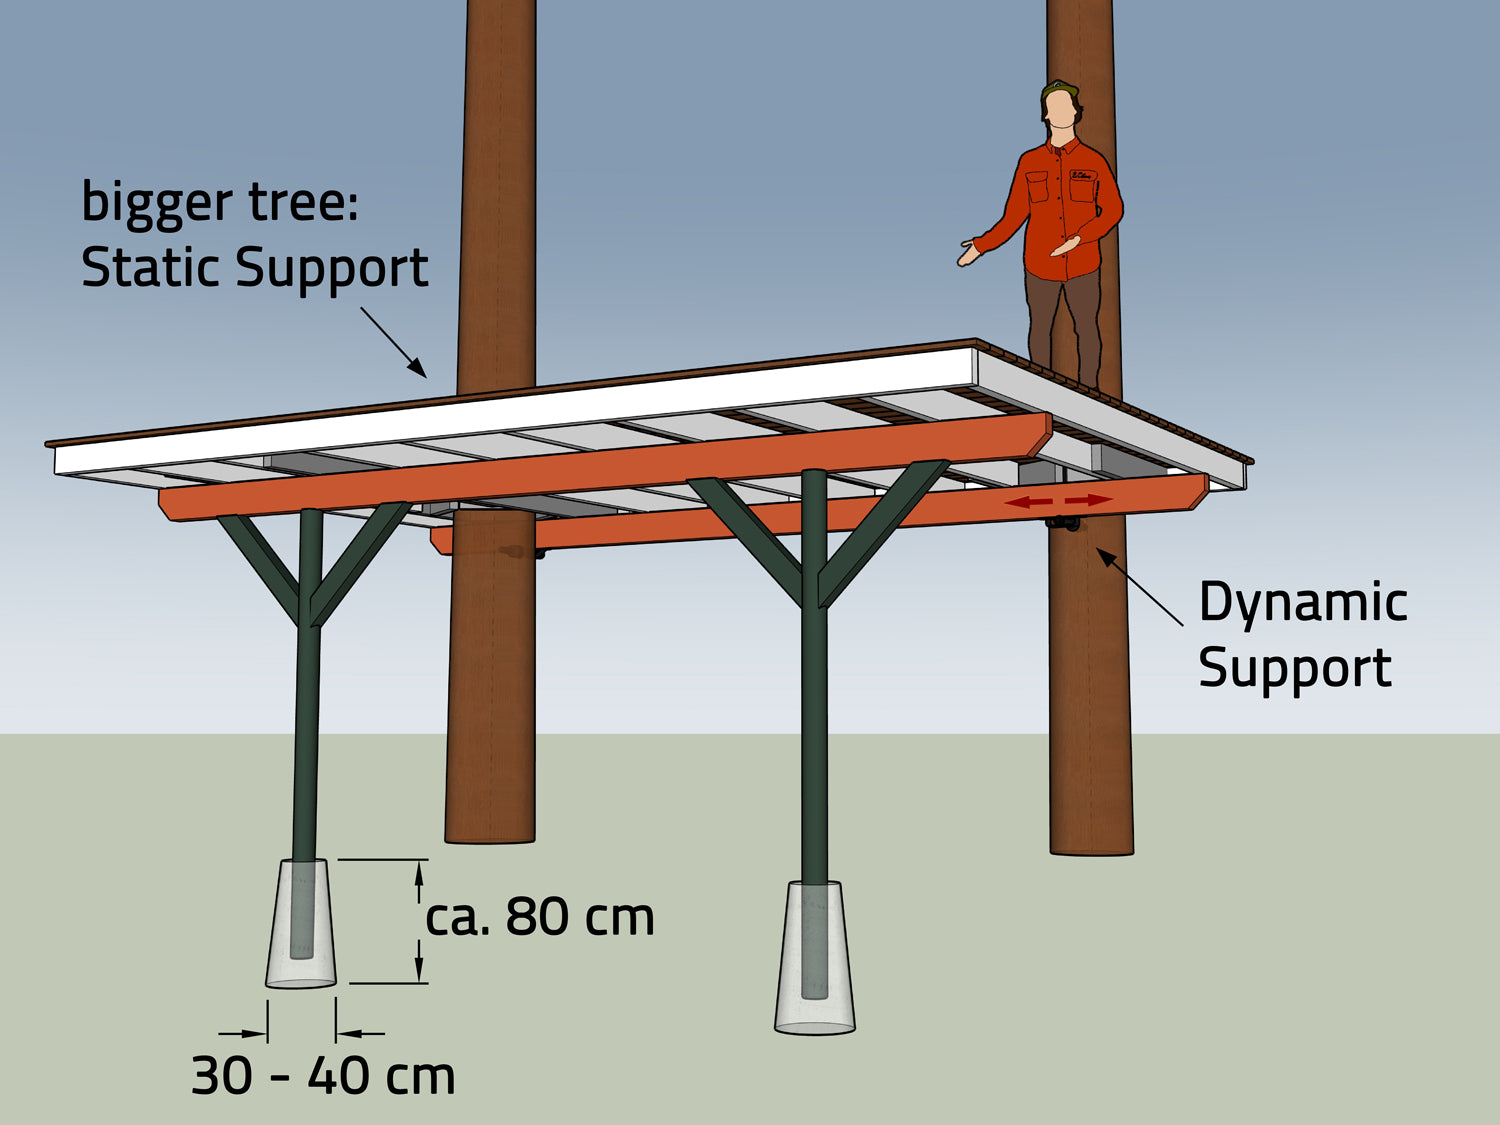
Two trees + stilts
Even with two trees, the floor plan can be extended and aligned as desired using the stilts. It is important that, if there is significant tree movement, one of the trees is decoupled. The supports must be reinforced with short struts (dark green). Otherwise, small movements of the trees will be well cushioned by the construction.
3. How to fasten a treehouse between three or more trees
When securing a platform to 3 or more trees, use the thickest trees as anchor points.
✔ All thick trees that hardly move (< 3 cm) can be fitted with Solid Brackets.
✔ Triangles and the platform itself can easily absorb small movements.
✔ Trees that sway more than 3-5 cm at the height of the platform must be mounted on movable supports.
To plan your platform and the individual fastenings, let's take a bird's eye view:
Bird's-eye view floor plans
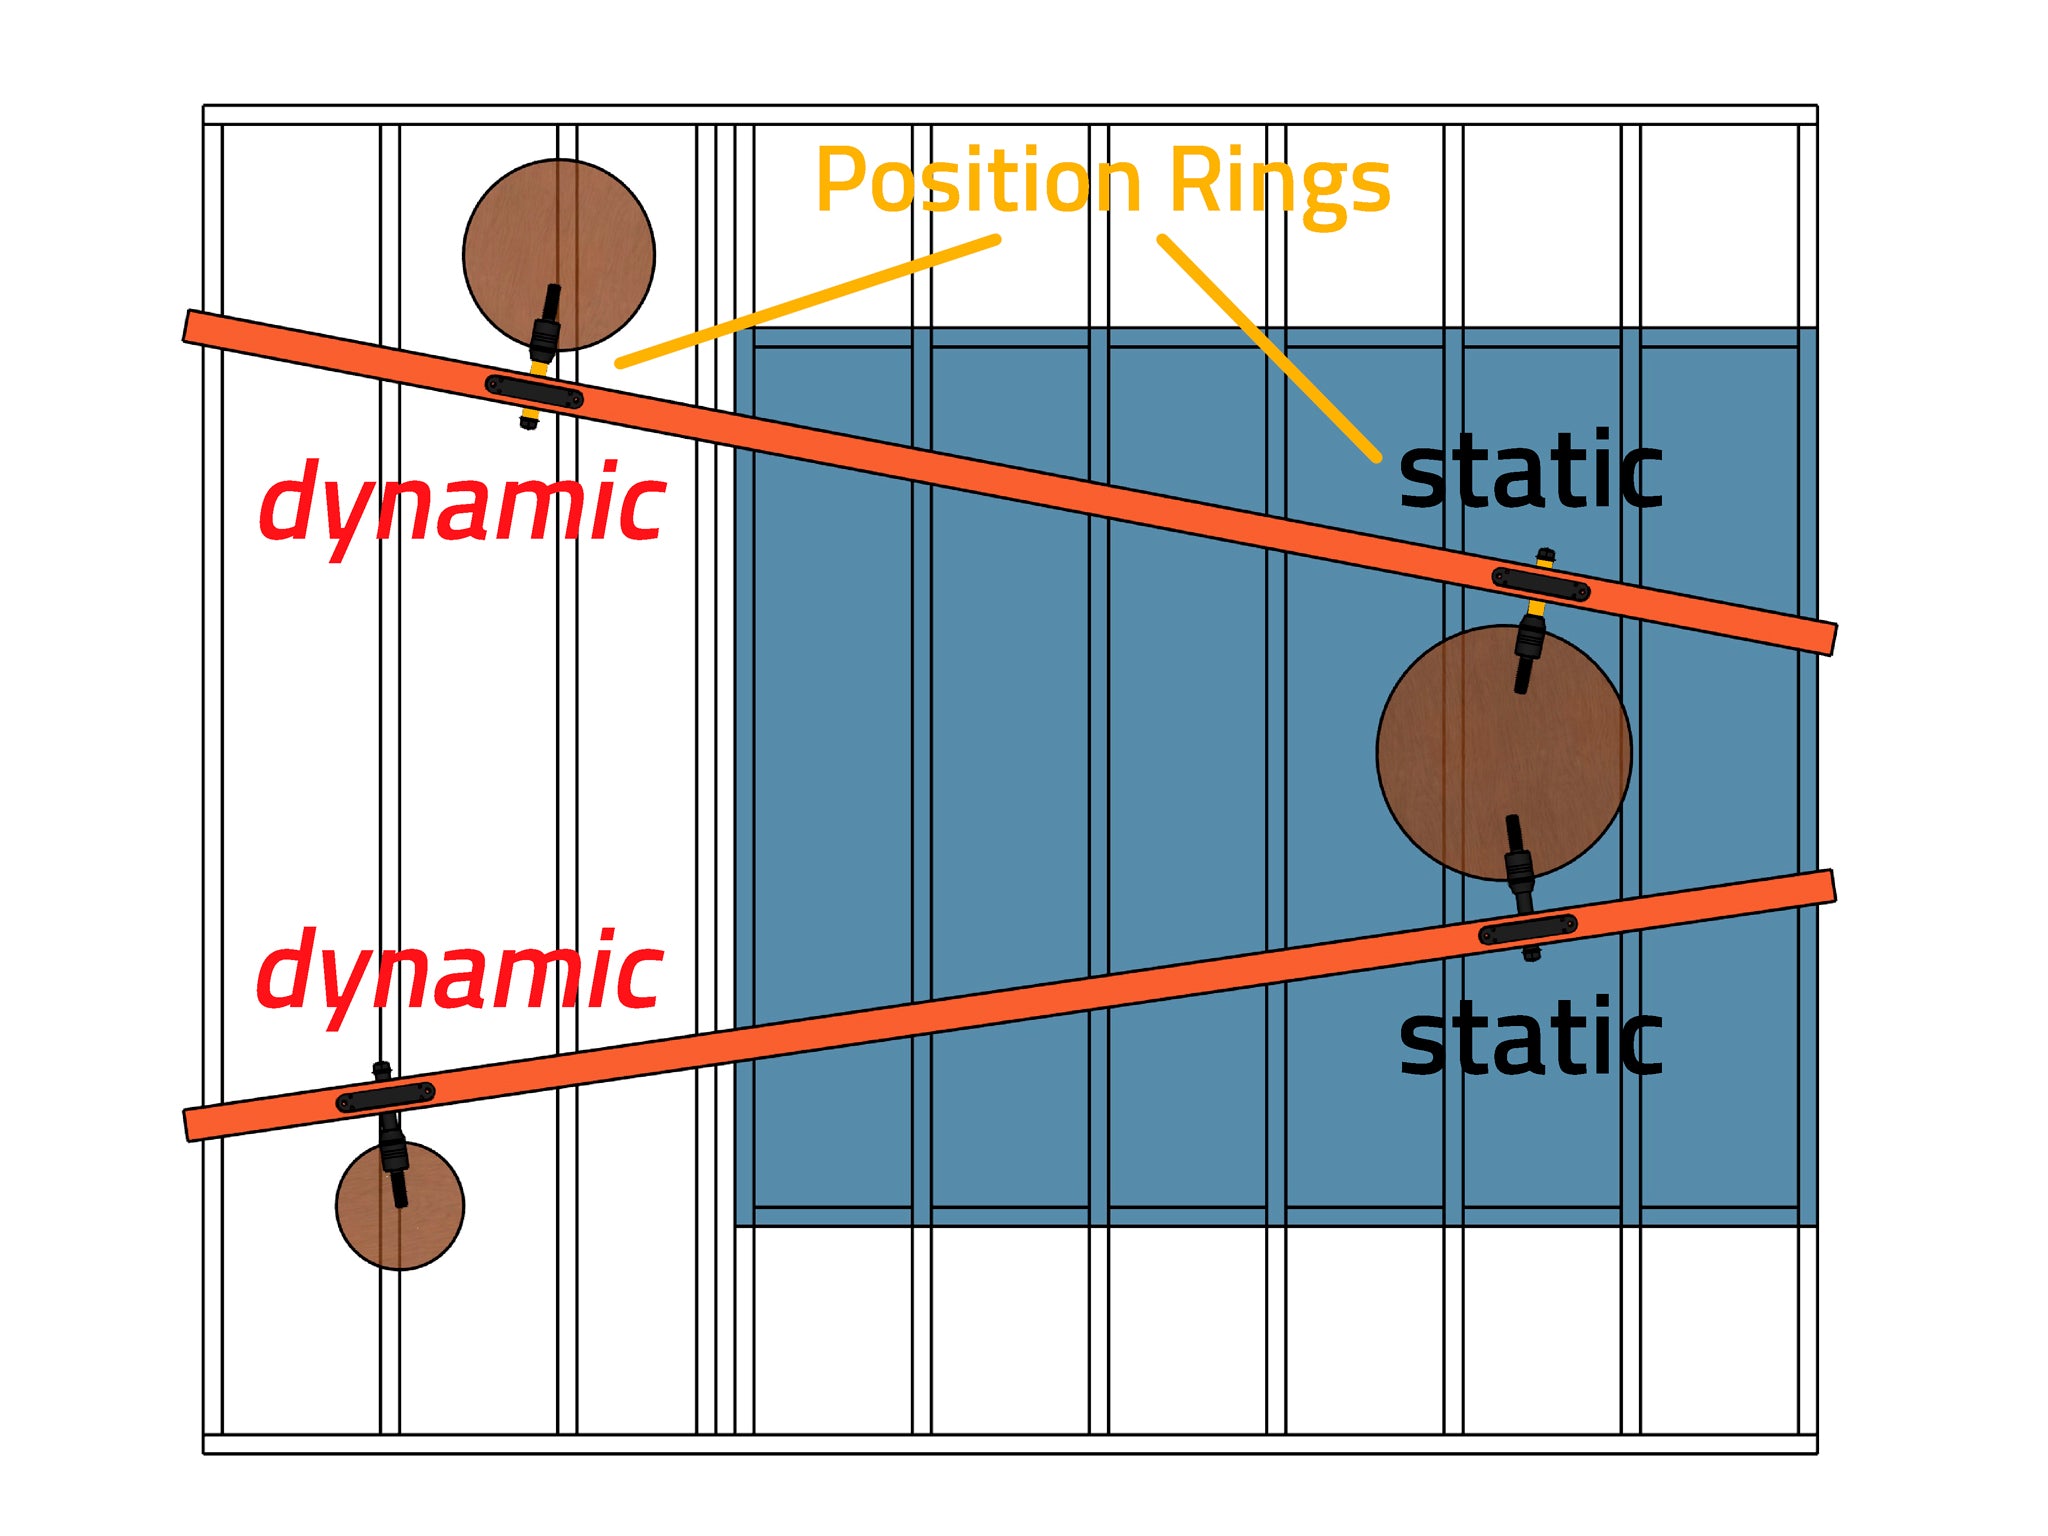
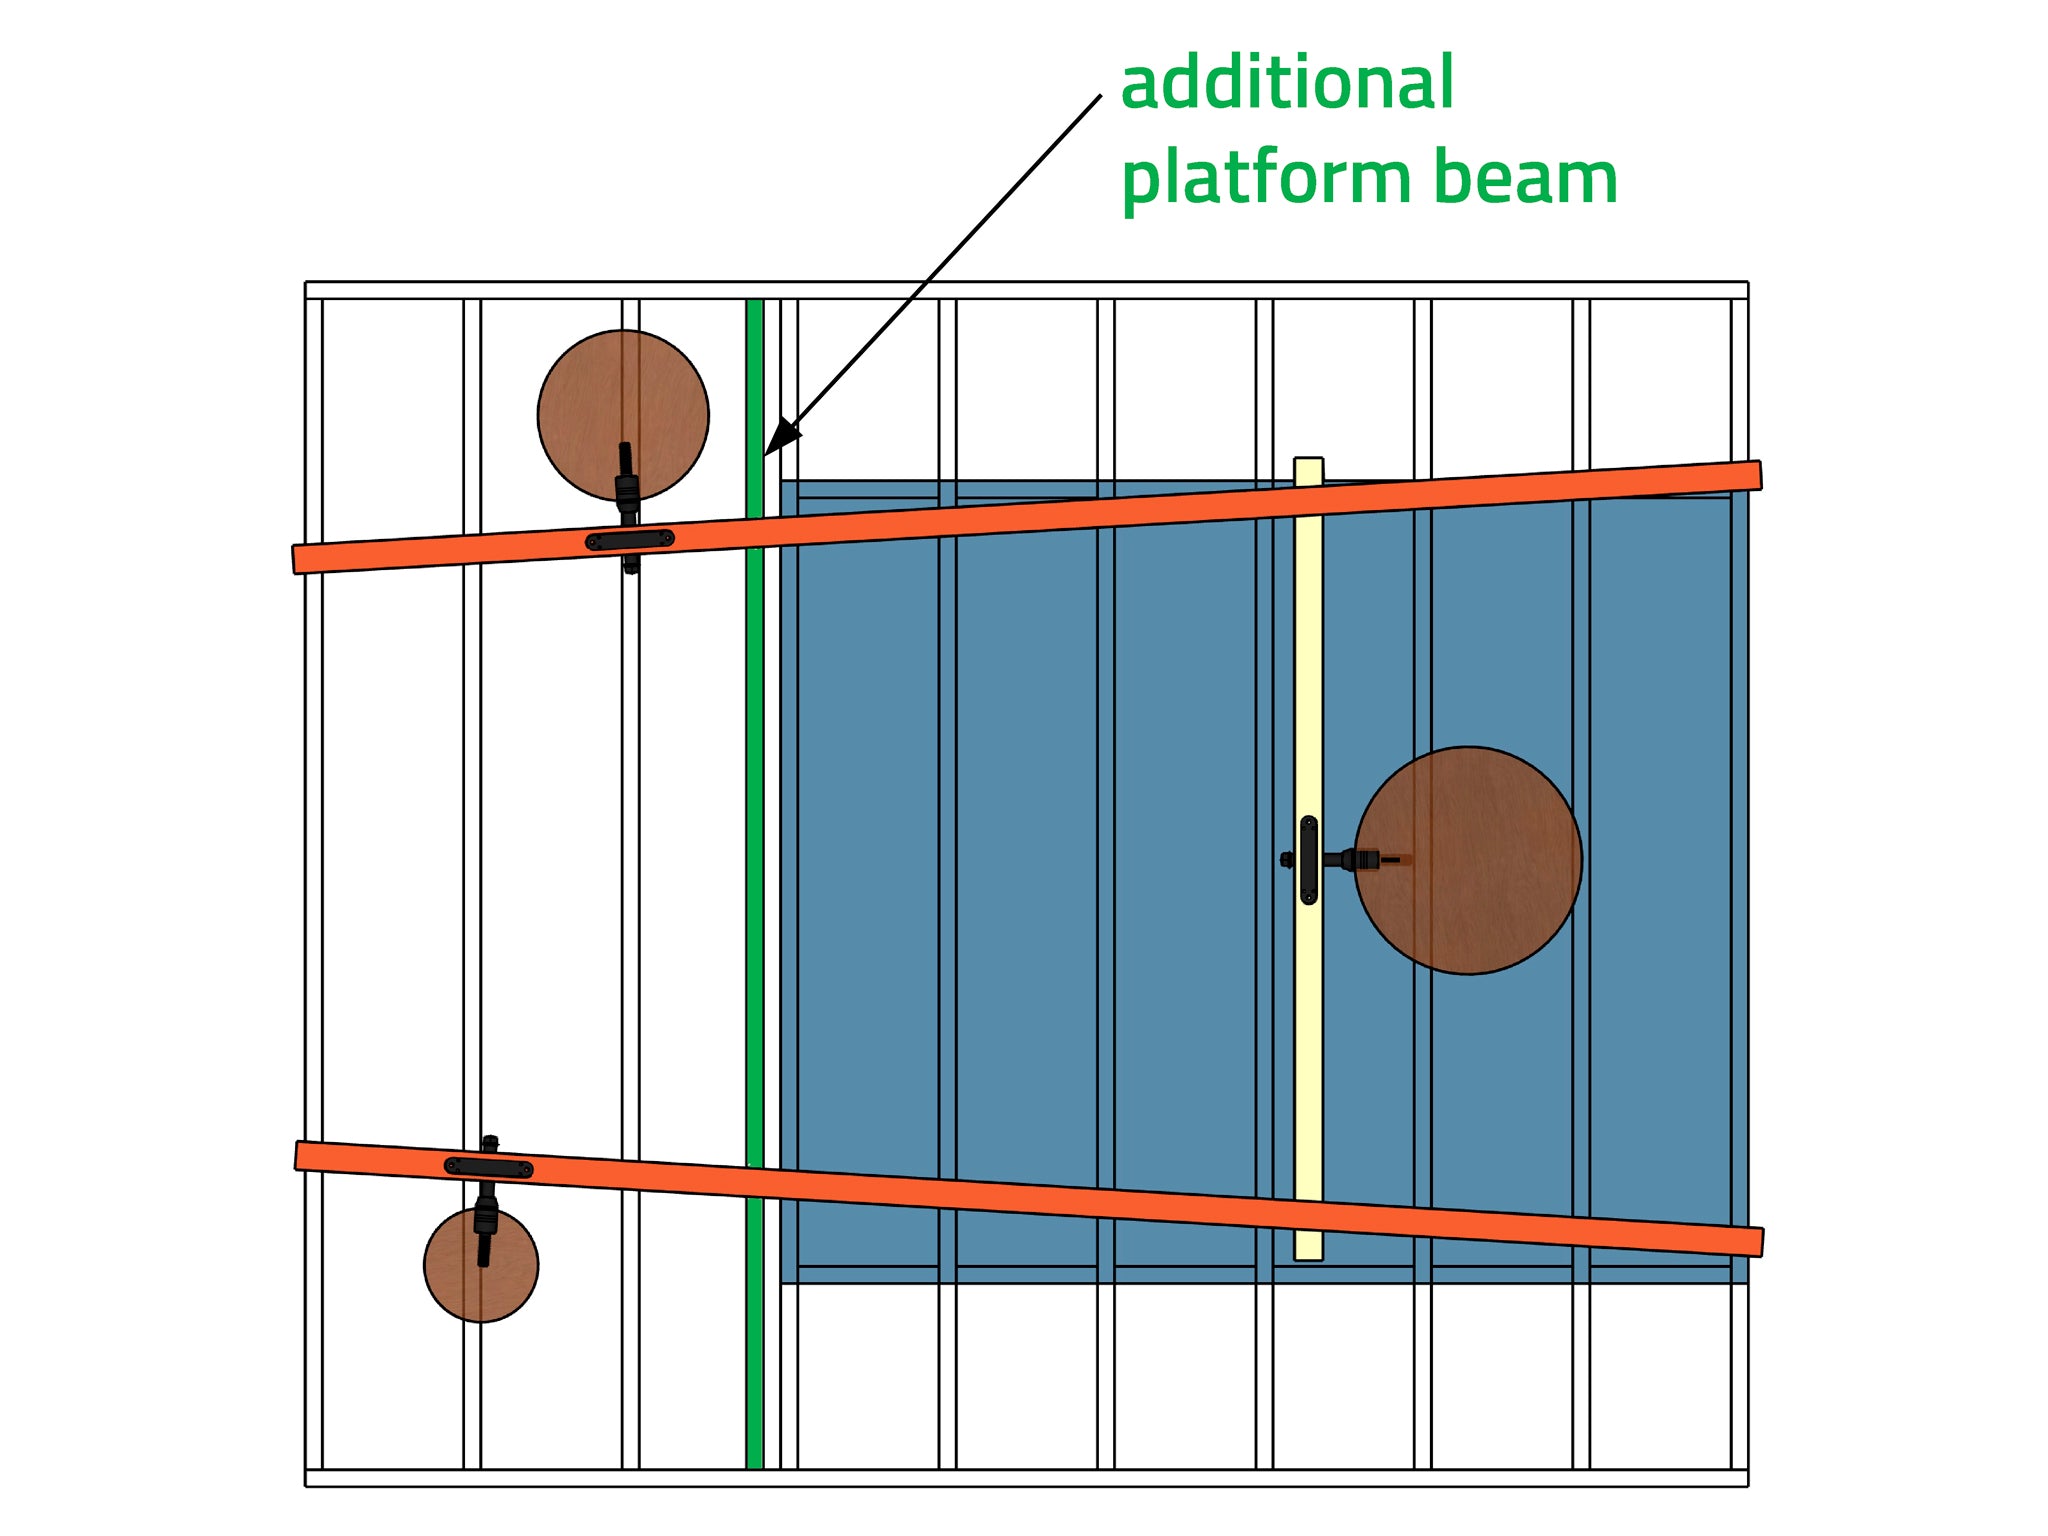
3 trees: longitudinal beams
✔ The two longitudinal beams (red) are mounted on the thickest tree using one fixed bracket each.
✔ Position-Rings (yellow) ensure that the beams maintain a certain distance from the bark.
✔ They are only required on two of the four tree bolts, as the platform forms a rigid unit at the end.
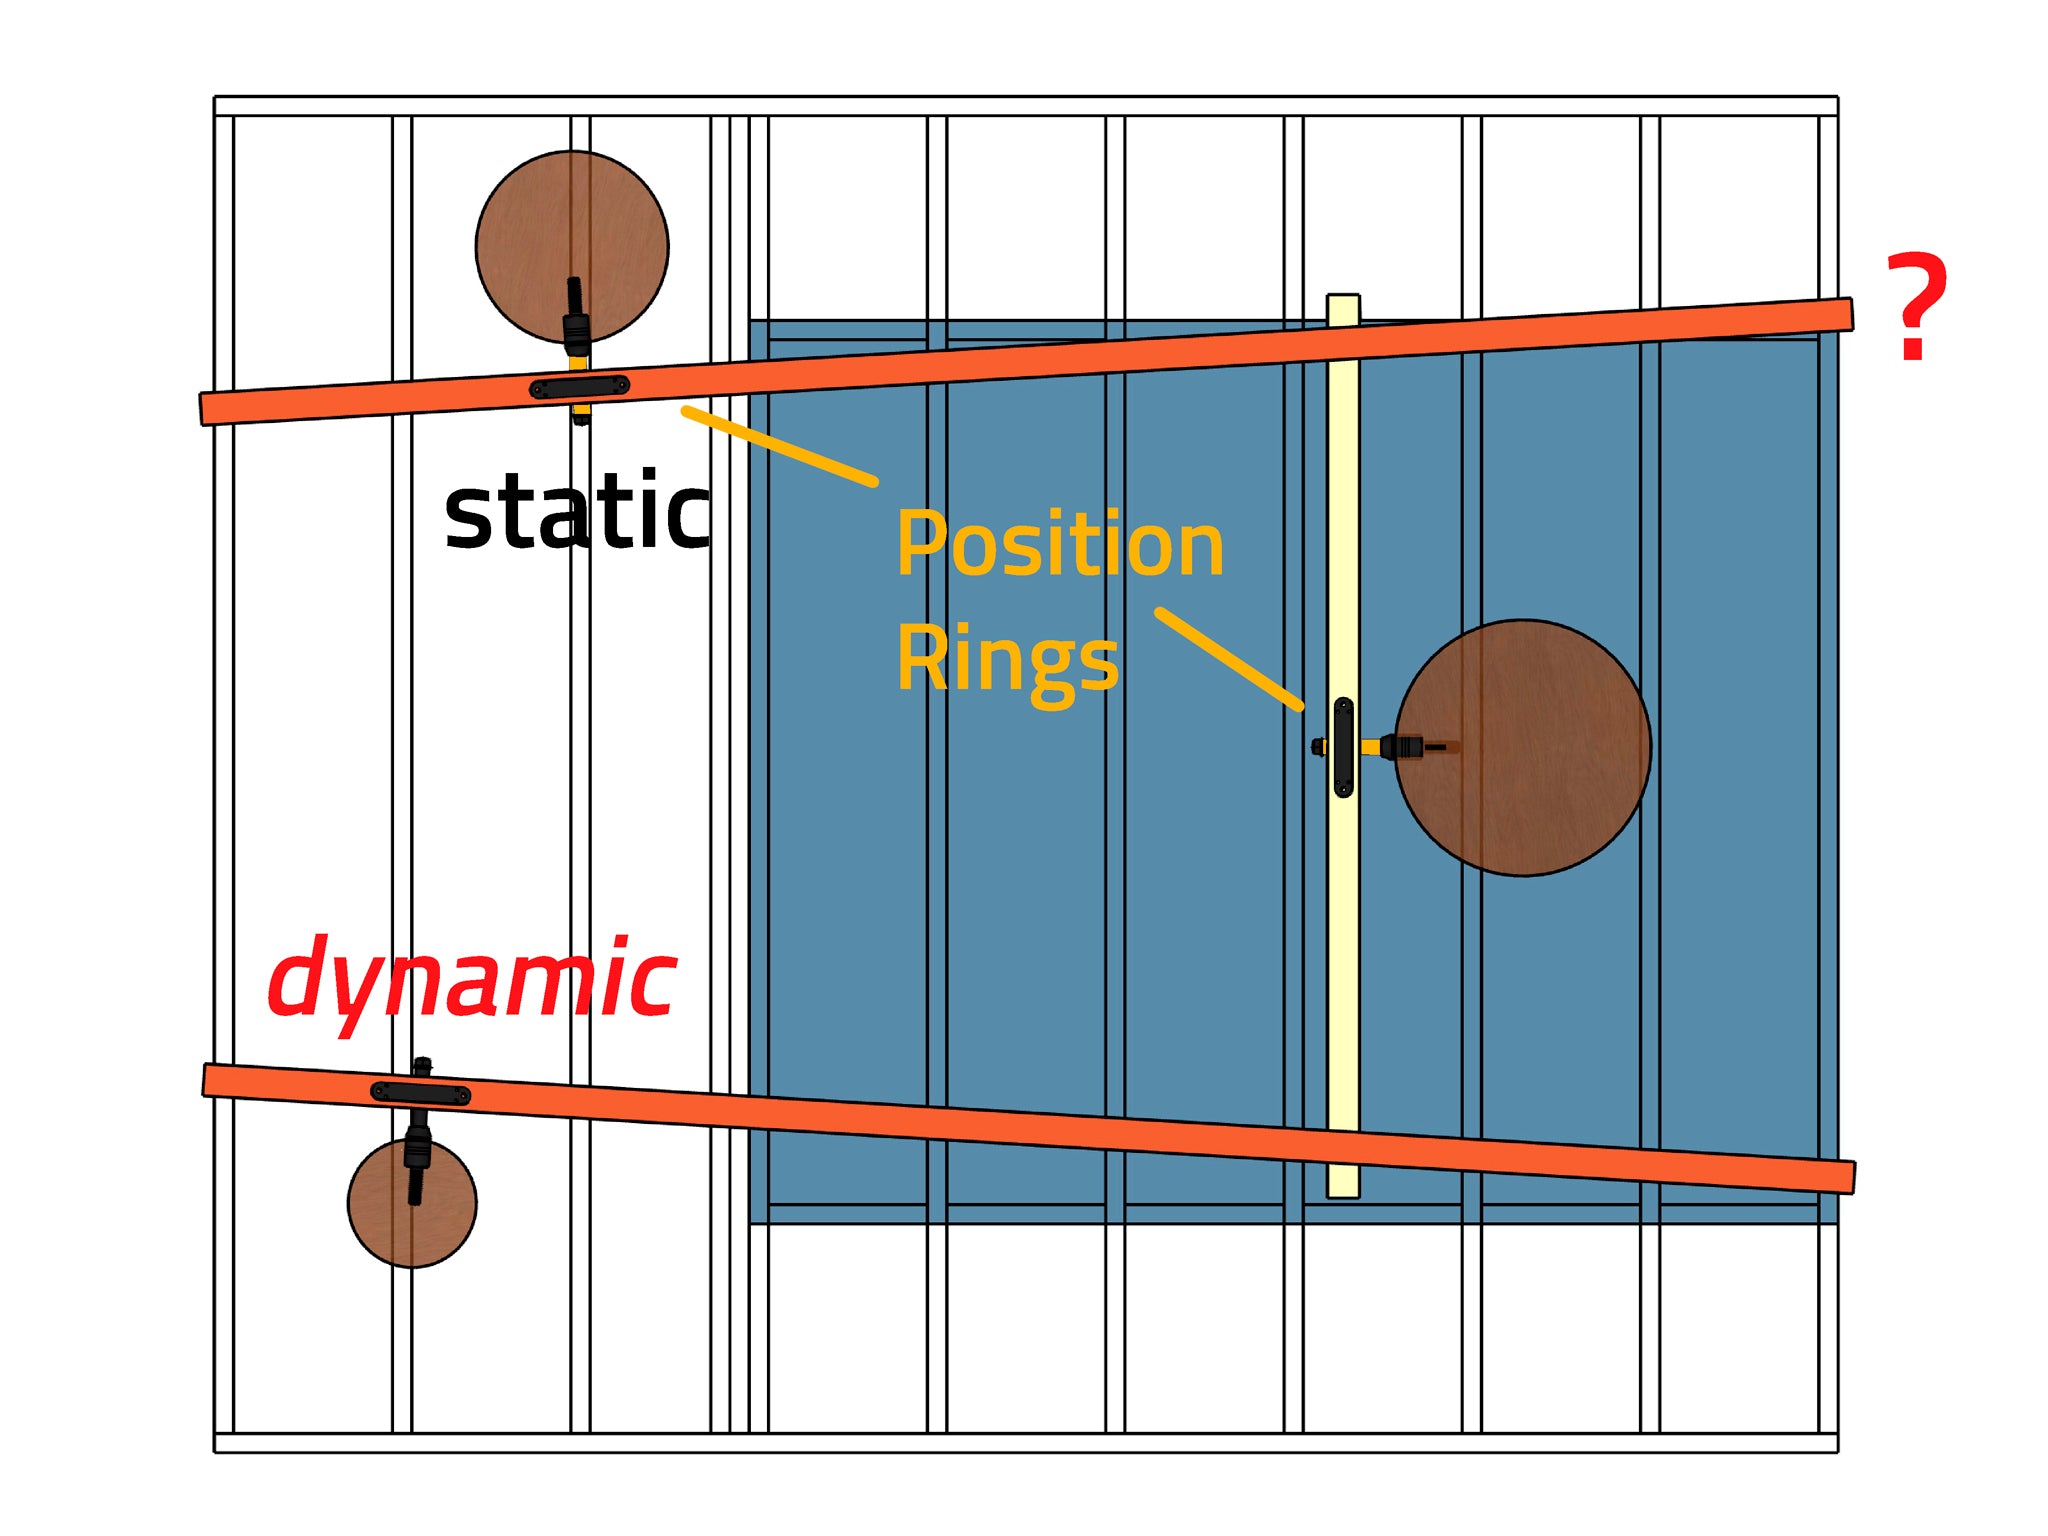
3 trees: longitudinal beam + triangle
✔ Tribeam Support Structures (light yellow) are a good solution for placing the longitudinal beams (red) further apart.
✔ This makes the platform more stable and gives the tree more space to grow in width.
✔ Make sure that heavily loaded beams do not protrude too far – in this example, it is borderline (sketch?).
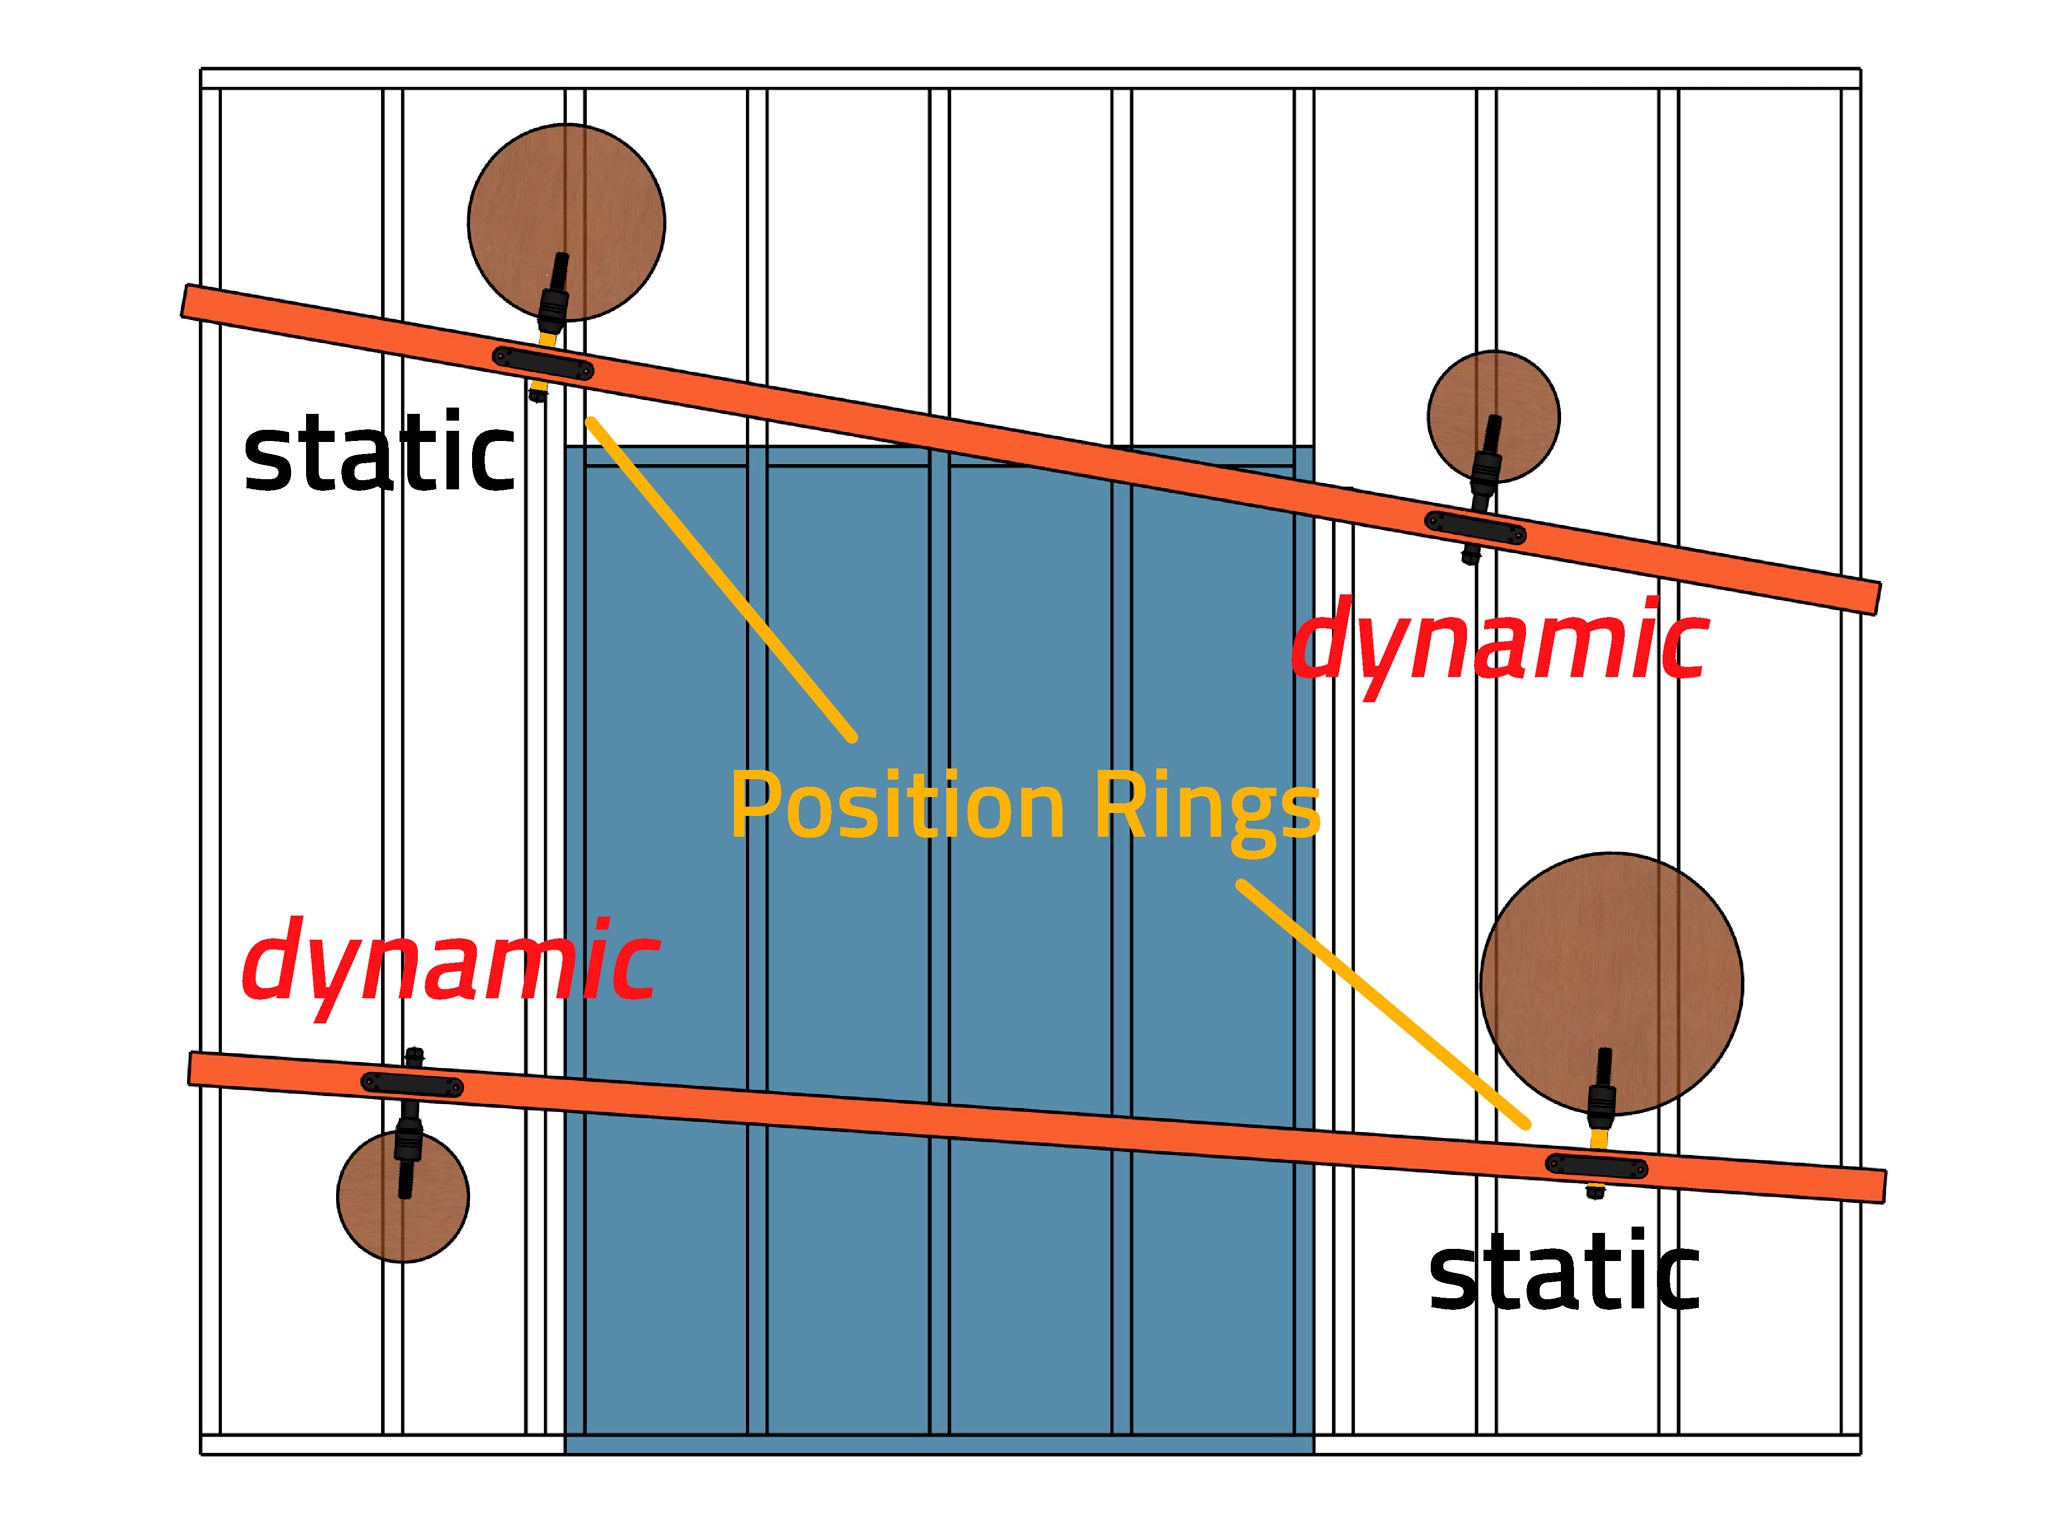
4 trees: longitudinal beams
For a treehouse between four trees, the two thicker trees should be fitted with Fixed Brackets and the two thinner trees with Dynamic Brackets. The platform buffers the remaining movements well.
4. The two most common mistakes when building a platform
Two important construction details from the Treehouse-Pro that are overlooked by most DIY builders:
Mistake 1: Not planning for tree growth!
Trees grow wider faster than you think, on average 3 to 15 mm per year. This means that a wooden beam that is initially 5 cm away from the tree can already be in contact with the bark after five years.
For structural reasons, it is often unavoidable that a support beam has to be very close to one side (e.g. in triangular constructions). In other places, however, you should allow the tree to grow freely in thickness:
✔ The less the tree is restricted in its growth in thickness, the better.
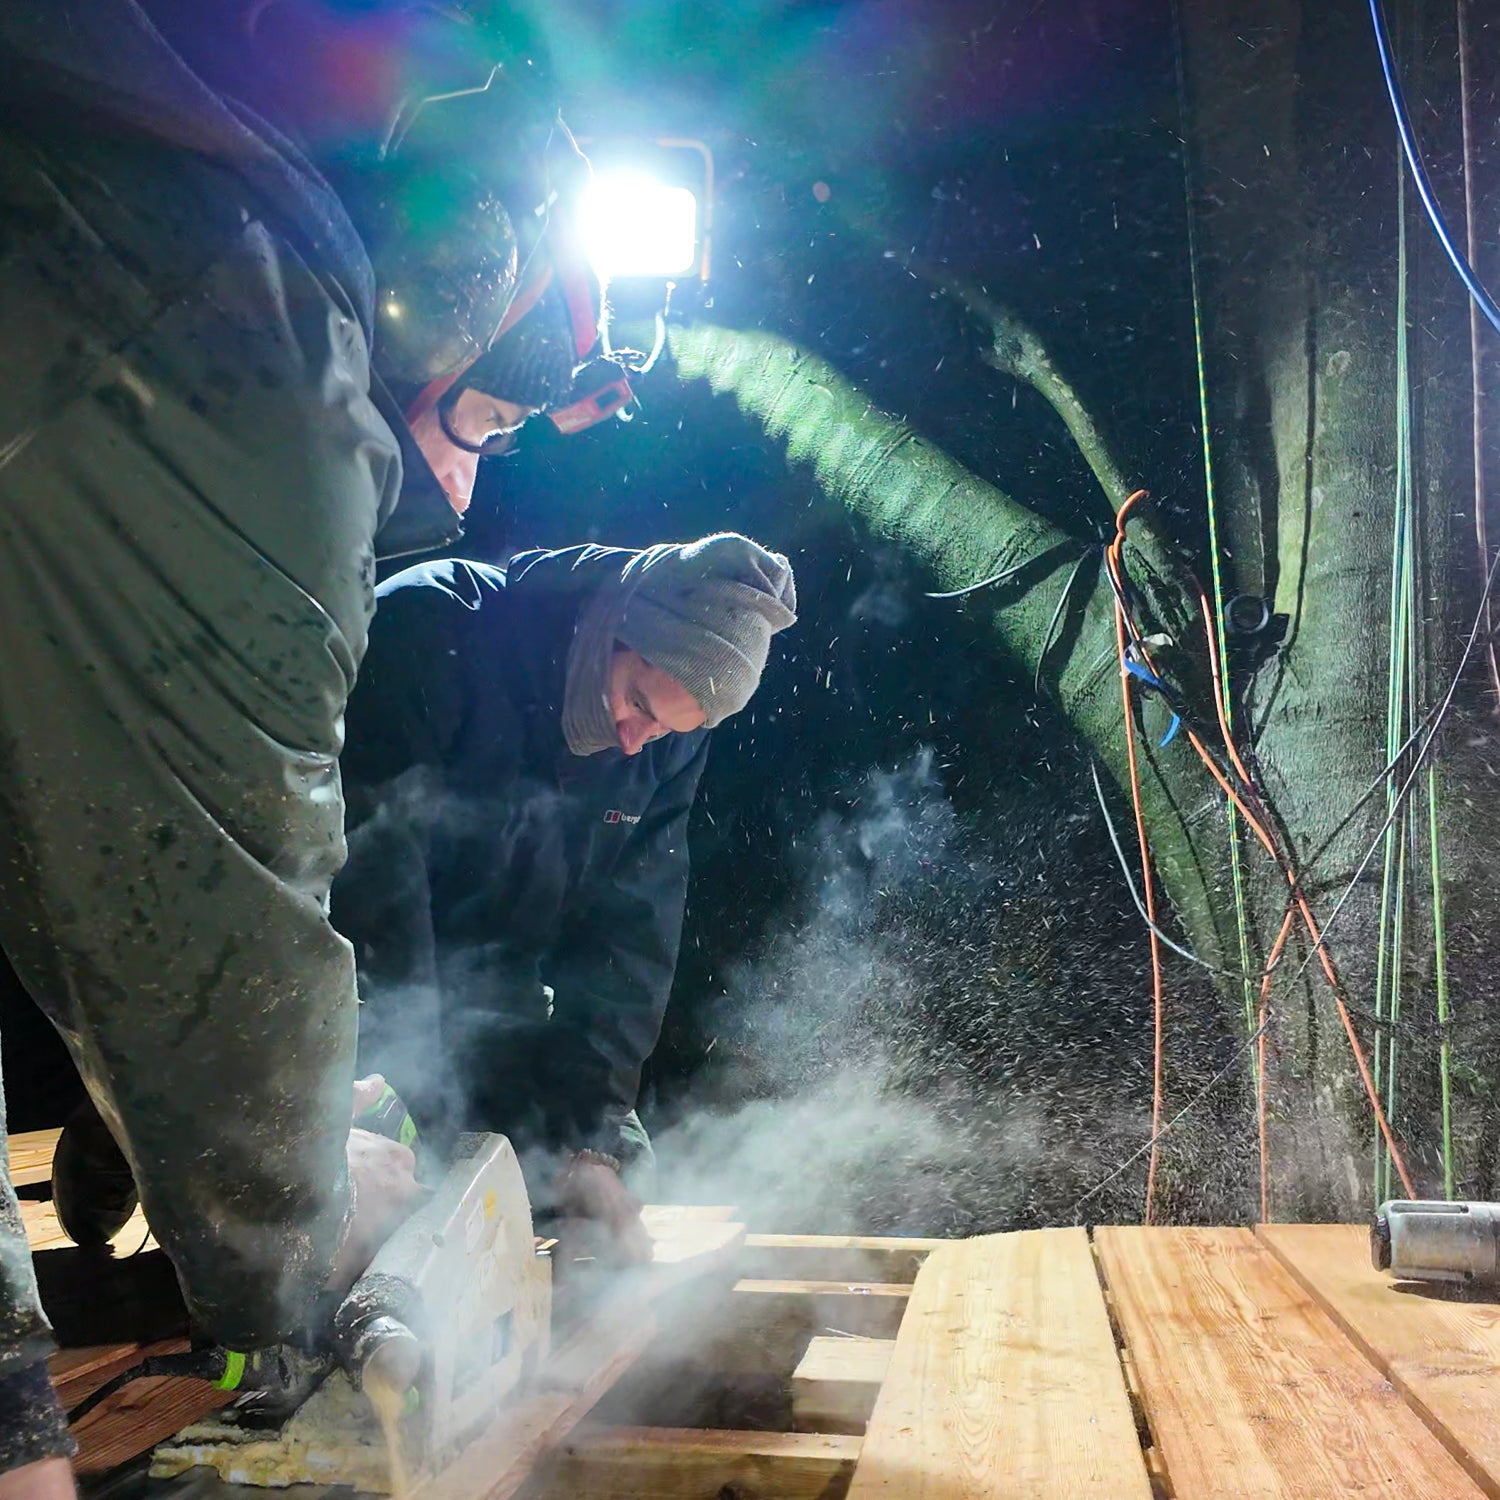
✔ Plan the platform from the outset so that the wooden boards can be cut with a jigsaw.
✔ Where possible, plan your platform so that the beams around the tree can be moved or replaced later!
Solution 1: ‘Growing’ treehouse platform
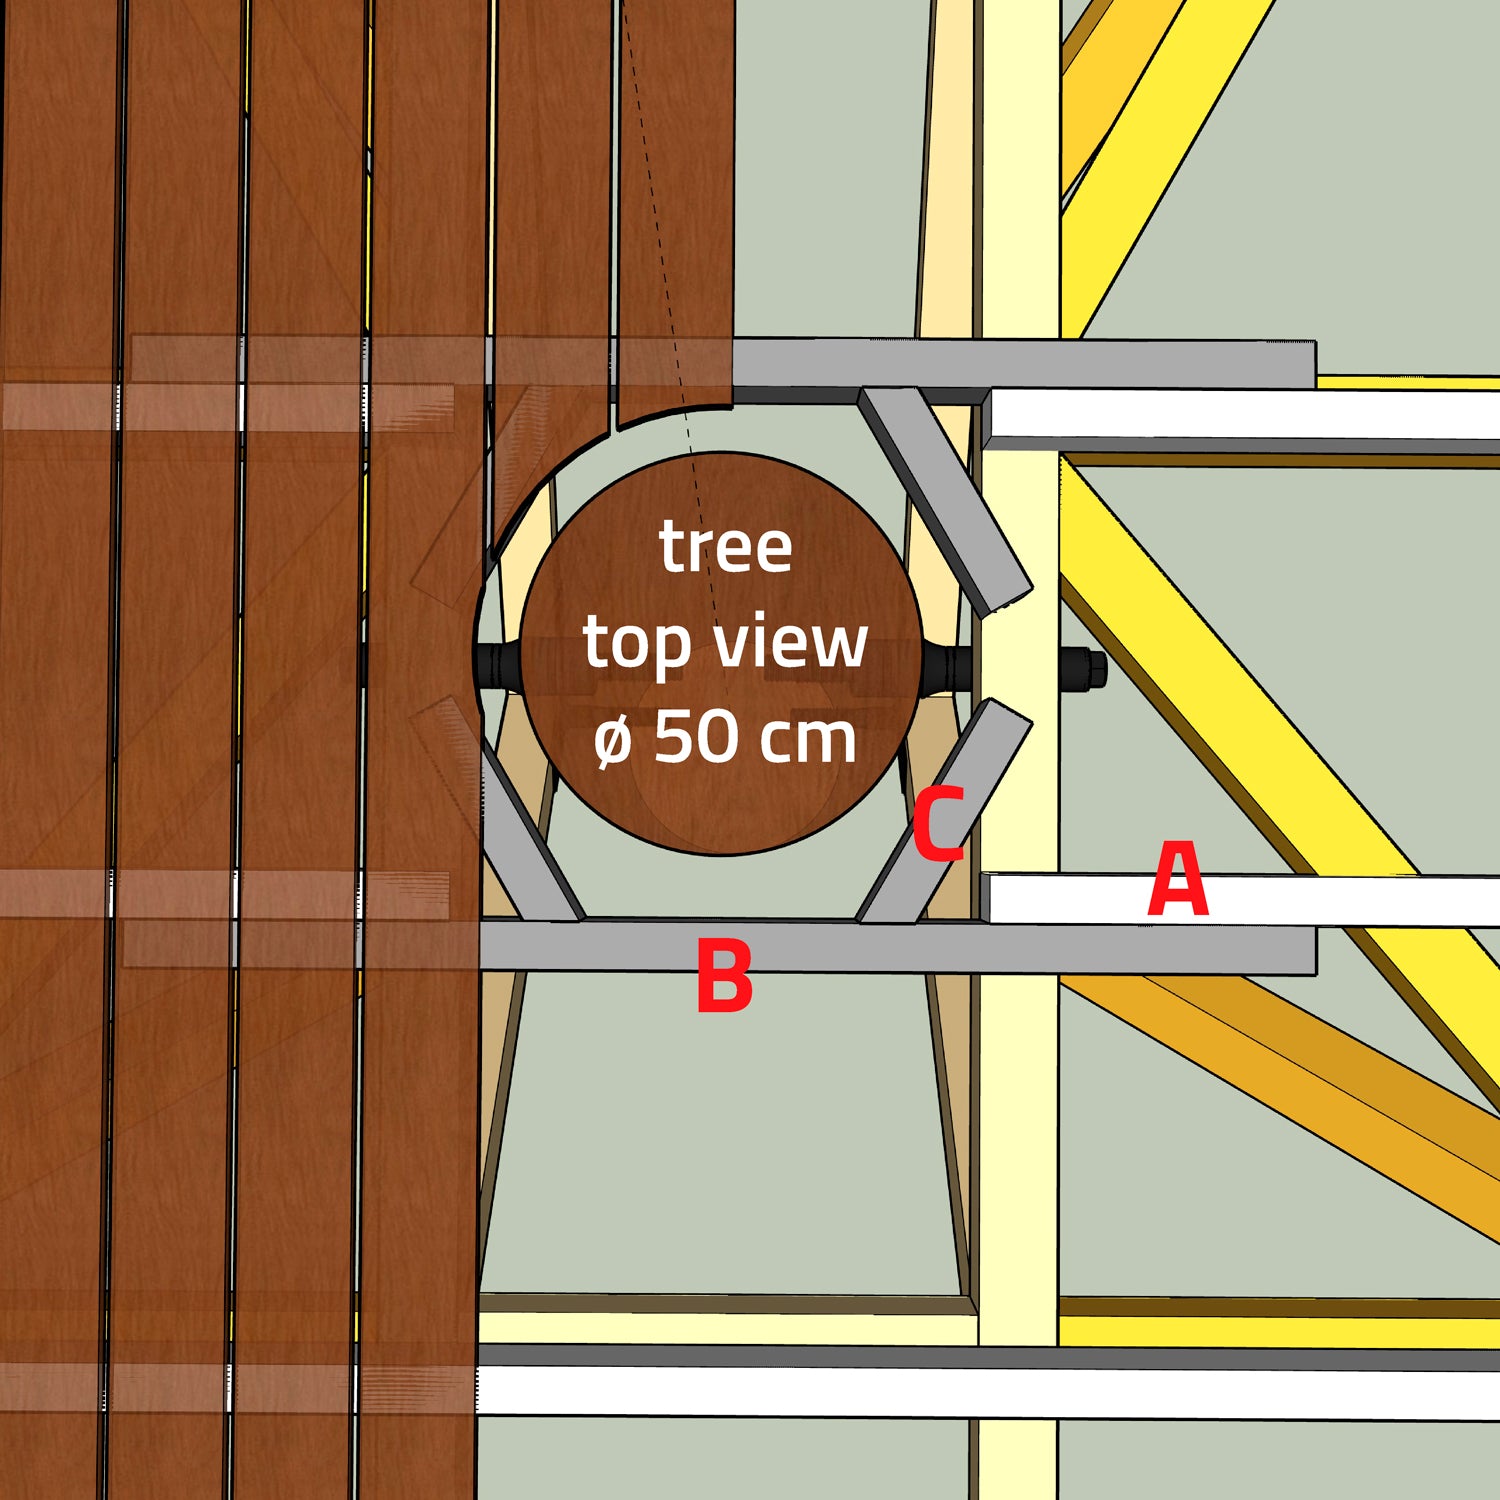
With a centre-to-centre distance of 65 cm (2.1 ft) between the floor joists (white A), the joists are sometimes very close to the trunk of thick trees.
❌ If the white joists were to run through, the tree would be restricted on a total of four sides.
✔ One solution would be to break the white joists and double them up on the sides (grey joists B).
✔ Slanted pieces of wood (C) are attached so that the decking boards do not hang in the air near the tree.
✔ The decking boards should of course be screwed and not nailed in this area.
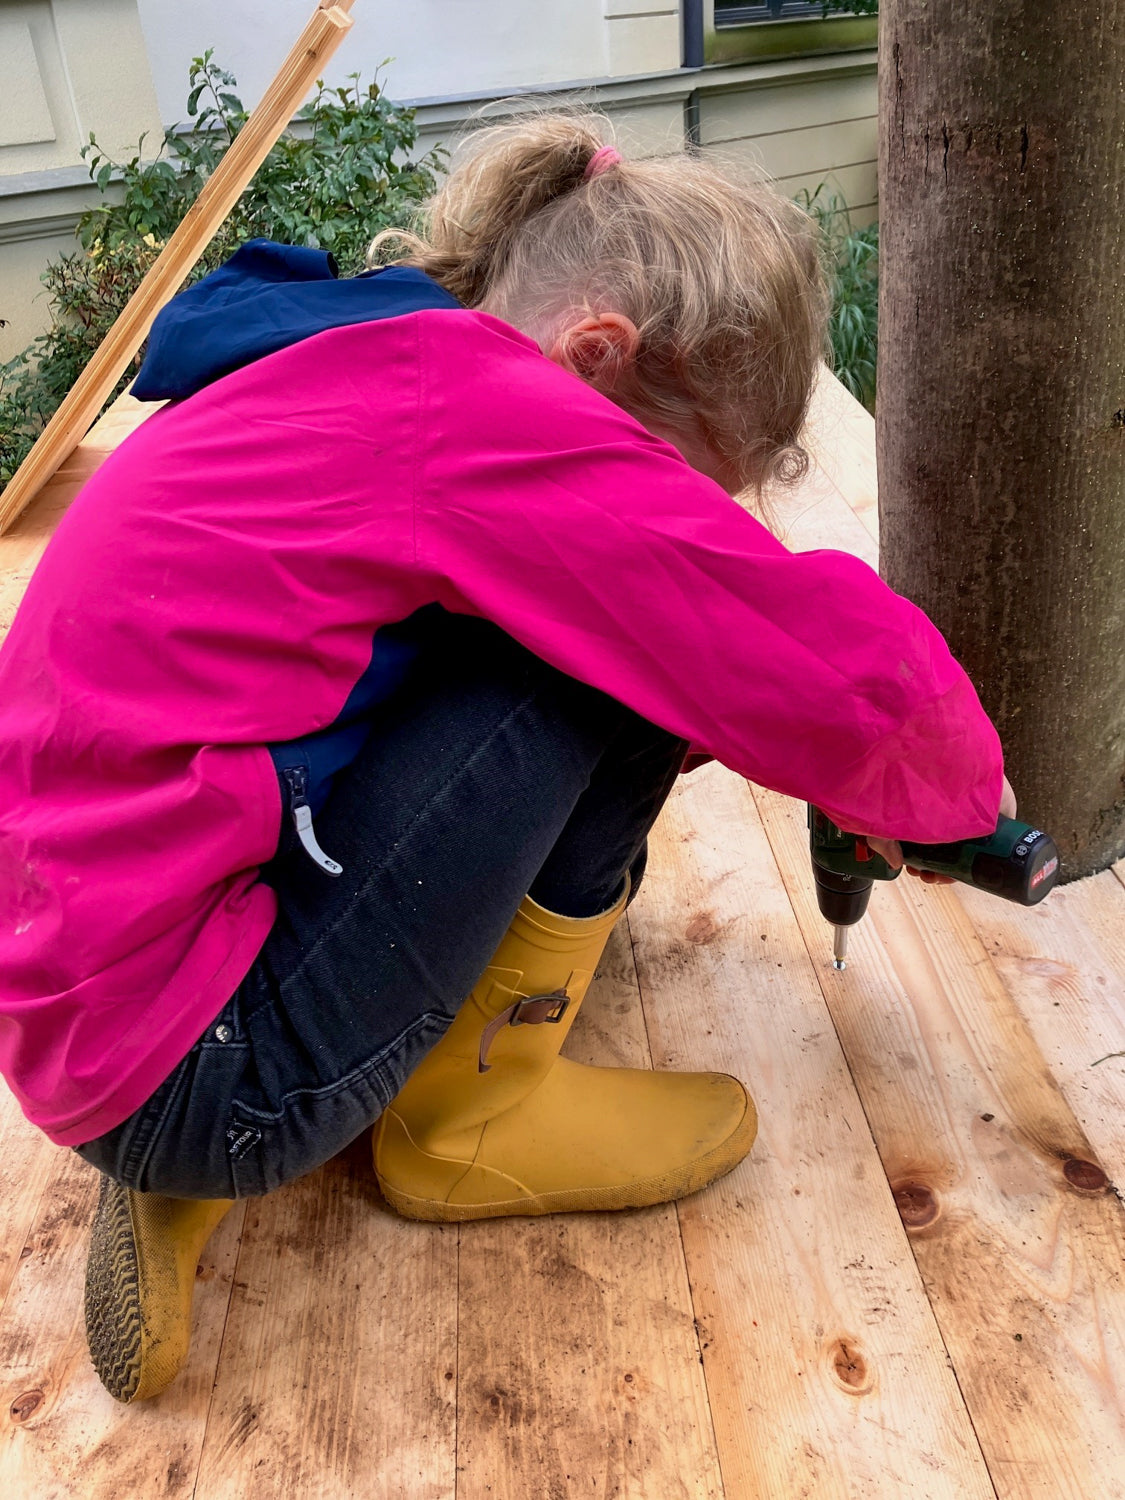
This gives your tree valuable centimetres to grow and allows you to easily adjust the platform every few years with a jigsaw and cordless screwdriver.
Mistake 2: No separation joint to the treehouse
One of the most common mistakes when building a treehouse is to cover the platform with boards and then simply place the treehouse on top of it:
❌ Rainwater collects and flows unhindered down the wall of the house.
❌ The wood of the wall construction absorbs the water and transports the moisture inside.
❌ The wood becomes rotten
❌ Mould can form
Solution 2: Separating joint between house and terrace
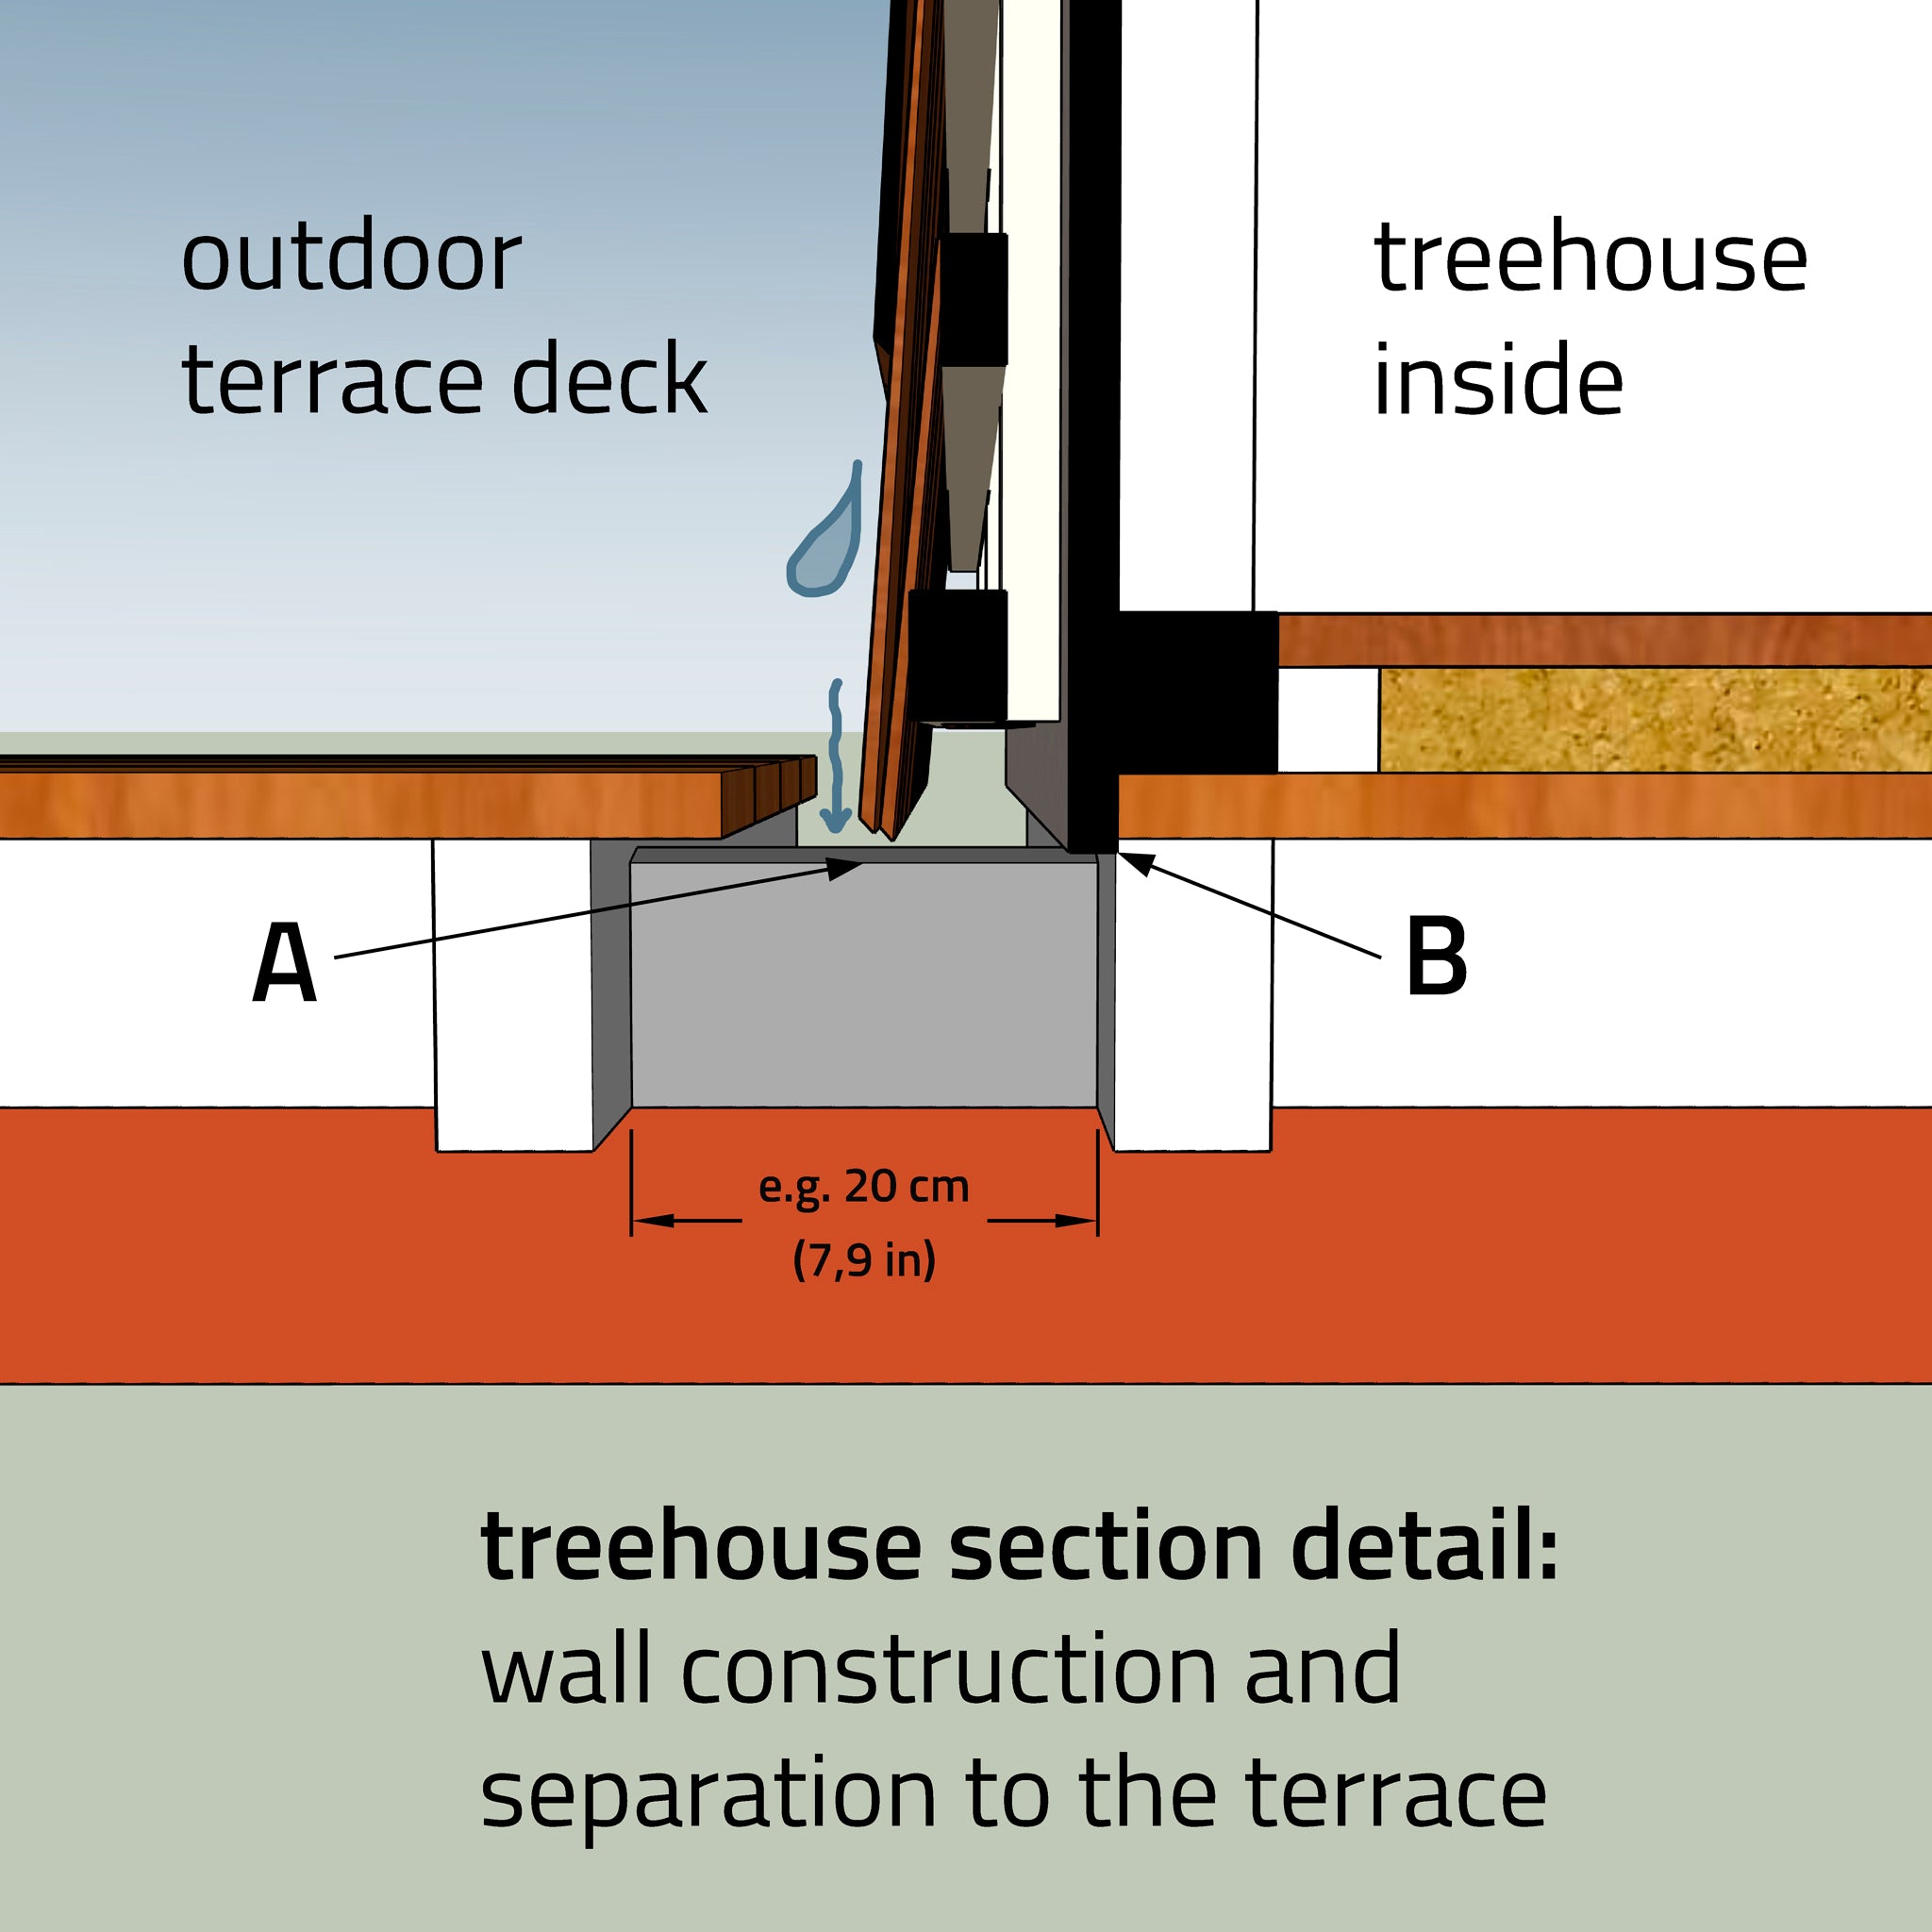
Detailed section of a tree house wall that is structurally separated from the terrace:
✔ Instead of letting the decking boards run all the way through, we interrupt them and leave them protruding approx. 3 cm from the outer façade layer – now rainwater can drain away effectively (blue drop).
✔ The decking boards should protrude approx. 5-10 cm beyond the beams so that the end grain draws less water towards the beams and screws and can dry out better.
✔ This also allows for more flexibility if the decking boards need to be sawn again.
✔ The short connecting beam (grey A) is slightly lower so that the façade does not bump against it. It is bevelled at the top so that water and dirt can run off more easily.
✔ The outer wall surface (black B) must overlap the decking boards of the interior by approx. 1-2 cm so that everything is airtight.
Pro tip: Draw everything on the floor plan
To avoid unpleasant surprises on the construction site, draw the walls of your tree house, including the thickness of the facade and the separating joint, on the floor plan:
✔ Mark the wall beams + space for the outer formwork
✔ Allow approx. 3-5 cm space between the outer edge of the outer formwork all around.
✔ As the sawn-through terrace boards (separating cut) would otherwise be left hanging in the air, it is essential to install an additional floor joist (green)!
5. Practical examples: Treehouses analysed by professionals
Below are a few customer examples, with comments from me as a tree house professional:
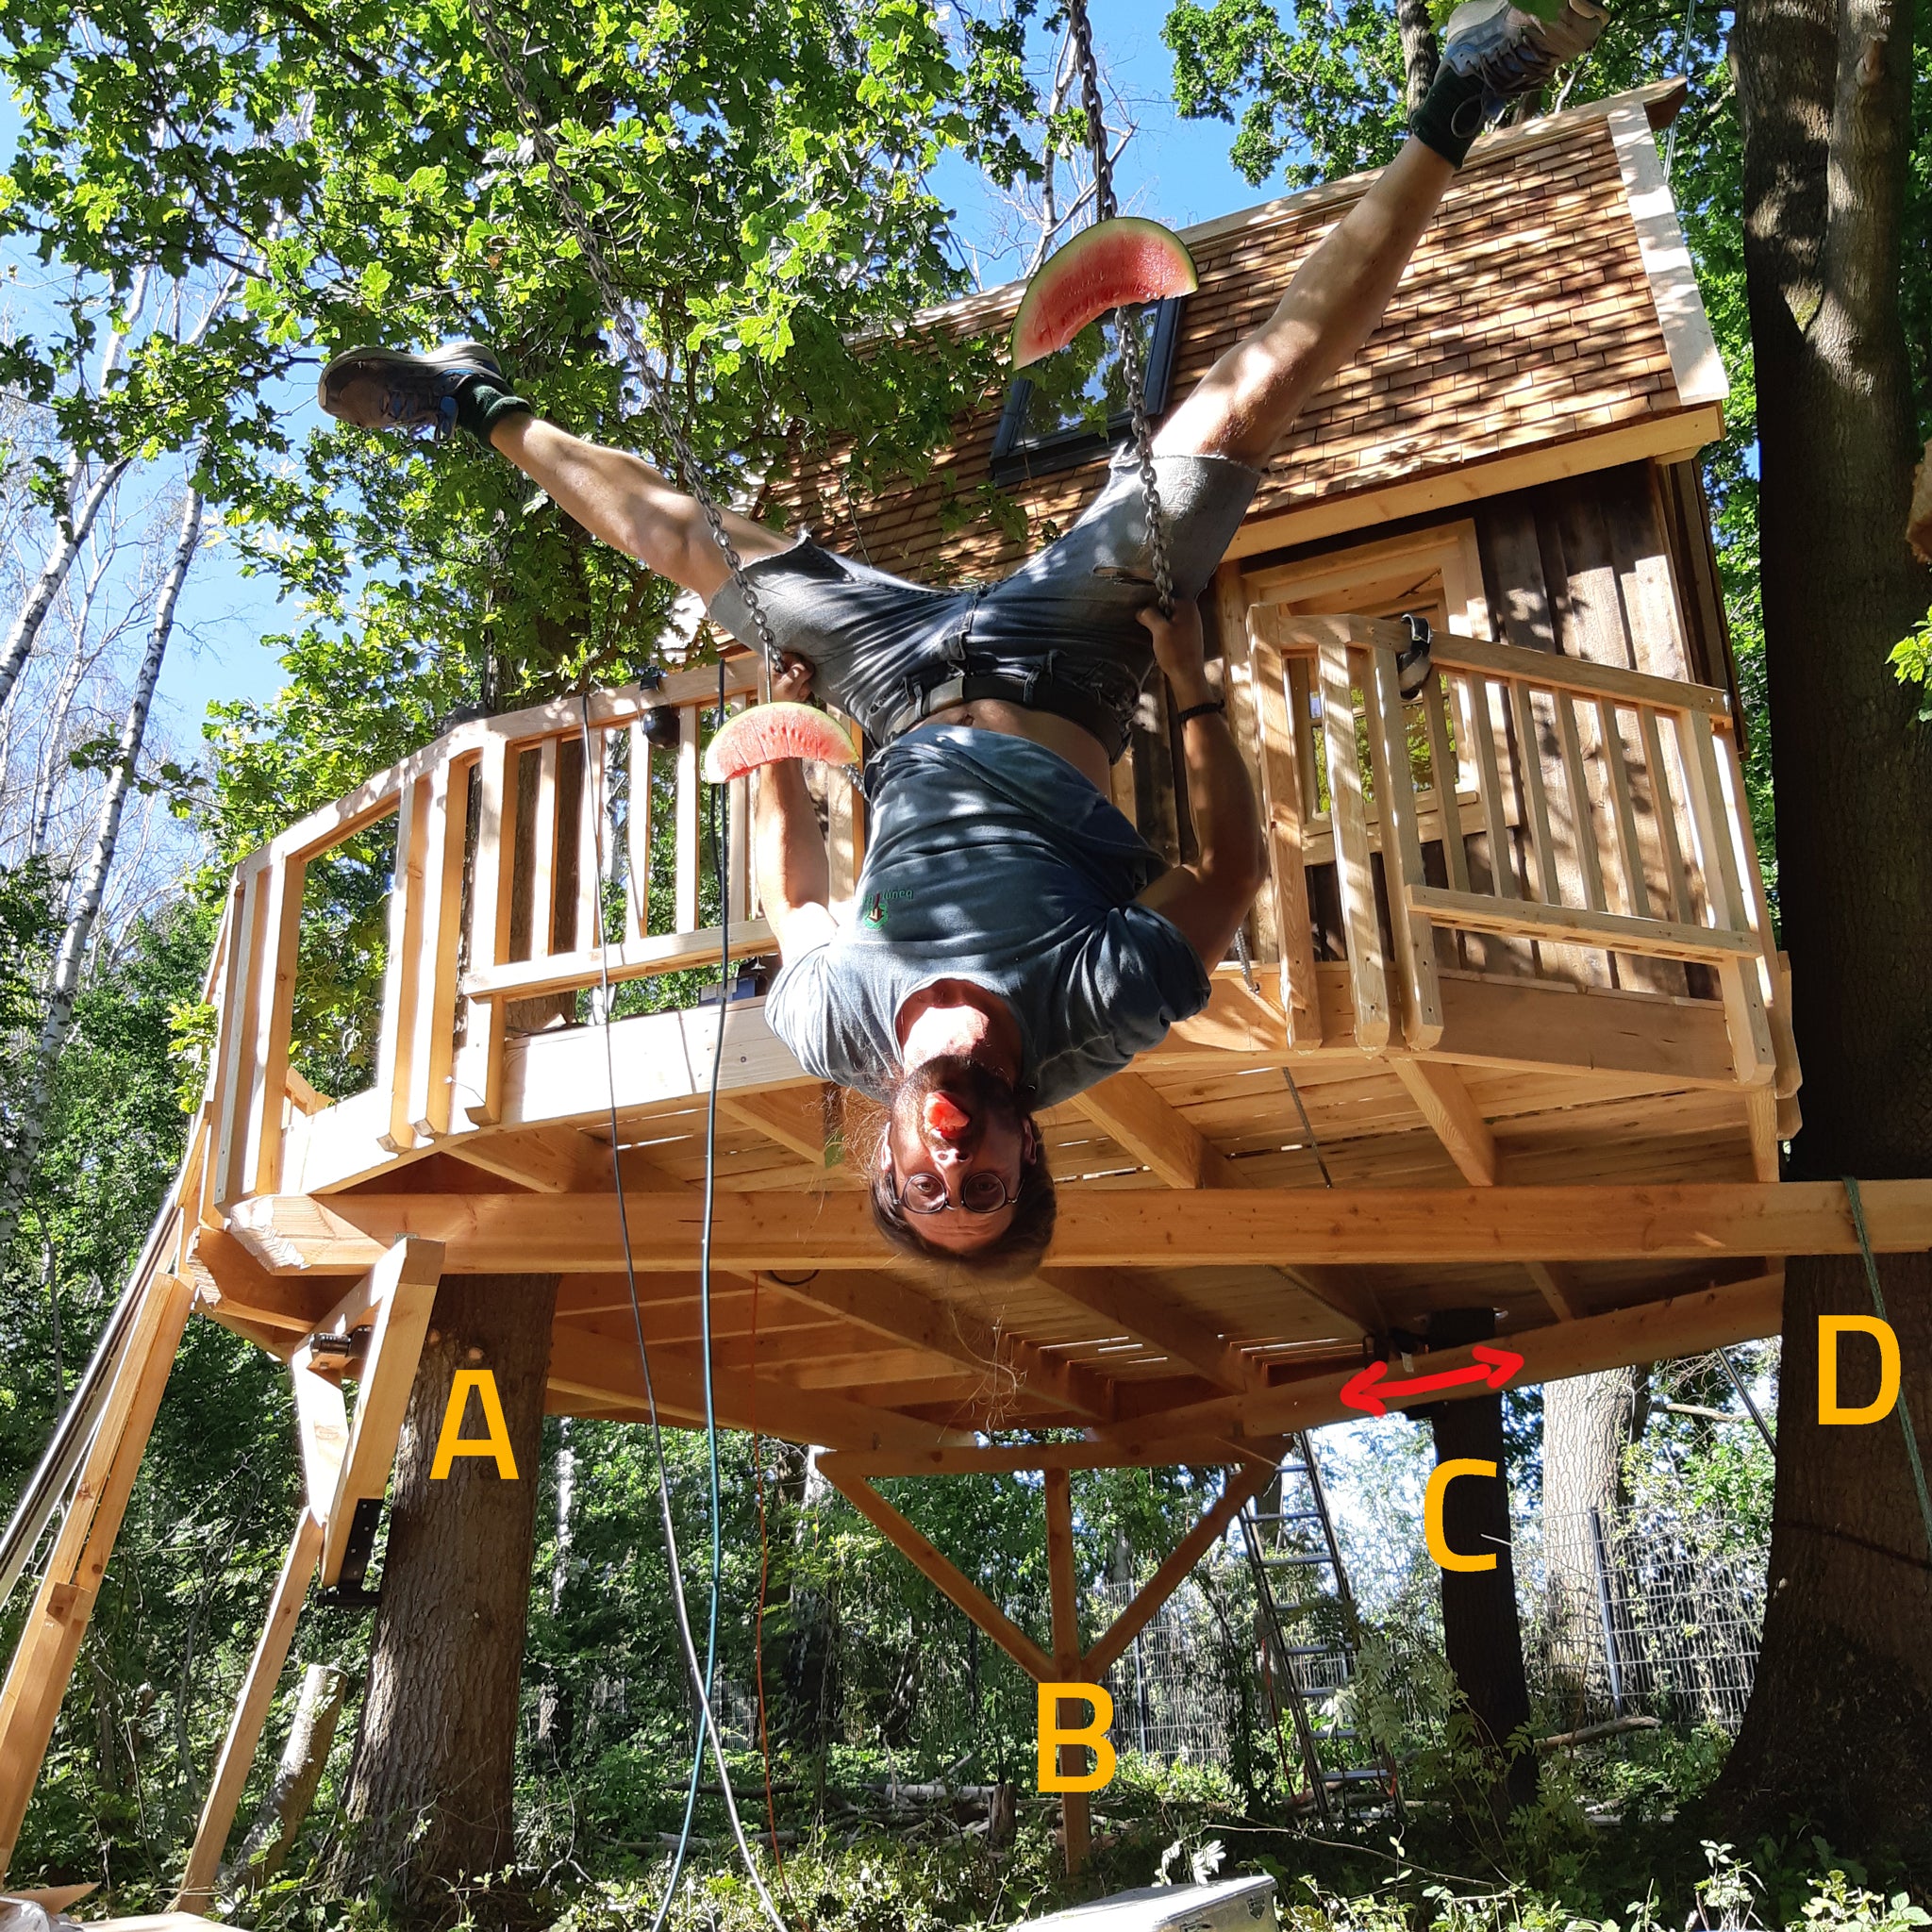
Combine support structures!
Every treehouse requires individual fastening – with our GTS hardware, you can make any dream come true!
✔ A: Small Solid Tribeam
✔ B: Solid Concrete Support
✔ C: Thin Tree with Dynamic Support
✔ D: Thick Tree with Two Solid Supports
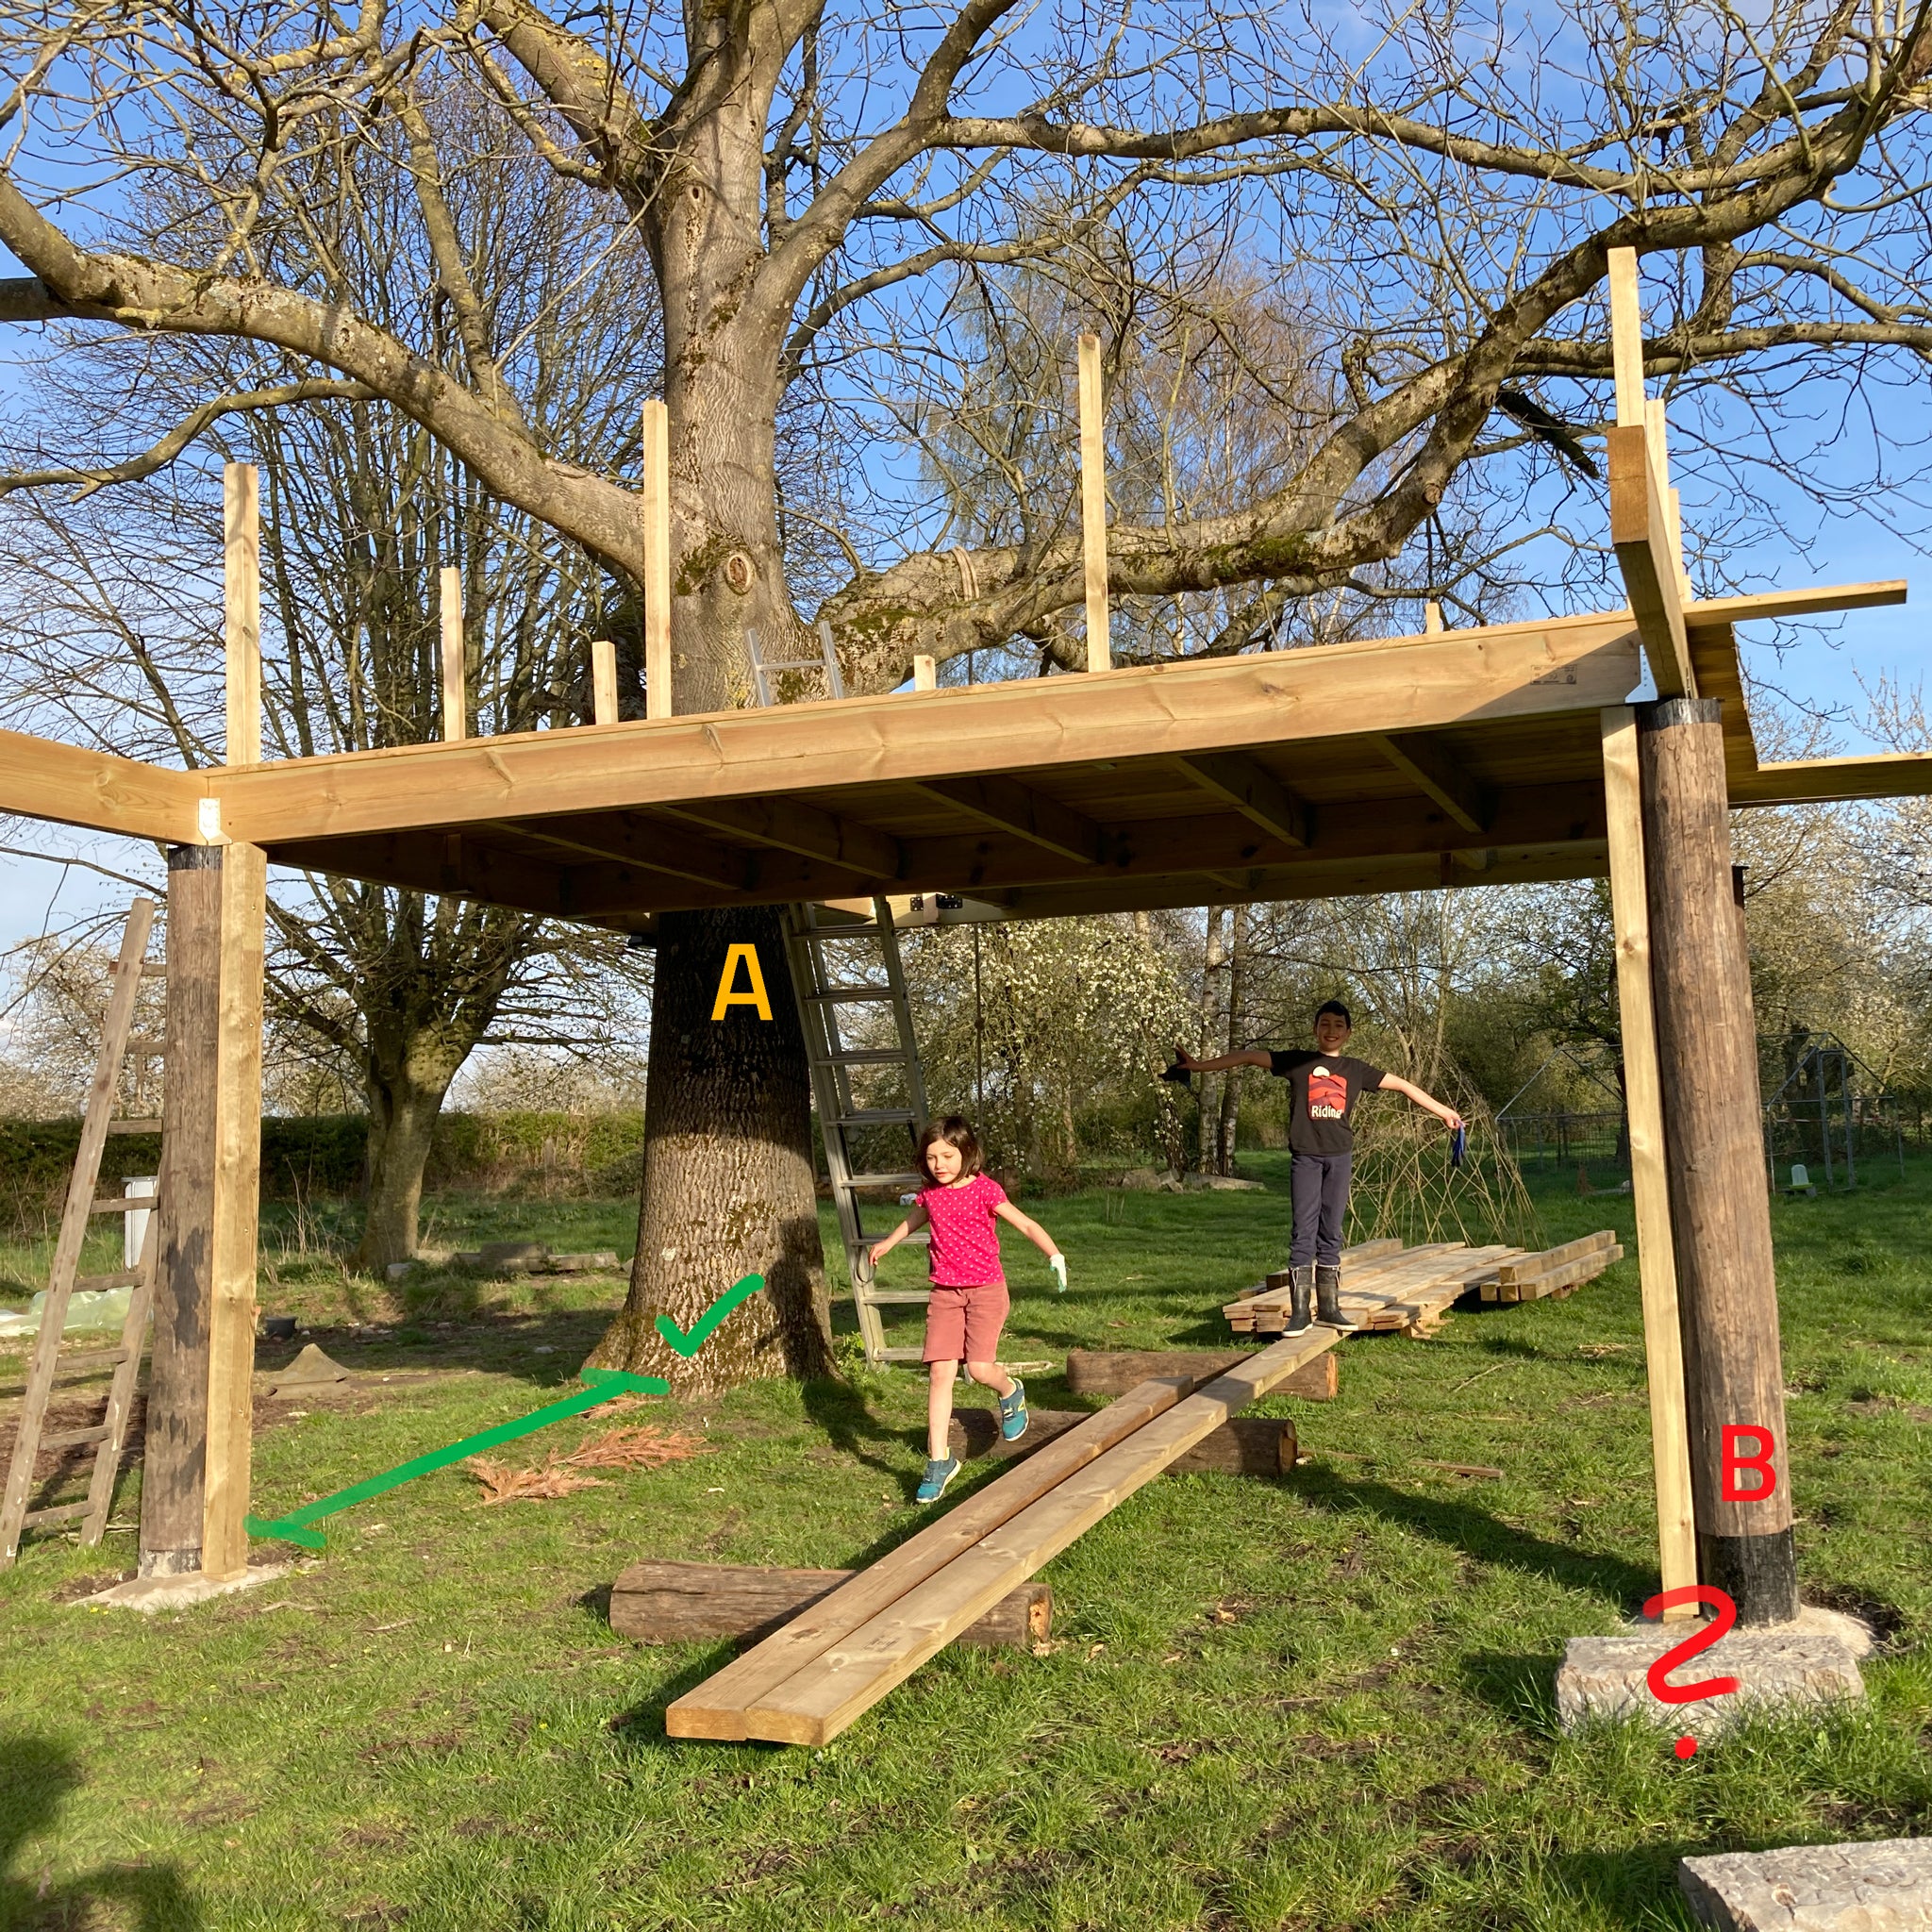
1 Tree + Stilts
A beautiful example of the combination of a treehouse and a raised stilt treehouse:
✔ The distance between the concrete footings and the tree is more than 1.5 m, so that the large main roots are not damaged.
❌ The support posts (B) were set directly in concrete. This is only possible with robinia/acacia, as other woods become damp and can rot after a few years. It is better to build with post shoes.
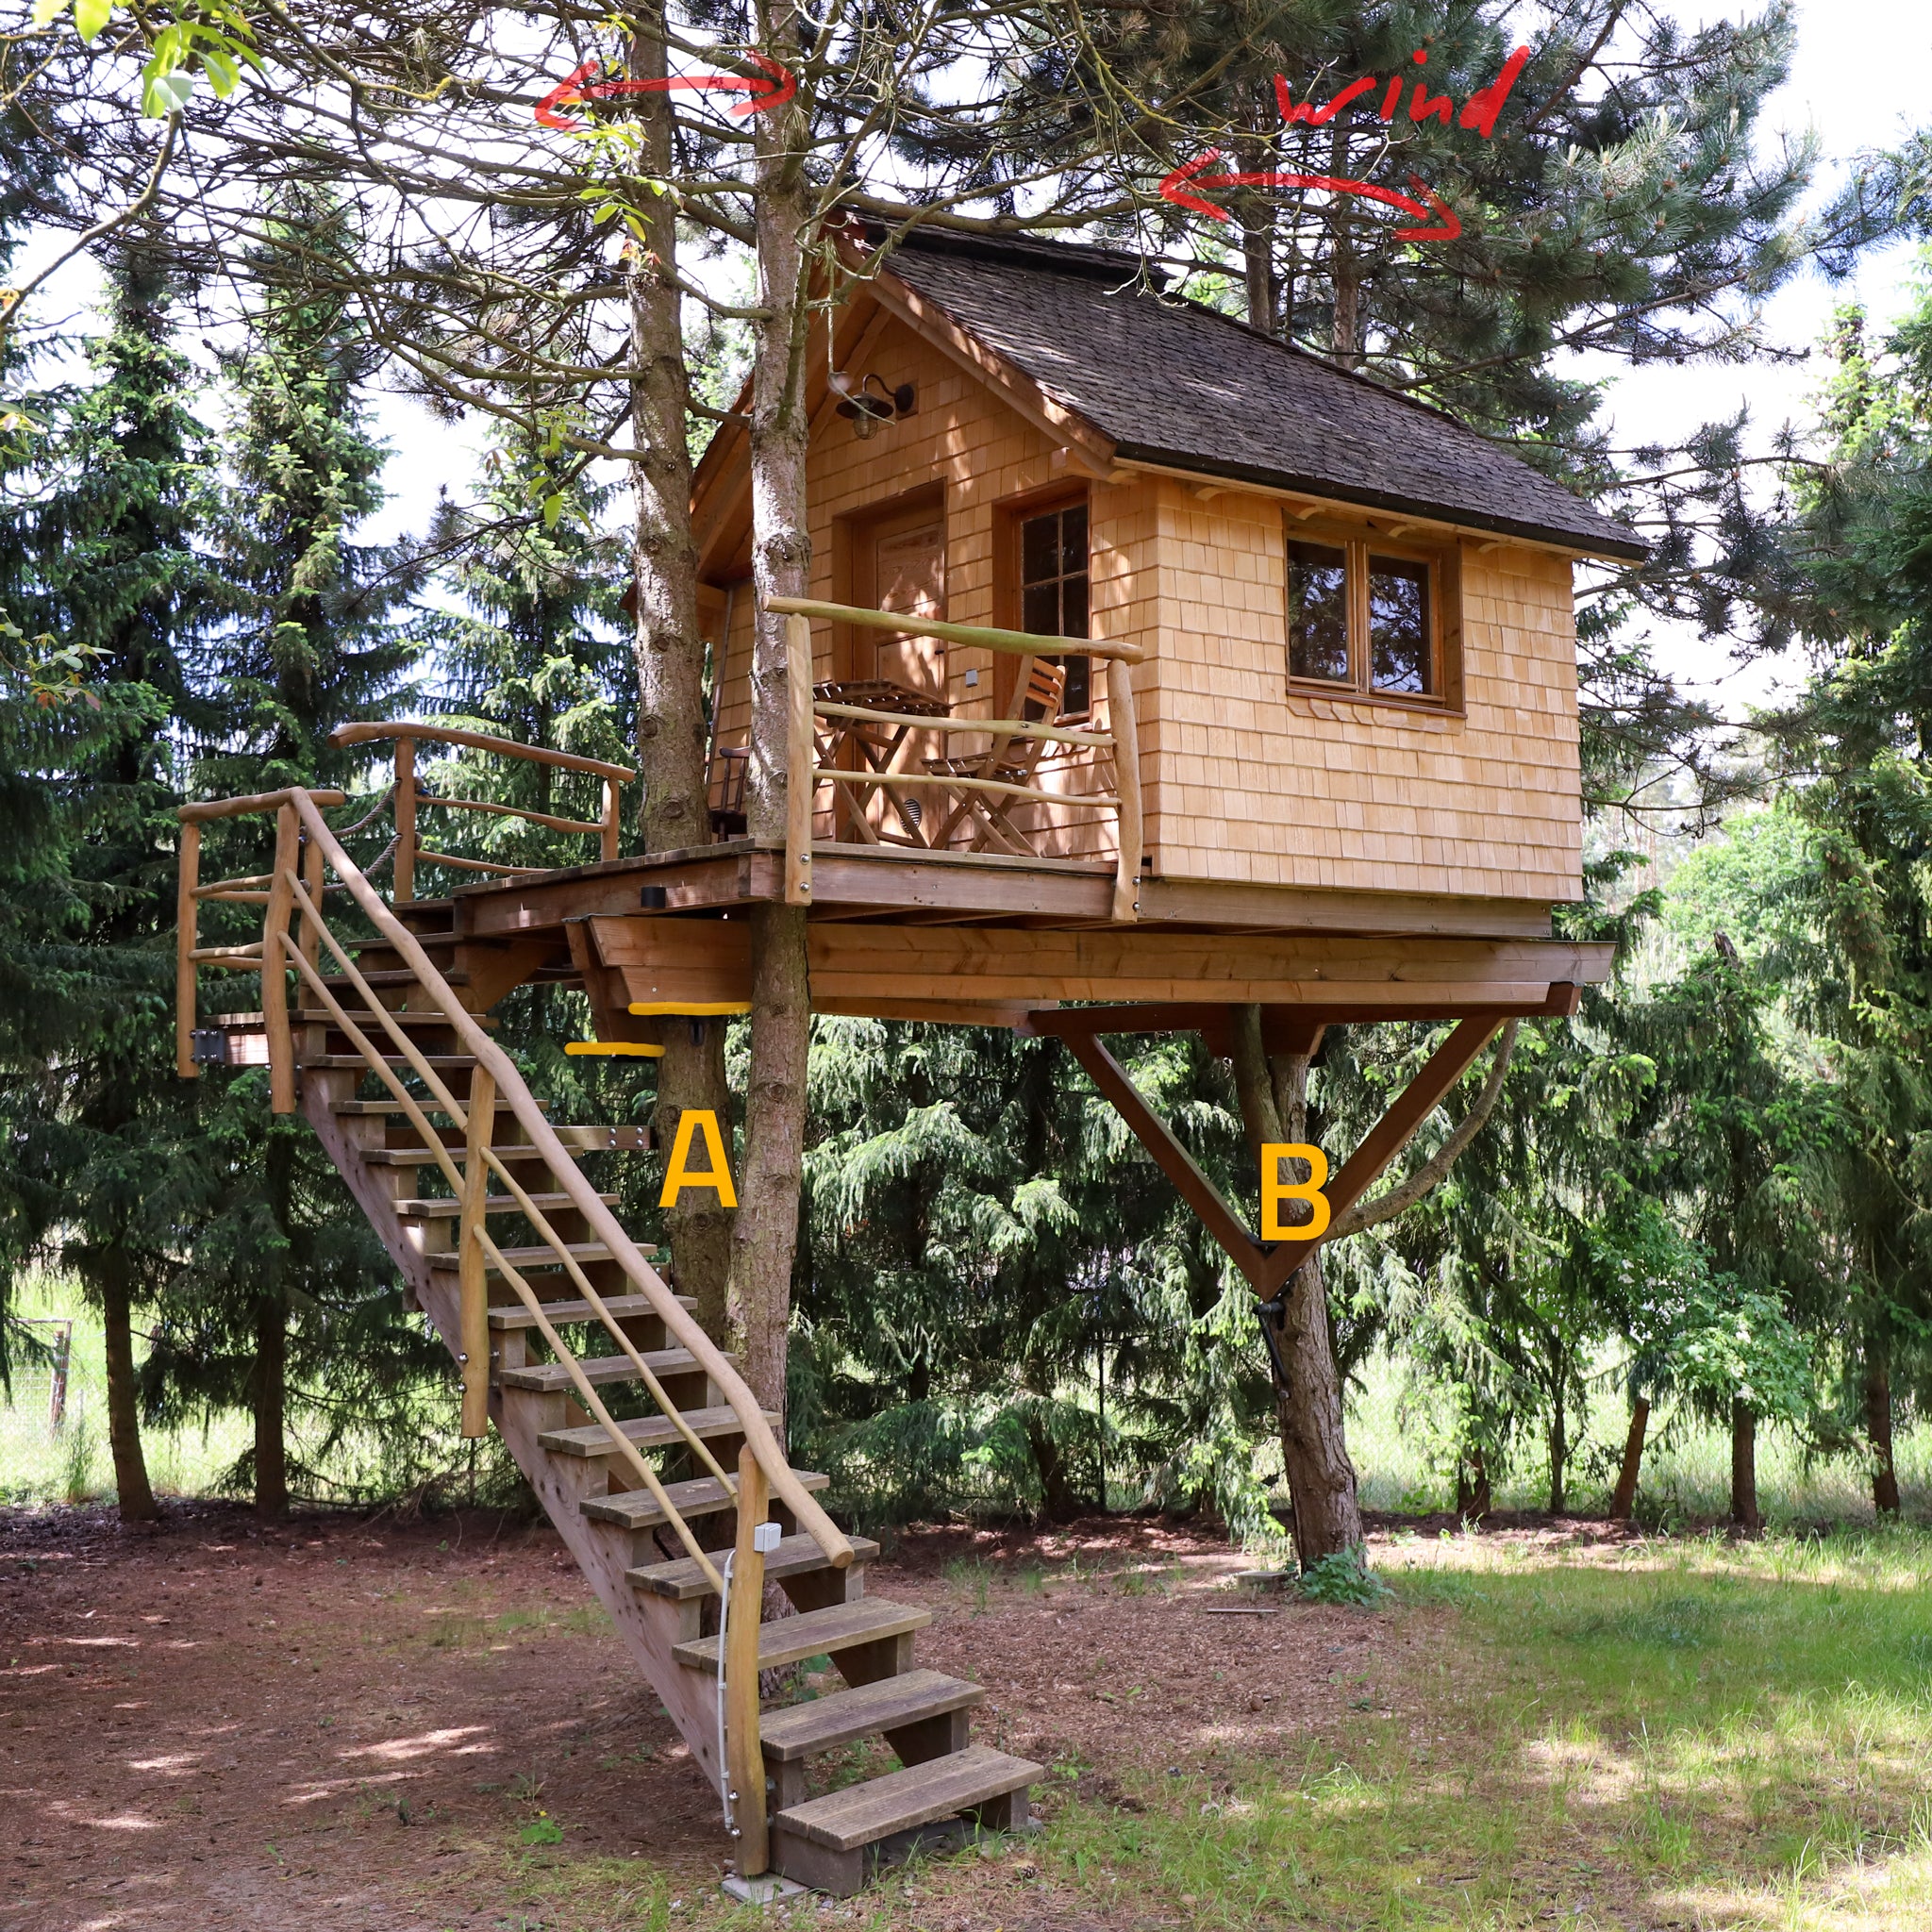
Thin trees – well done!
The trees in this example are very thin and therefore susceptible to wind vibrations (red arrows). A sturdy concrete staircase provides additional support for the construction.
✔ A: The two GTS Top units have been offset in height so that they do not collide with each other.
✔ B: The triangle fits nicely into the crooked tree and forms a stable platform for the large treehouse.
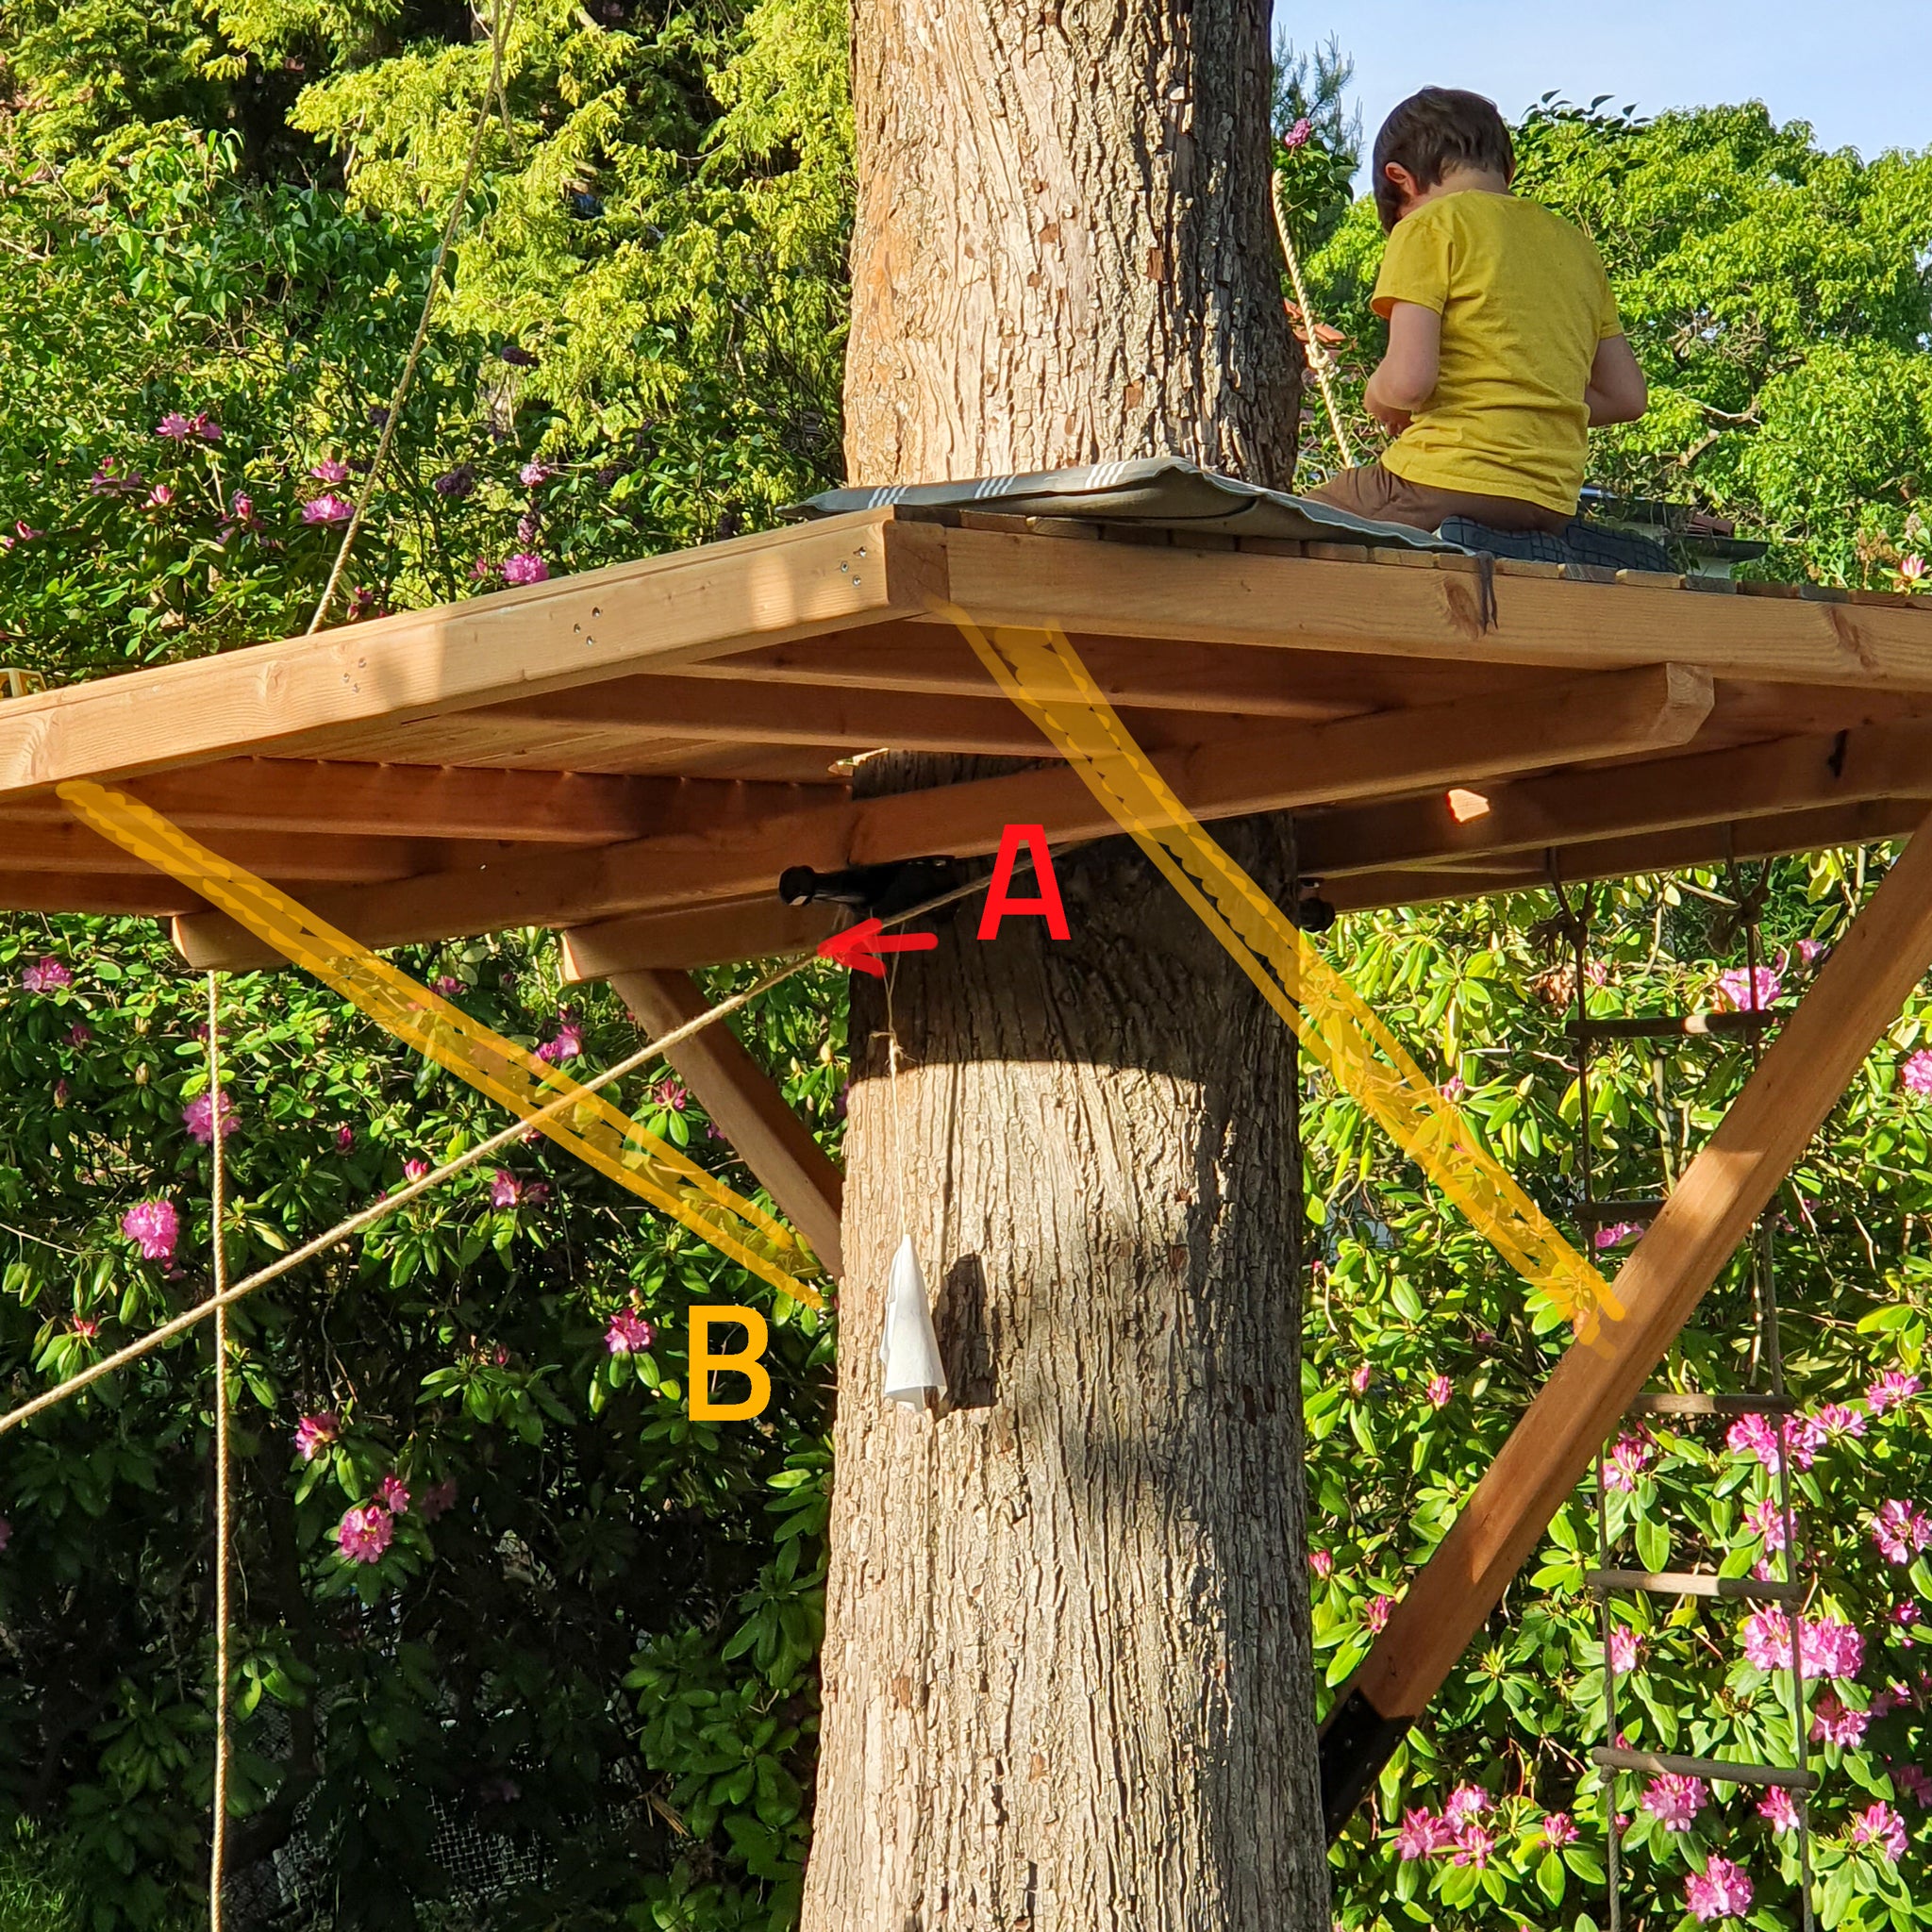
Nice but too wobbly
This romantic platform should only be used by children who do not move around much. Our customer could have done the following things better:
❌A: The beams are too close to the tree – with such a low weight, you can easily move them to the maximum distance so that the tree can grow undisturbed.
❌B: The corners of the platform are probably very wobbly – additional struts (yellow) should be added here.
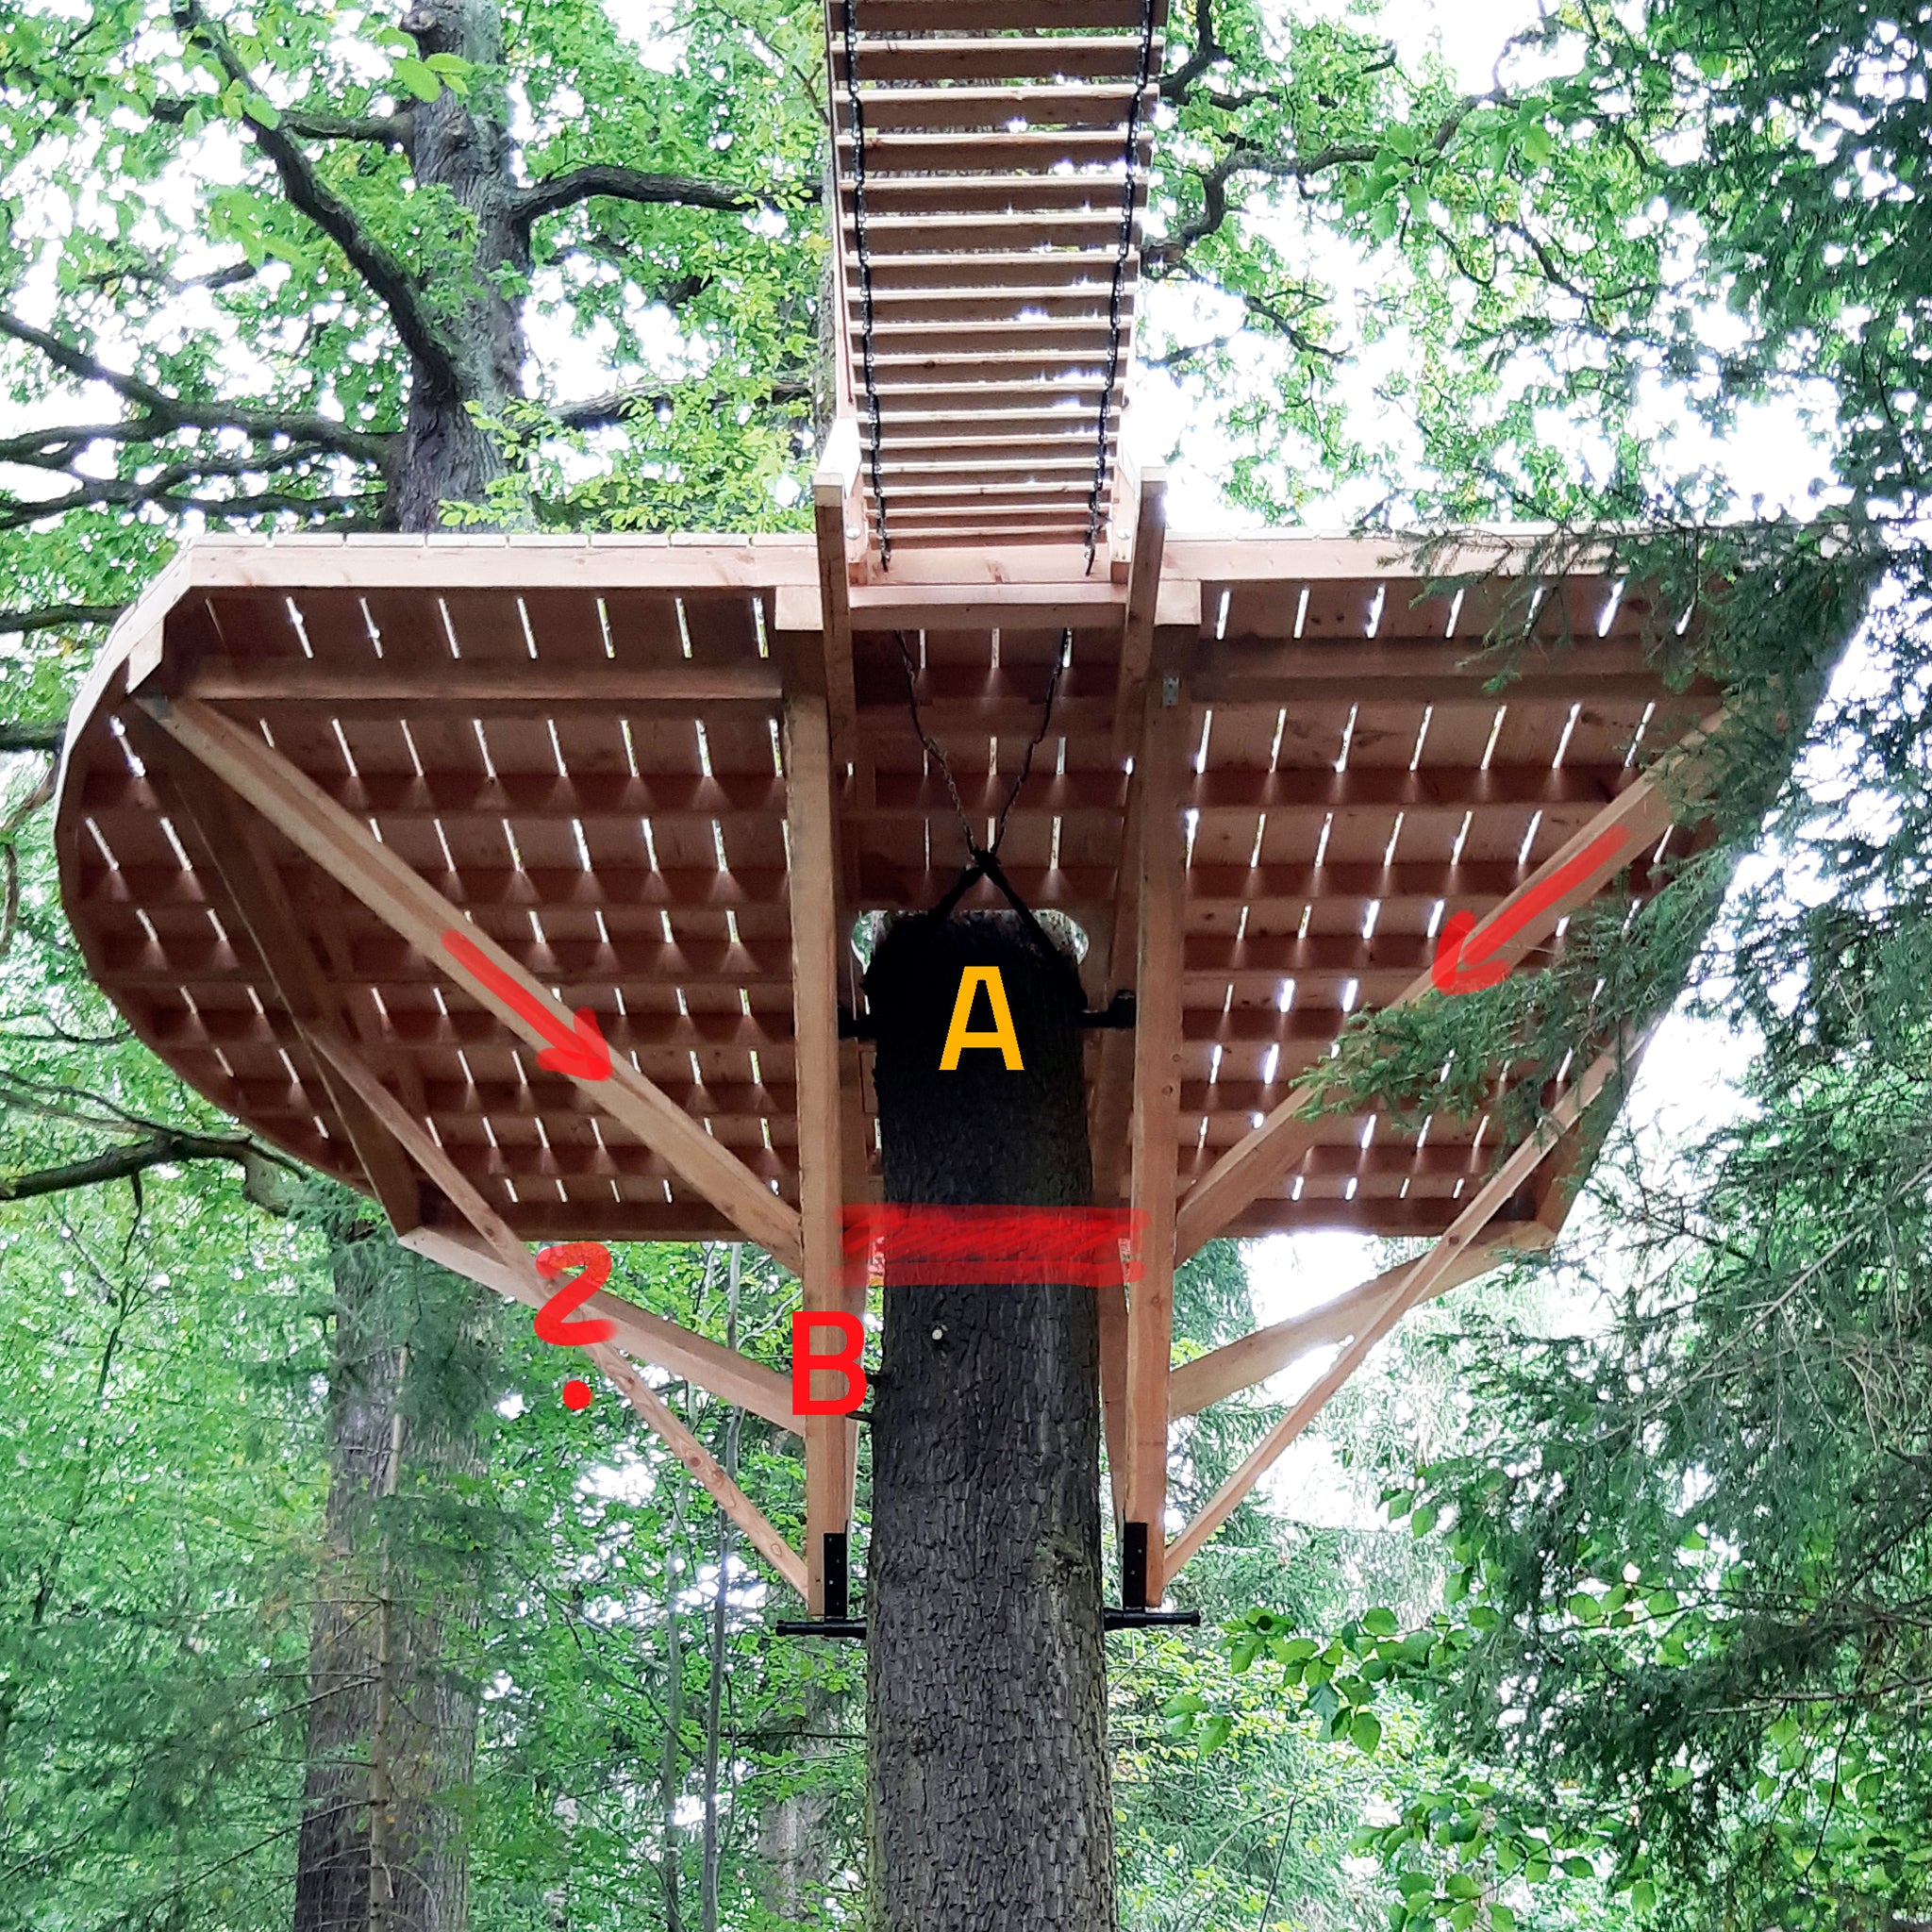
Large 3D platform with suspension bridge
This large platform stands securely and stably in the tree.
✔ A: The suspension bridge is attached directly to the tree with a tree support sling and is decoupled from the platform.
❌ B: The struts would be too thin and too long for a heavy treehouse (?) – additional struts would have to be inserted to reduce the buckling length.
❌ B: The corner struts press against the main struts (red arrows) and bend them – a simple crossbeam (red) solves this problem.
