
You are here: Home / Service / Installation Instructions /
Step-by-step installation instruction for “German Treehouse Screw GTS”
- Tool list for installation
- Installation of German Treehouse Screw
- Marking the drill hole
- Tools ready to hand
- Disinfect
- Pre-drilling
- PU glue
- Screw in tree screw
- Tips on tools
- Safety
- Possible problems during assembly
You are currently viewing a placeholder content from Default. To access the actual content, click the button below. Please note that doing so will share data with third-party providers.
More InformationNote:
In order to minimise the risk of infection and resin leakage of tree, the tree screws are screwed in immediately after pre-drilling. Good preparation is therefore very important. It is best to work at least in pairs!
As this is the static connection of our treehouse, work must be precise and focused, so keep in head:
3 x measuring – 2 x checking – 1 x drilling!

Tool List for Installation
GTS Hardware:
- Treehouse Screw & Nut
- Lubricant for nut threads
- Screw Accessories (Supports, Distance Rings & Extensions)
Pre-Drilling:
- Auger drill ø 36 mm (GTS Allstar, Top, Friend, Free, Side)
- Auger Drill ø 24 mm (GTS Safety, Struts)
- Forstner drill ø 74 mm + Guide Pin (GTS Allstar)
- Powerful drill with handle & reverse gear (>70 Nm torque, 22 V 5.2 Ah battery)
- Disinfection spray, alcohol or fire for cleaning tools
Montage:
- Long reversible ratchet (lever > 70 cm) + nut 46 mm
- PU-Glue (optional)
- Folding rule or tape measure (for depth of borehole)
- Small torpedo level (10 – 15 cm) and long spirit level
- Compass or compass-app to align multiple screws.
- Ladder, scaffolding, climbing and protective equipment
- Long wood screw to mark position
- Notepads, pens, calculators
Installation of our German Treehouse Screws
1. Mark Position
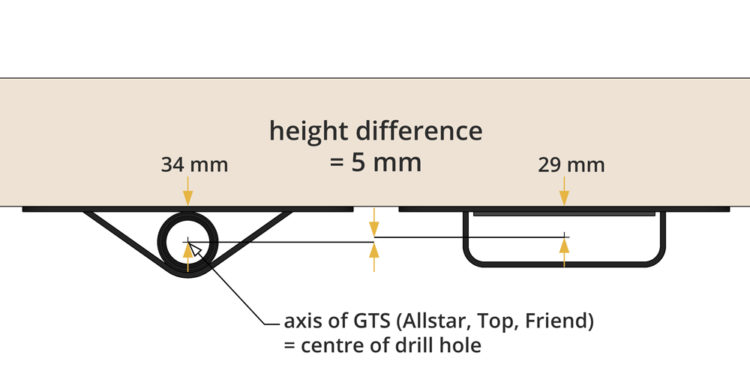
Mark the correct position and alignment of the Treehouse Screw (e.g. with a long wood screw). Note the additional height of the support and the exact correspondence with the other support points.
Tip when mounting multiple screws:
1. Same height: use a “hose level”.
2. Right orientation (90° towards main beam from platform): Stretch a string that simulates your platform beam. Attach it slightly above your screw hole.
3. Same orientation / screw axis as “partner screw”: use a compass or an app.
2. Everything well prepared!
Keep all parts required for installation handy: drills, screw, support, Distanze Rings, 46mm nut, Ratchet, PU glue, Fully loaded batteries, …. The faster the installation is done, the better for the tree and the easier it is to screw in the screw, because no resin/juice has flowed into the hole.
3. Disinfection
Disinfect the drills and the screw with alcohol or flame before use to minimize the risk of fungal attack. Clean the tool before each use, especially when working in several different trees.

4. Pre-Drilling
All tree screws must be pre-drilled. The drill hole must be exactly horizontal*; use a small spirit level (10 – 15 cm) that you place directly on the Auger-Bit. Alternatively, you can attach a spirit level to your drill, this must be exactly aligned with the auger (auger horizontal – spirit level on drill horizontal) – do not trust any edges on your machine!
*Exception: GTS Safety + rope suspension – here, drill perpendicular to the course of the rope!
Final dimensions of drill hole GTS:
- The depth is measured from the cambium (thin, slippery layer between bark and wood).
- The hole (see measurements in the table) should be approx. 1 cm deeper than the thread of the screw.
- Check the measurements again with a metre rule.
- Clean the hole (e.g. with a long wood screw).
Specialty of GTS Allstar:
- Pre-drilling in two steps
- The cylinder must be tight against the back of the drill hole.
- Often the depth of the cylinder hole varies (uneven bark or curvatures).
- Note the exact depth at one point of the cylinder borehole – so you know exactly when you have reached the depth when screwing in (1 cm marking on GTS Allstar cylinder).
Specialty of the GTS Top:
- The plate of the GTS Top points downwards
- The soft bark under the plate must be removed, use a cutter knife or chisel for this purpose
- The plate must lie flat on solid wood!
Specialty of GTS Safety:
- The GTS Safety is not pre-drilled and screwed in horizontally, but perpendicular (90°) to the course of the rope. This allows the screw to take more load and has a higher pull-out resistance.
Important note on drilling:
- Always work in pairs so that one of you can check the correct alignment of the drill.
- Use an additional handle on the drill (otherwise risk of wrist injury – especially with GTS Allstar + Forstner-Bit!)
- Make sure you have a firm footing – secure the ladder, use a climbing harness, helmet and safety device!
- Drill at low speed (1st or 2nd gear) – the machine has more power here!
IMPORTANT – If the drill does not penetrate further:
- Do not continue drilling, otherwise the thread tip will fray.
- Briefly reverse until the thread tip is loose.
- Then turn forward gear and pull drill out of hole.
- Remove wood chips from the drill and from the hole (blow, with wood screw, …).
- Then continue drilling. Repeat until drilling depth is reached.
- Whenever wood chips block the drill (friction), first clean the drill and hole and then continue drilling.
- Never pre-drill with another drill bit, otherwise the threaded tip of the Auger-Bit will no longer grip. This ensures that the drill bit is pulled into the wood!
- In very moist, soft wood (e.g. outer sapwood layer in spruce), the Forstner-Bit may not want to penetrate further. Then clean the hole and fray the wood layer a little with a chisel/stem iron so that the Forstner-Bit can grip again. As soon as the drill hits somewhat drier wood (after approx. 3-4 cm), you can continue drilling normally.
Tips on tools:
You are most likely to find large special tools at farmers, truck drivers or car workshops that specialise in agricultural vehicles.
If you don’t have a reversible ratchet, you can also screw in the screw with an extended pipe wrench if necessary. The pipe wrench must be super sturdy and at least 50 cm long. Working with a pipe wrench is very tedious.
Use the pipe wrench only on the nut and not on the shaft of the GTS, as the resulting grooves and edges on the shaft can block the accessories!
The screwing in of the screw only works manually, even strong hydraulic percussion drills do not bring up the power and overheat – we have tried a lot;)
Safety:
- Make sure you have a secure footing
- You can slip off at any time (when drilling and screwing in the screw!)
- Drill only with handle extension (caution wrist twisting / injury)
- Secure your ladder from tipping over and attach it to the tree.
- Secure yourself with a climbing harness and rope
- Secure all objects from falling down (small cords and carabiners)
- Ground staff always work with helmets
Possible problems during assembly:
- Unusually soft or discoloured wood -> Caution, danger of rot! If the wood / wood chips at the borehole are unusually soft, crumbly or strongly discoloured, this is an indicator of rot. Do not use a tree screw as a support there – the tree should be thoroughly examined before continuing construction!
- Inserting the screw is very tough (with hard wood) -> Extend the handle of the ratchet or pipe wrench with a sturdy steel pipe, so you have a larger lever arm and more torque. Get reinforcements. Eat a can of sauerkraut and spinach!
- Bolt is spinning (soft softwood or hole is worn out) -> Do not overtighten and check if the tree house bolt is screwed in far enough to take the load. If there is any doubt, there is the possibility to strengthen the screw with accessories “Cable Suspension” or “Strut GTS +”. If necessary, a new bolt must be fitted.
- When trying to loosen the nut, the screw turns out -> oil the nut, hit the Nut hard with a hammer and open it with a jerk. If this is still not possible: Hold the screw shaft with a pipe wrench and loosen the nut.
- Black KTL coating comes off -> not too bad, statically harmless, can be visually touched up with black spray paint.
- Screw not horizontal – pre-drilled crooked -> Ohoh, not good, maybe you can adjust your wooden beam accordingly. Possibly have special supports welded. Otherwise set a new screw if the tree can cope with it. Drink less beer next time.
- Hole drilled too deep or too high -> Possibly adjust your wooden beam or weld a spiral construction.
- Hole drilled in completely the wrong place, open damaged area -> Screw in the tree house screw anyway, close the wound and possibly flex the shaft.