


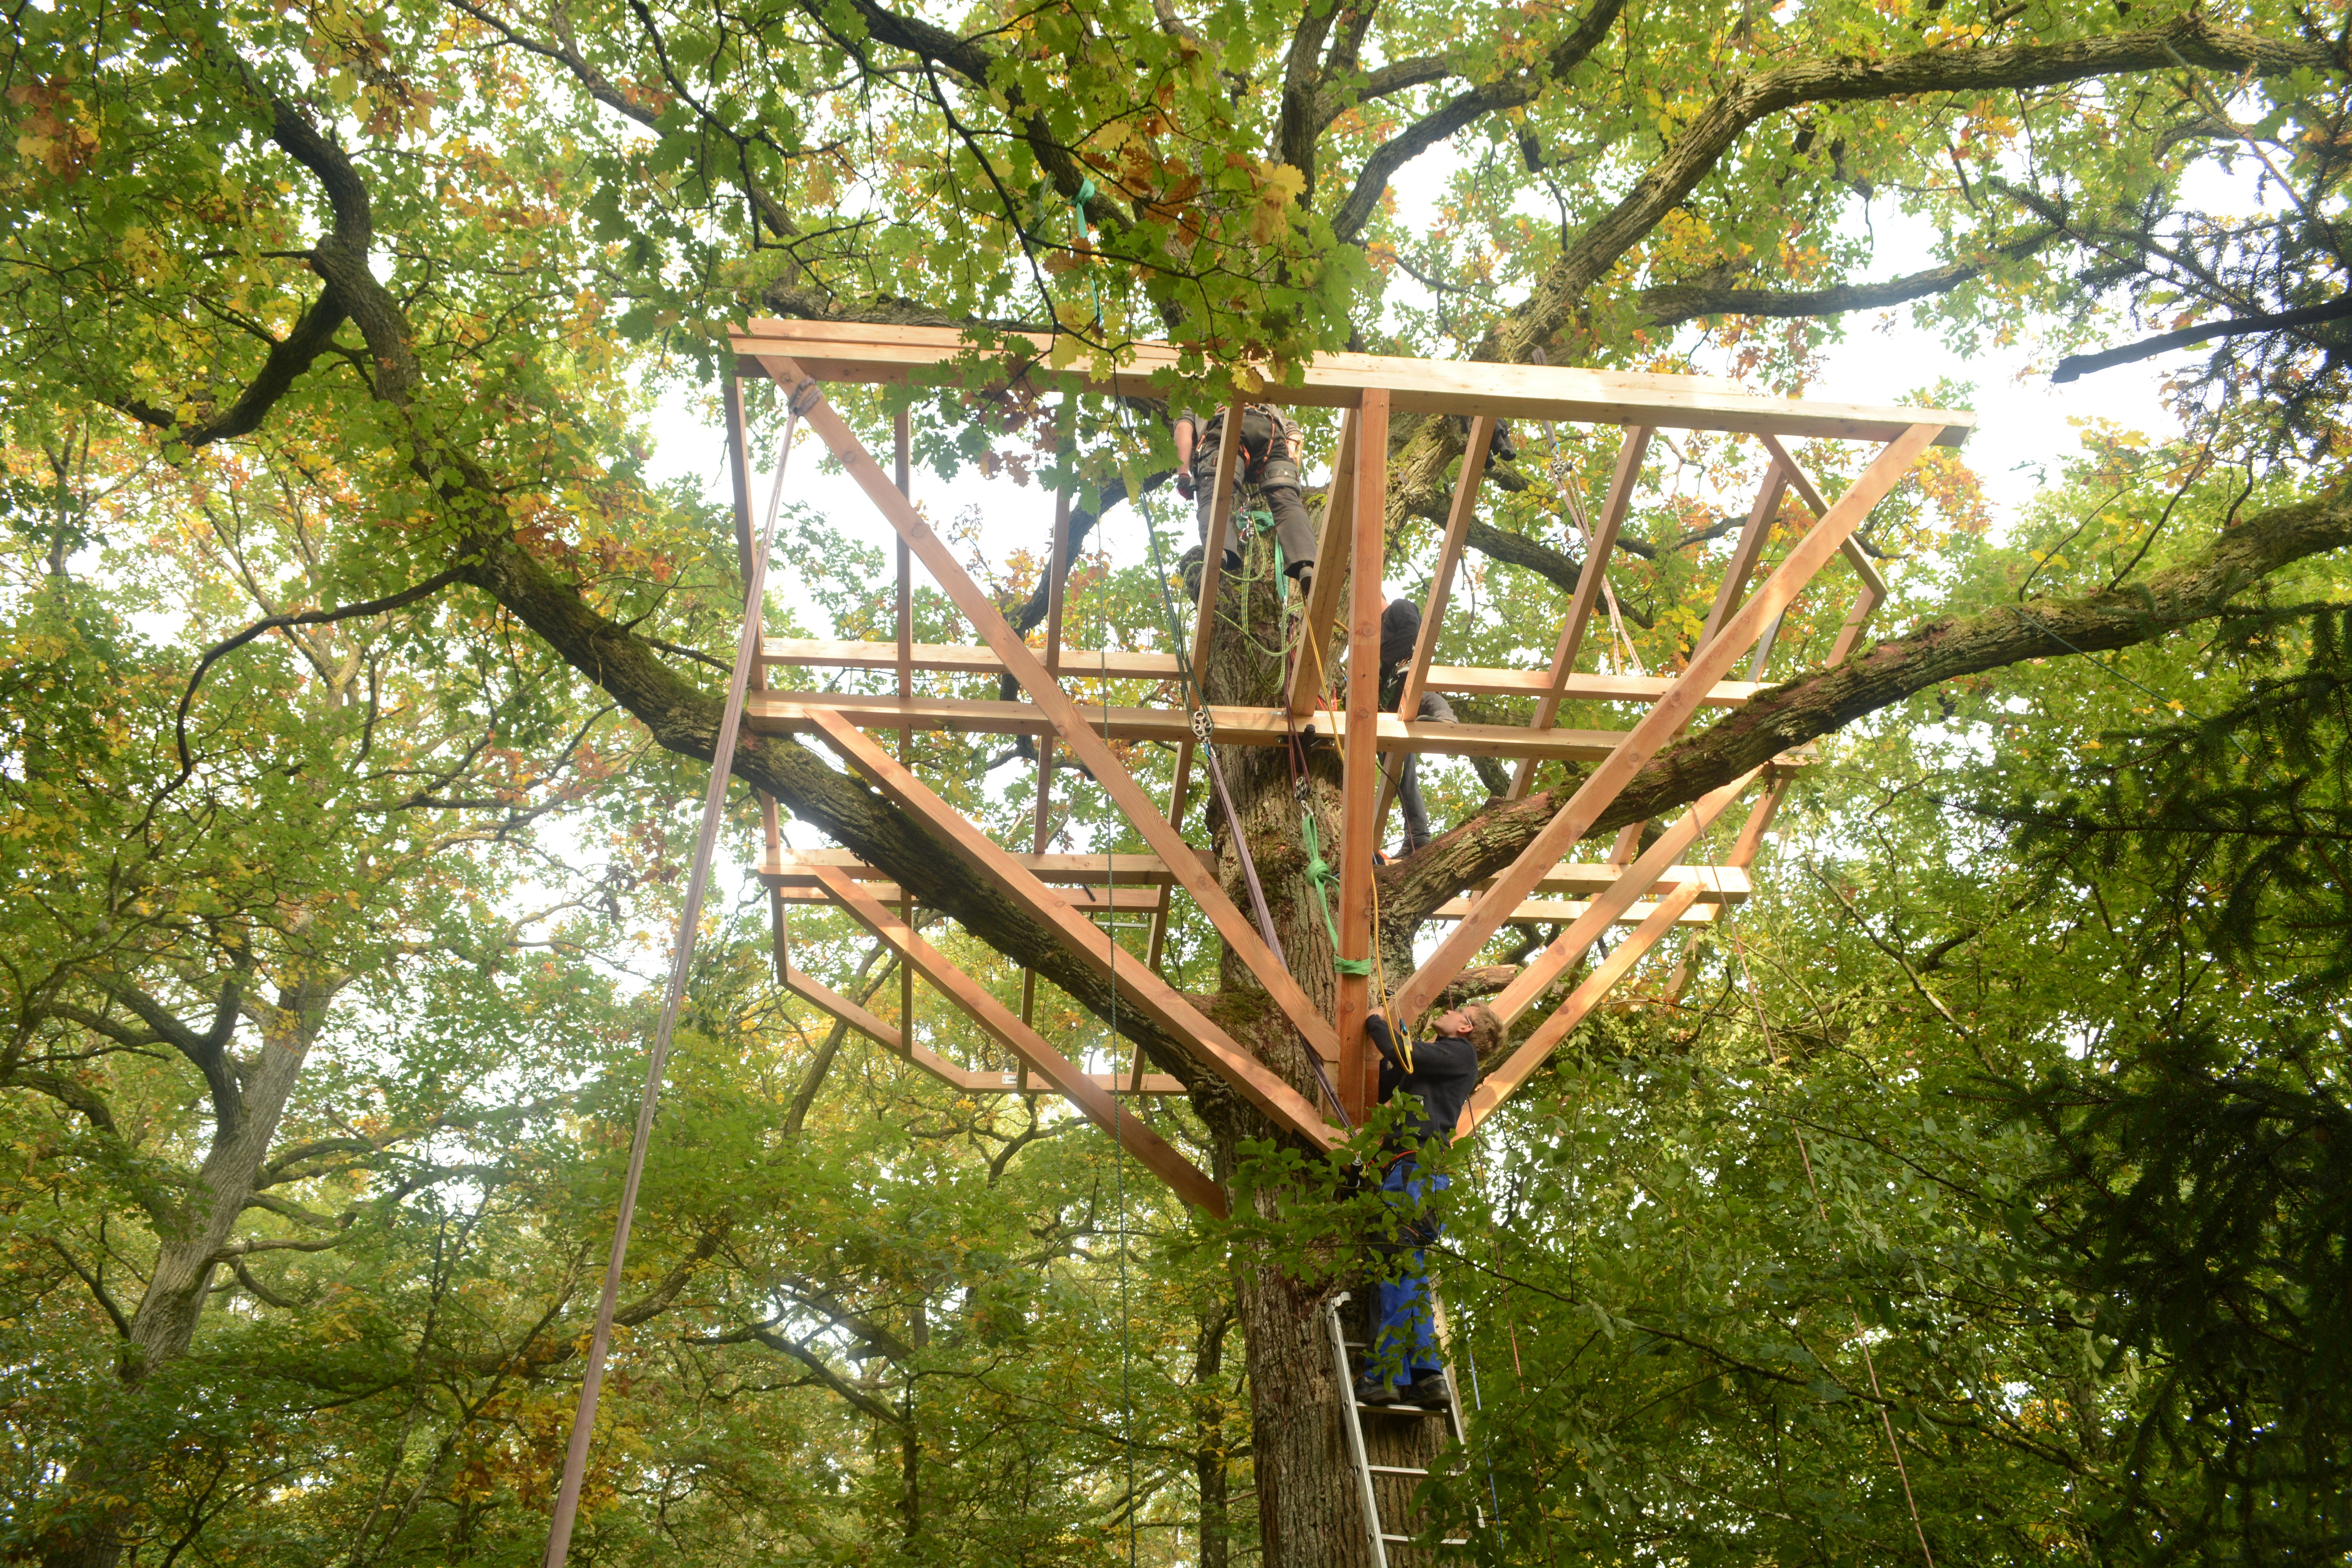
Step 9: Build Support Structures for Treehouse Platforms
How the real Treehouse Pros build:
✔ Learn how to combine our GTS products correctly
✔ Use them to attach a stable support structure directly to the tree
✔ For trees with a trunk diameter of 30 cm (11.8 in) or more
✔ Includes instructions and assembly tips from the Treehouse Pro
Examples, plans & instructions
The colourful plans show you how to correctly combine our GTS components. Click on the yellow circles to learn the most important terms.
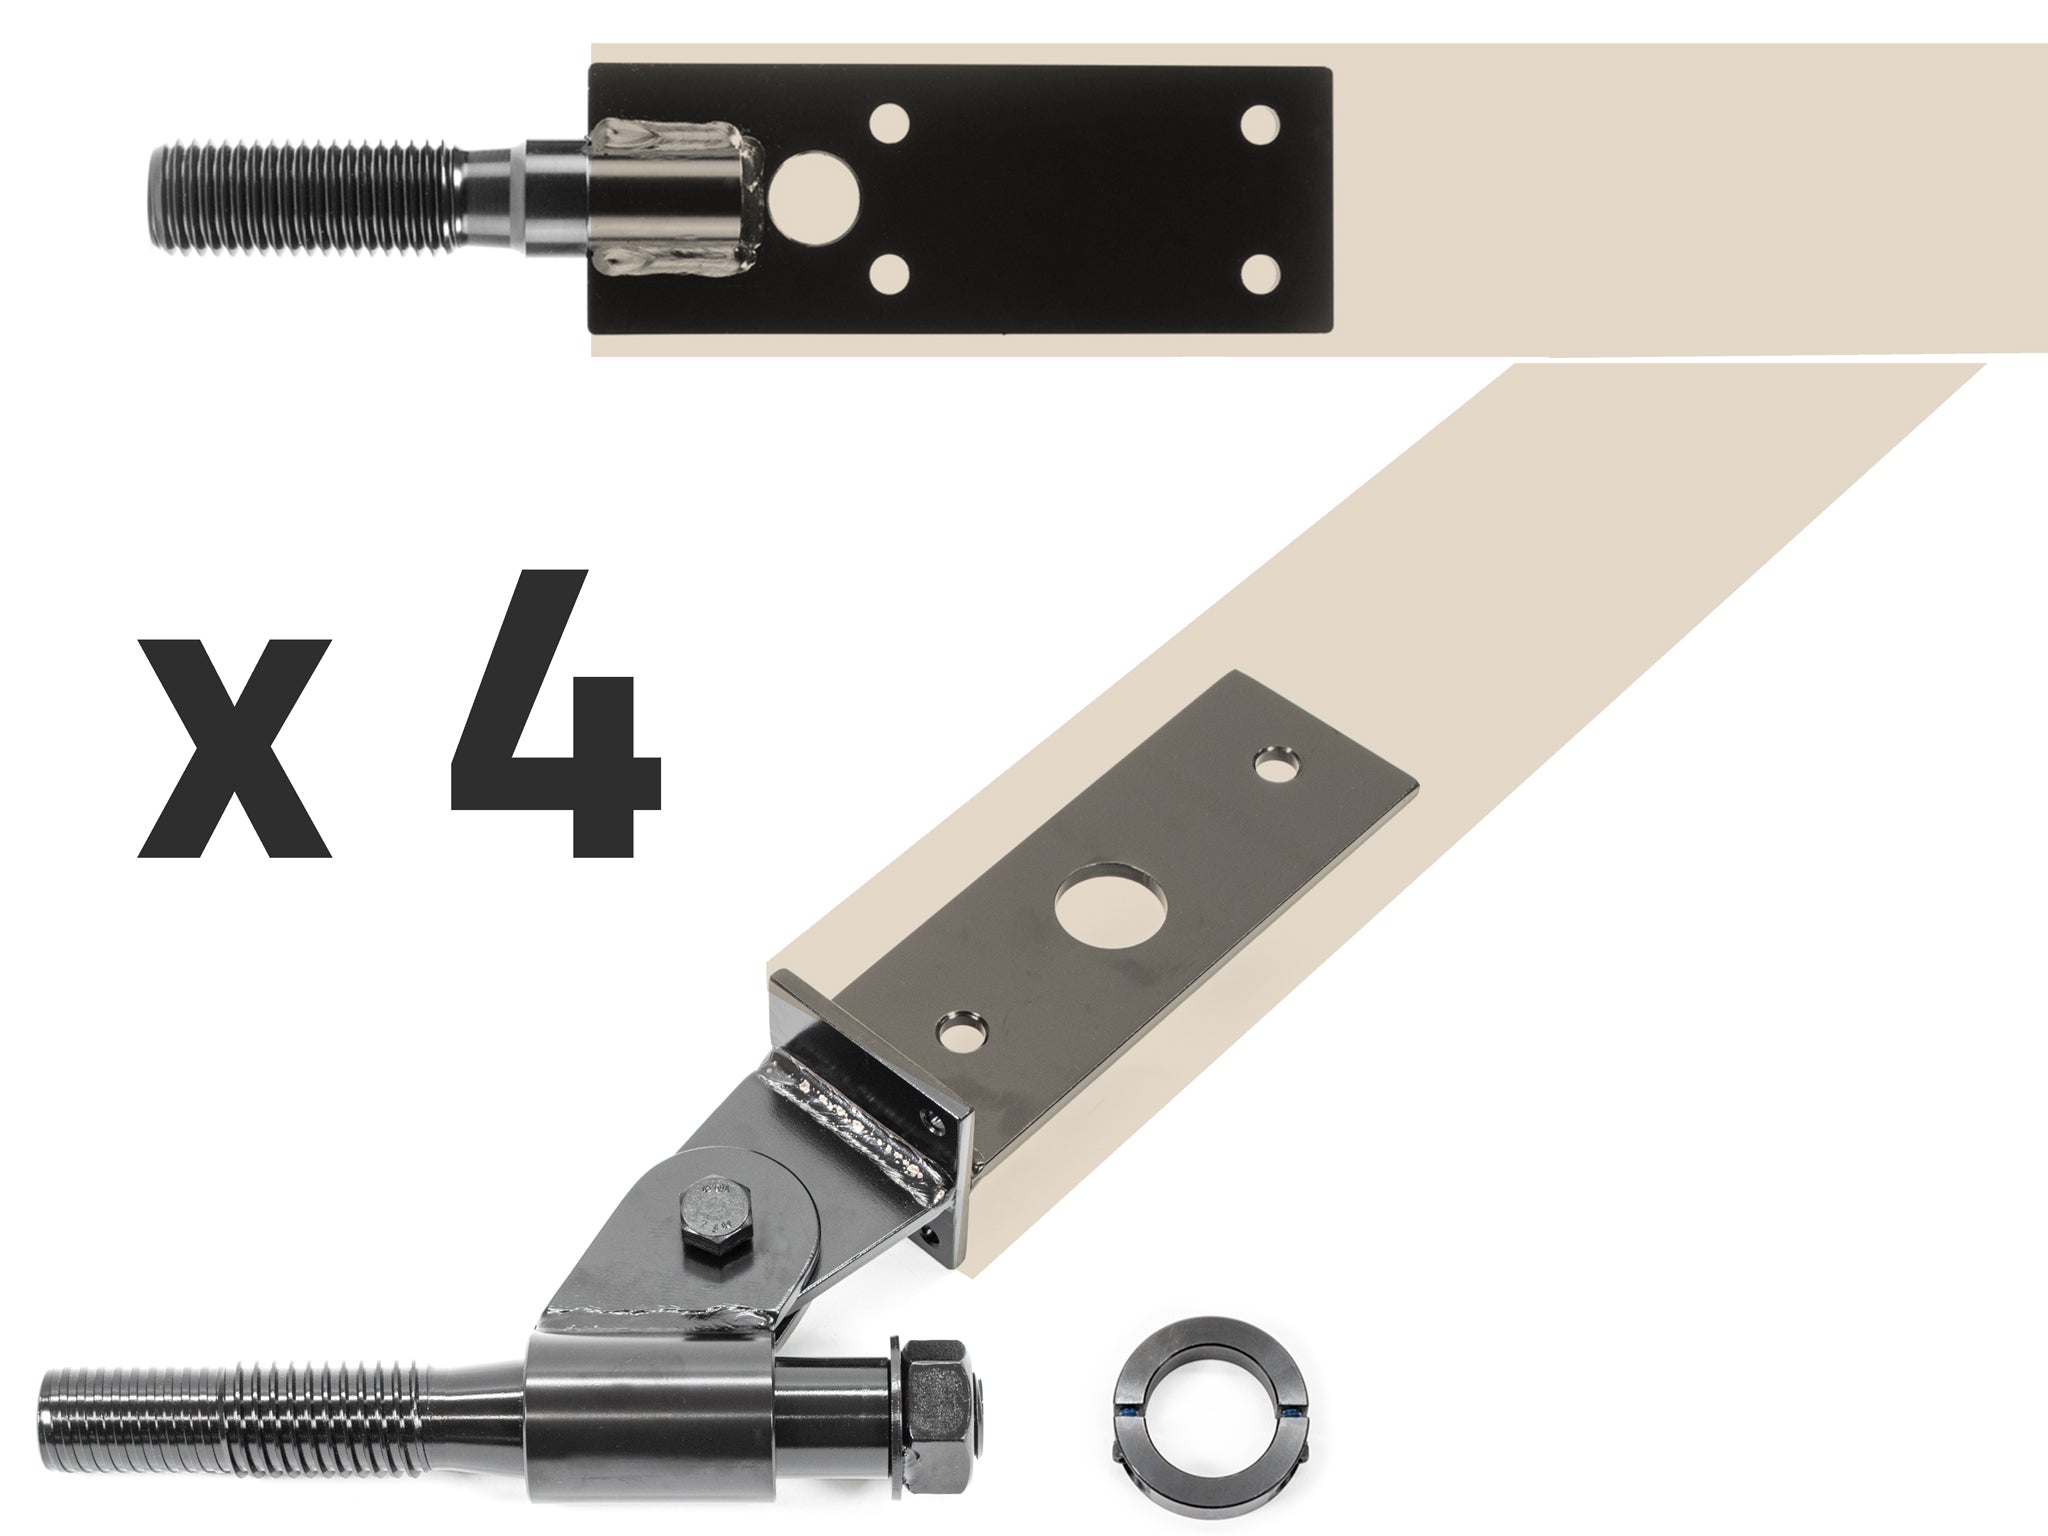
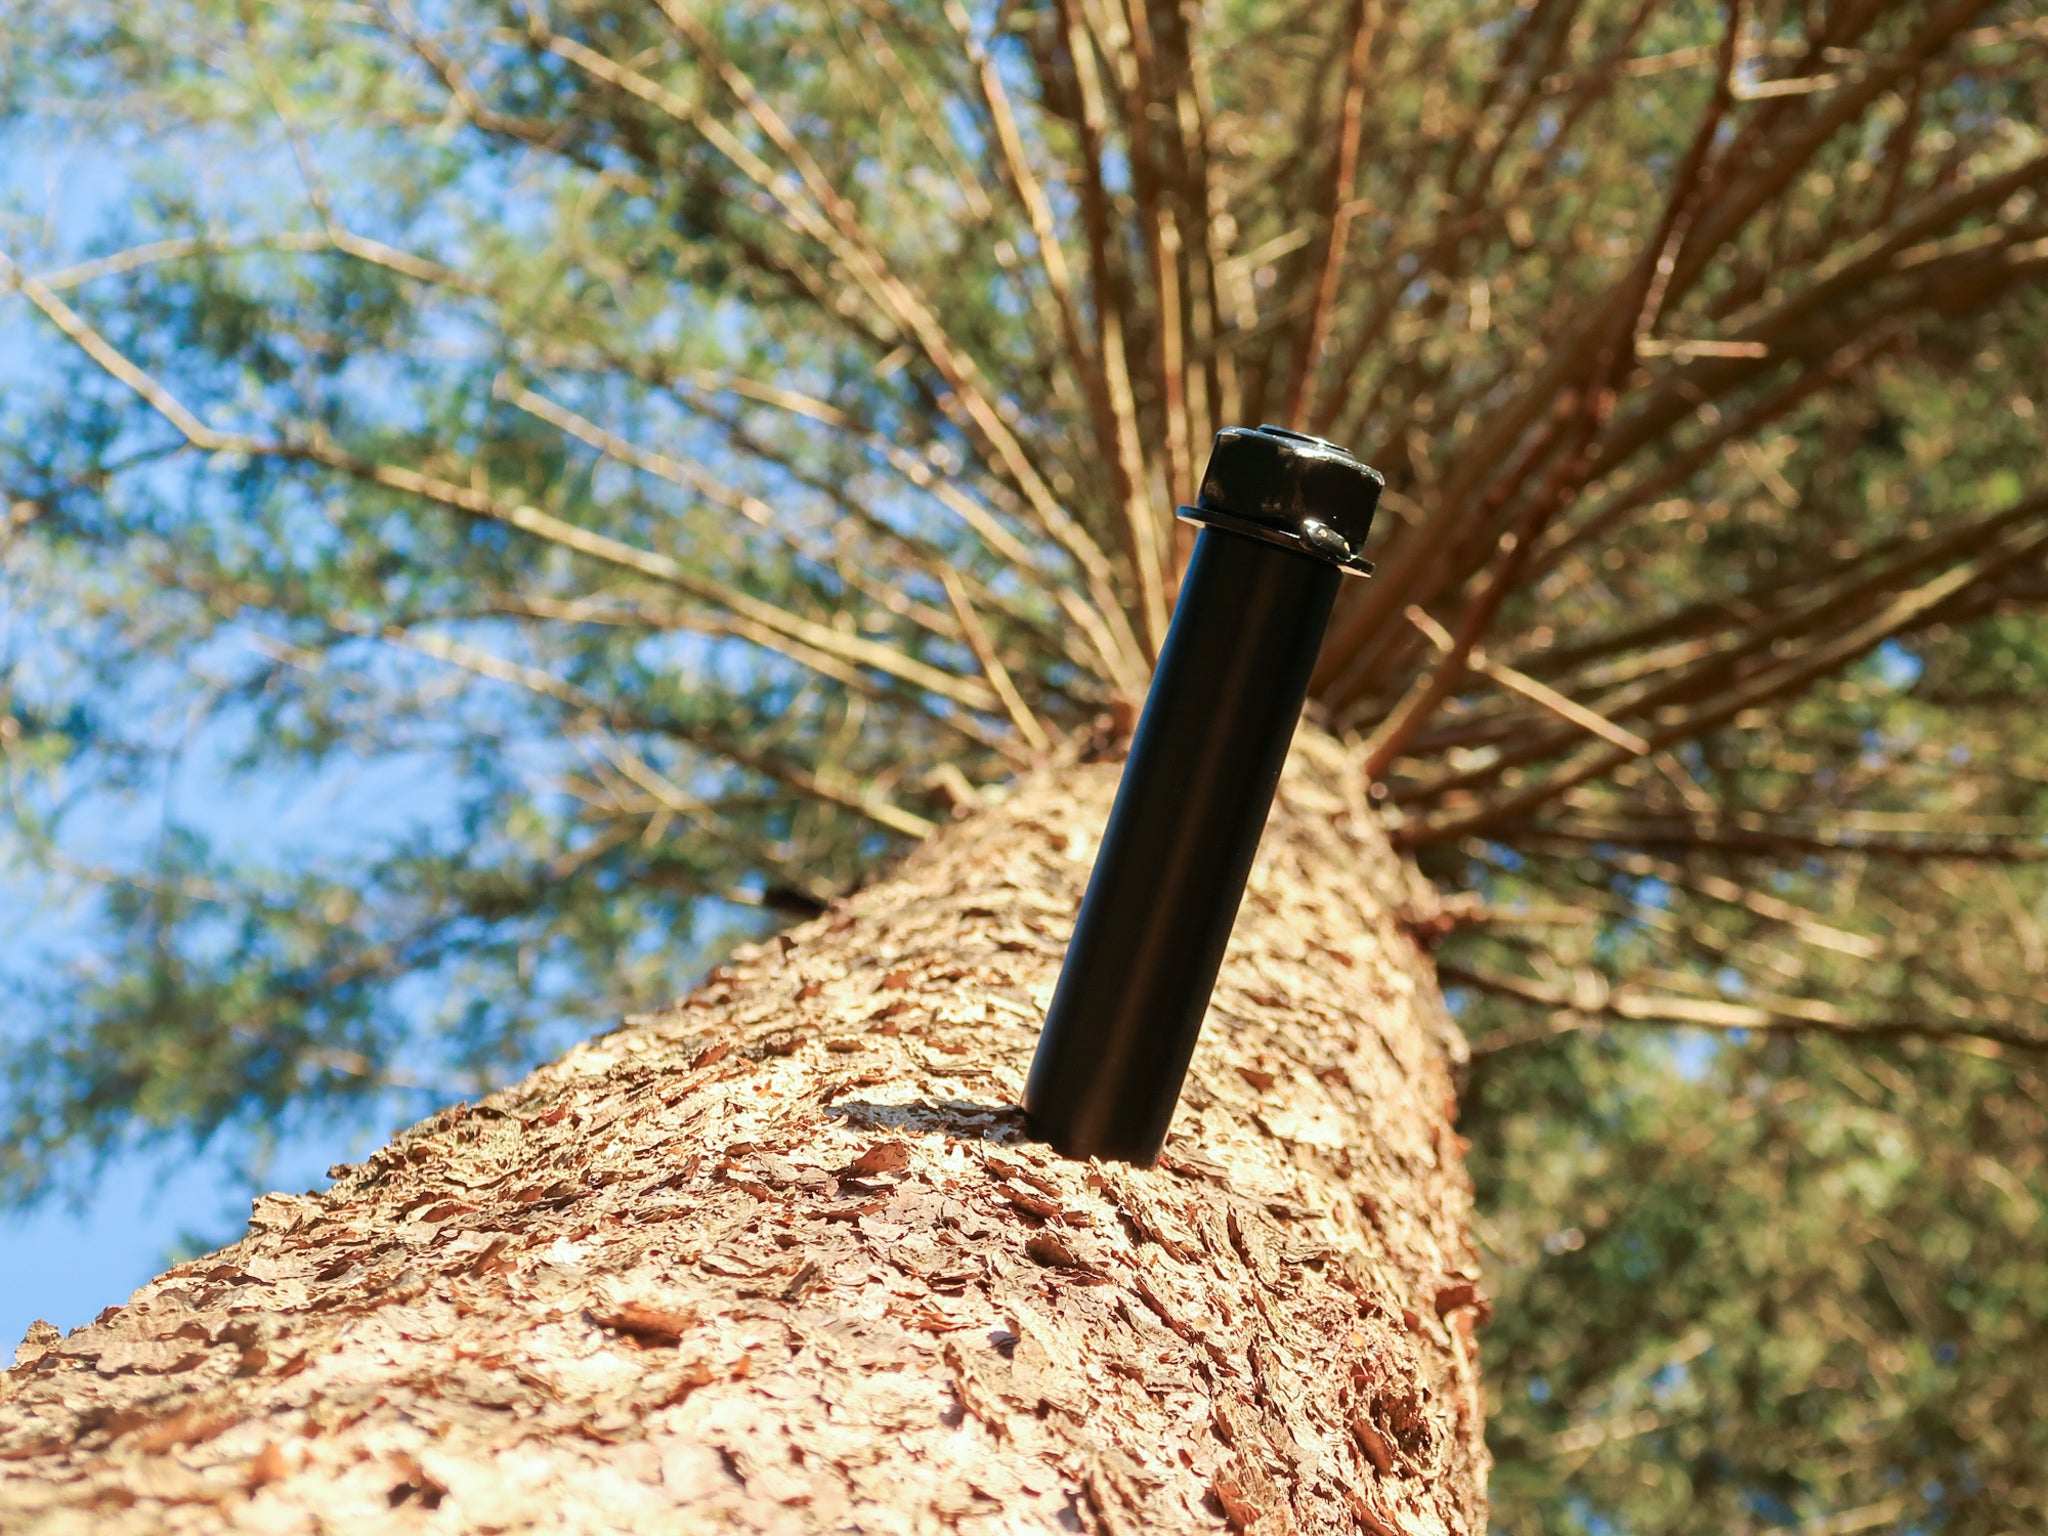
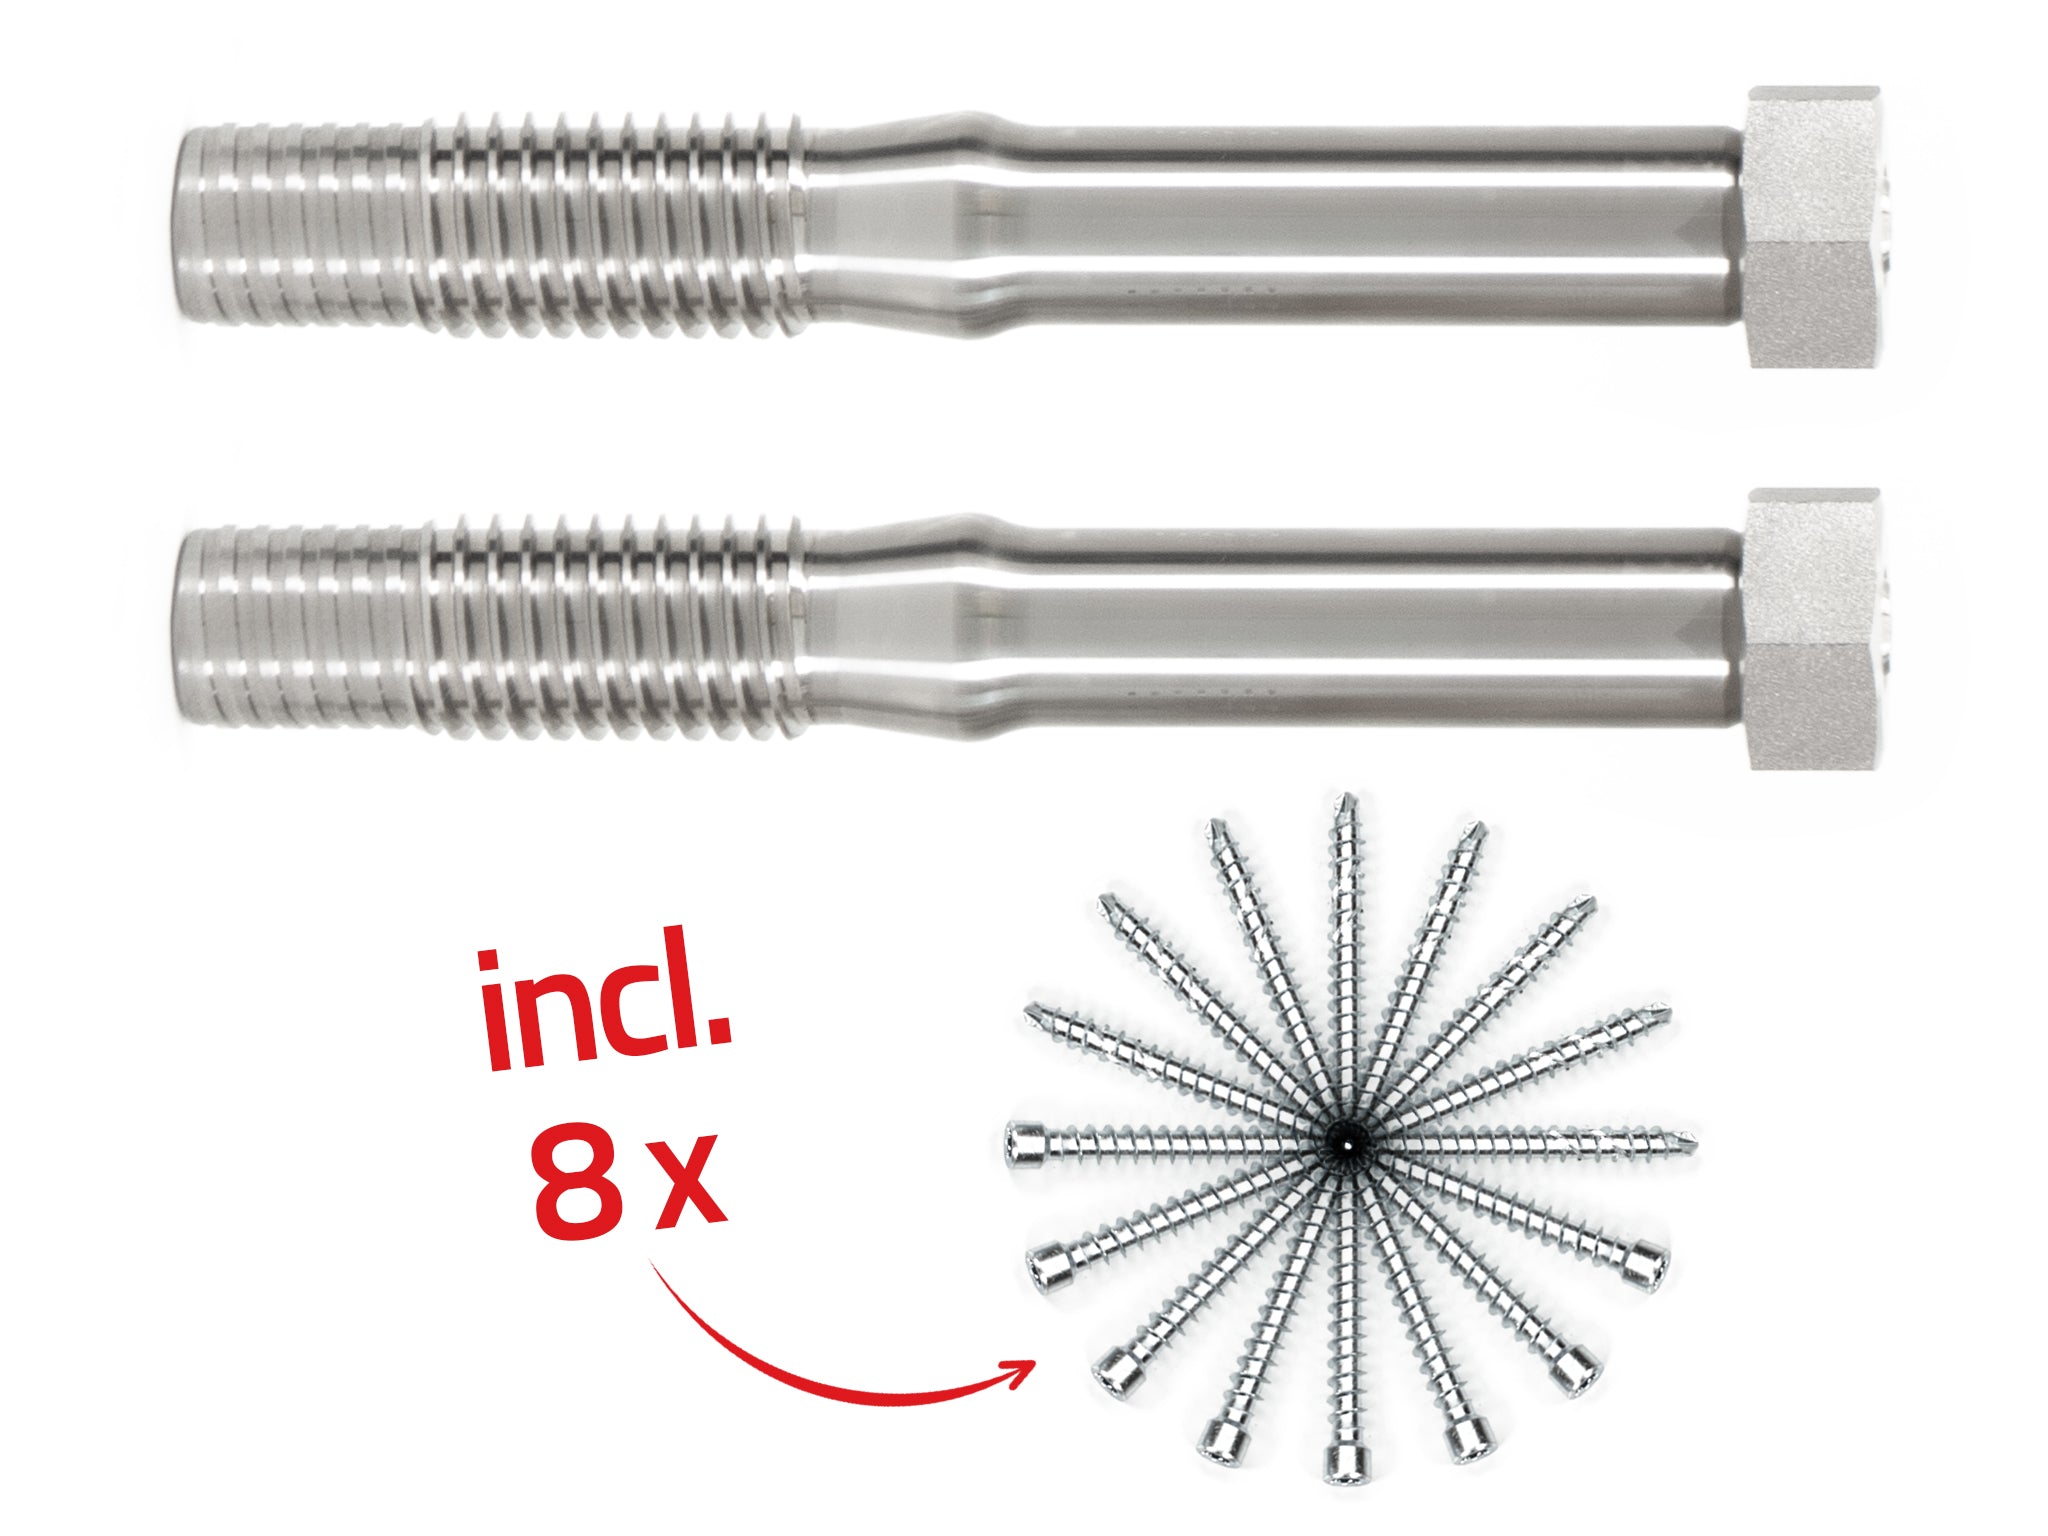
GTS hardware (black)
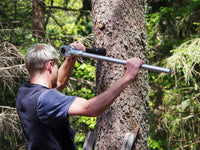
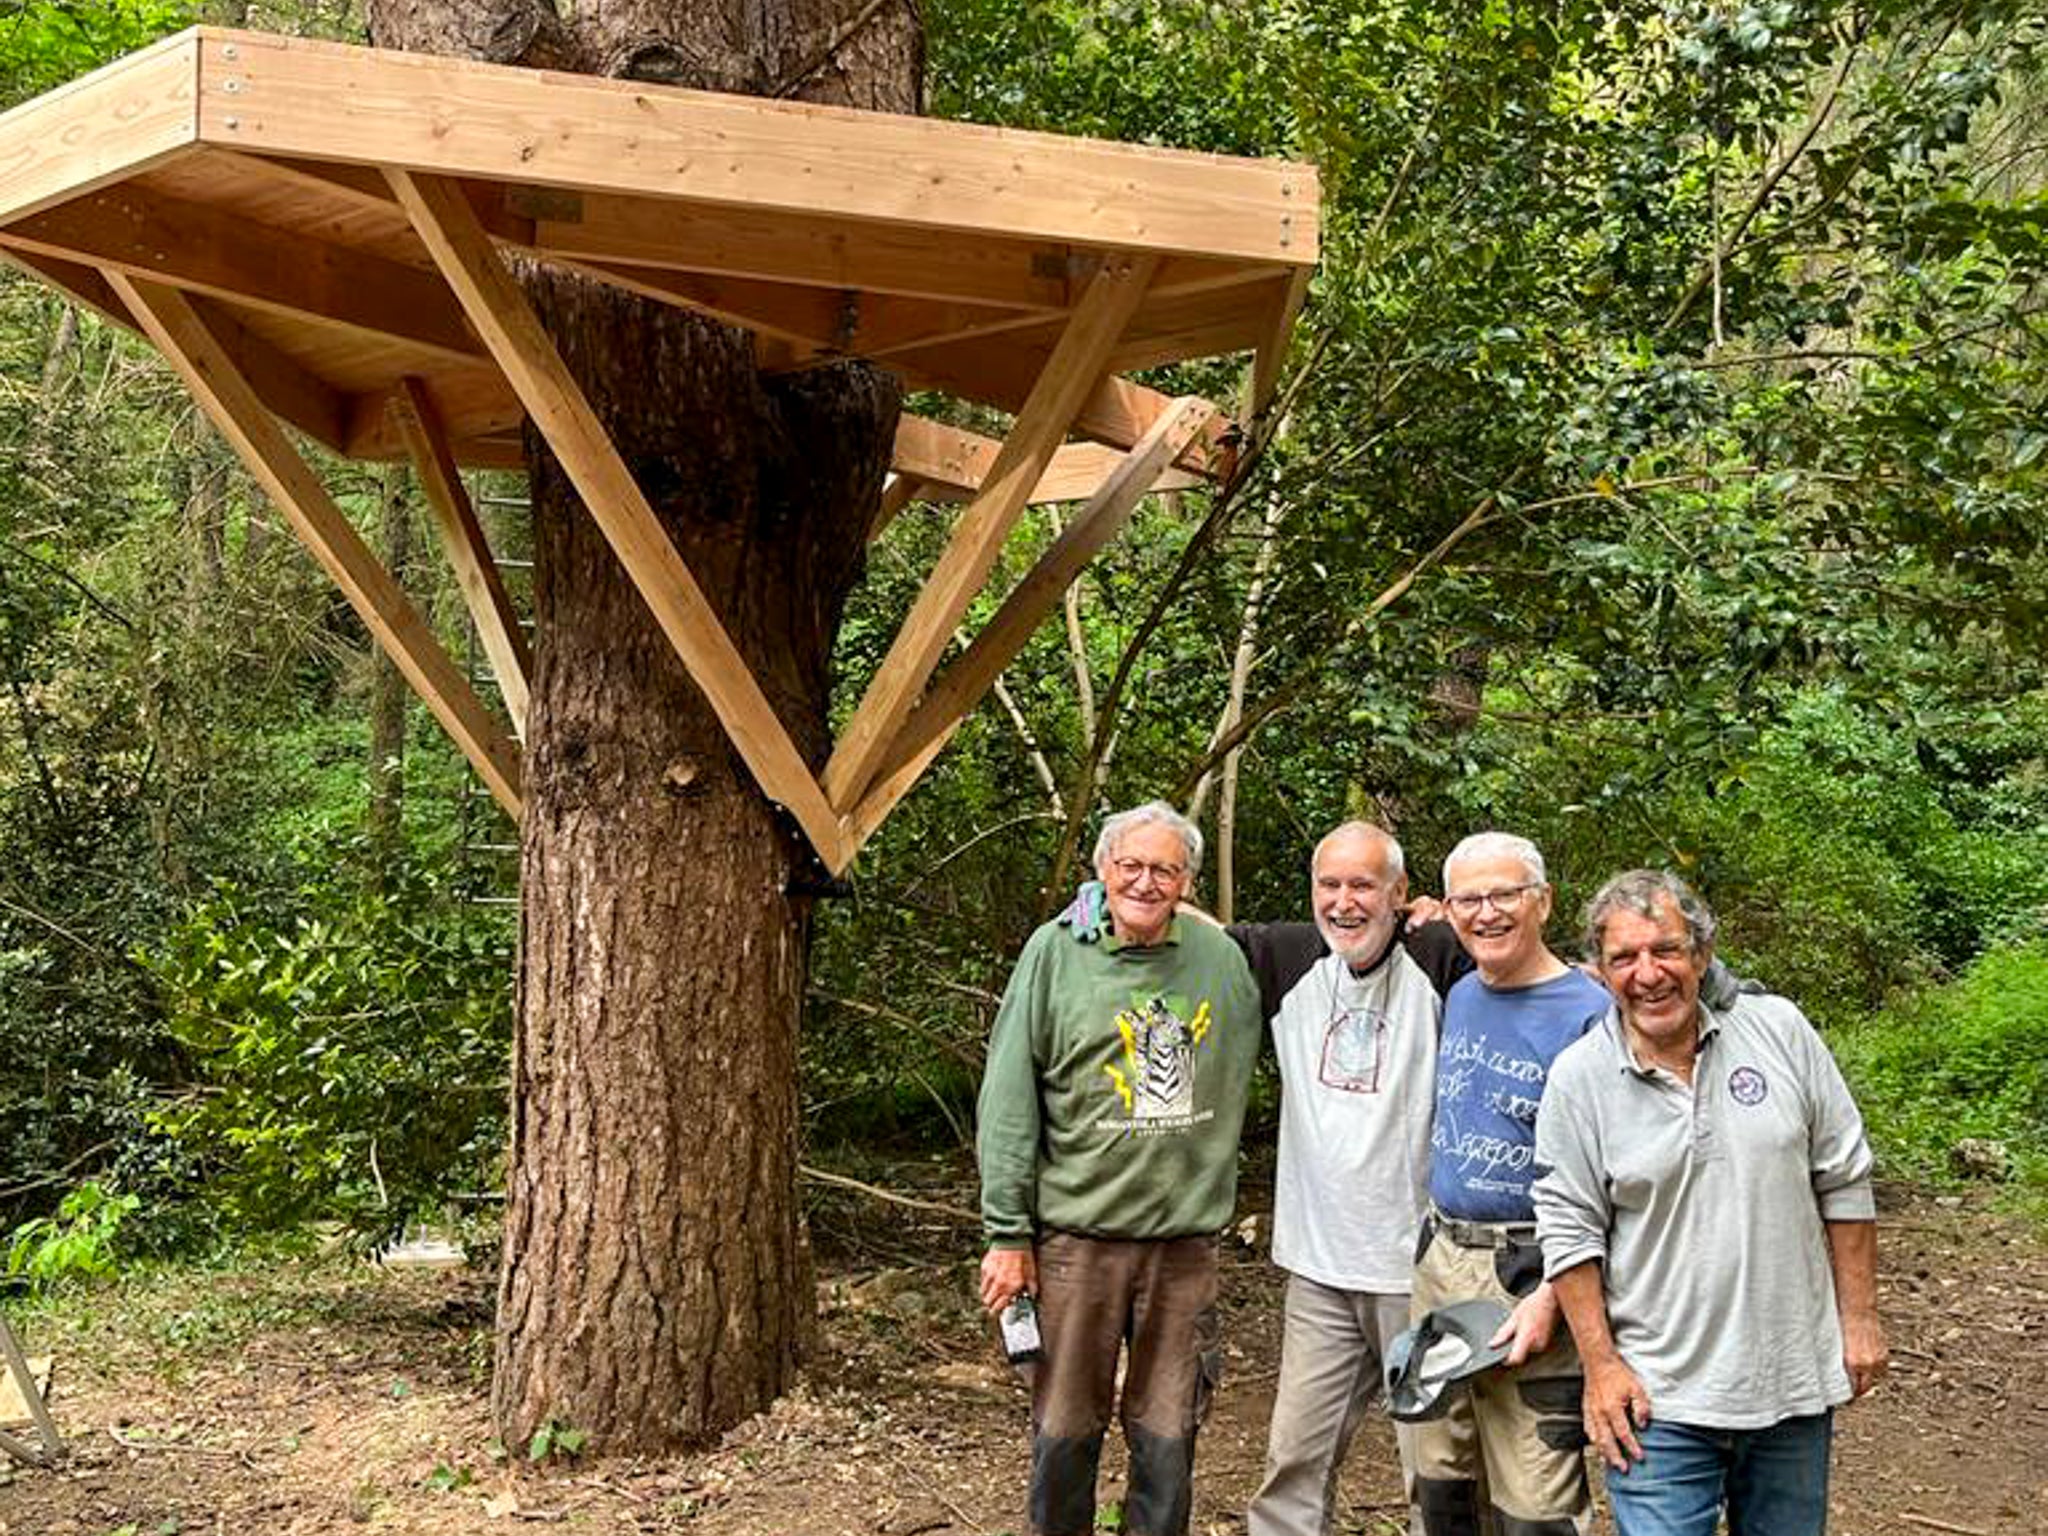
With our GTS Tree Screws, you can securely fasten the support structure to the tree. The guy with the red shirt is me, by the way – hello ;)
2D-Tribeam (beige)
With 2D-Tribeams, you can create stable and large support surfaces for your floor joists.
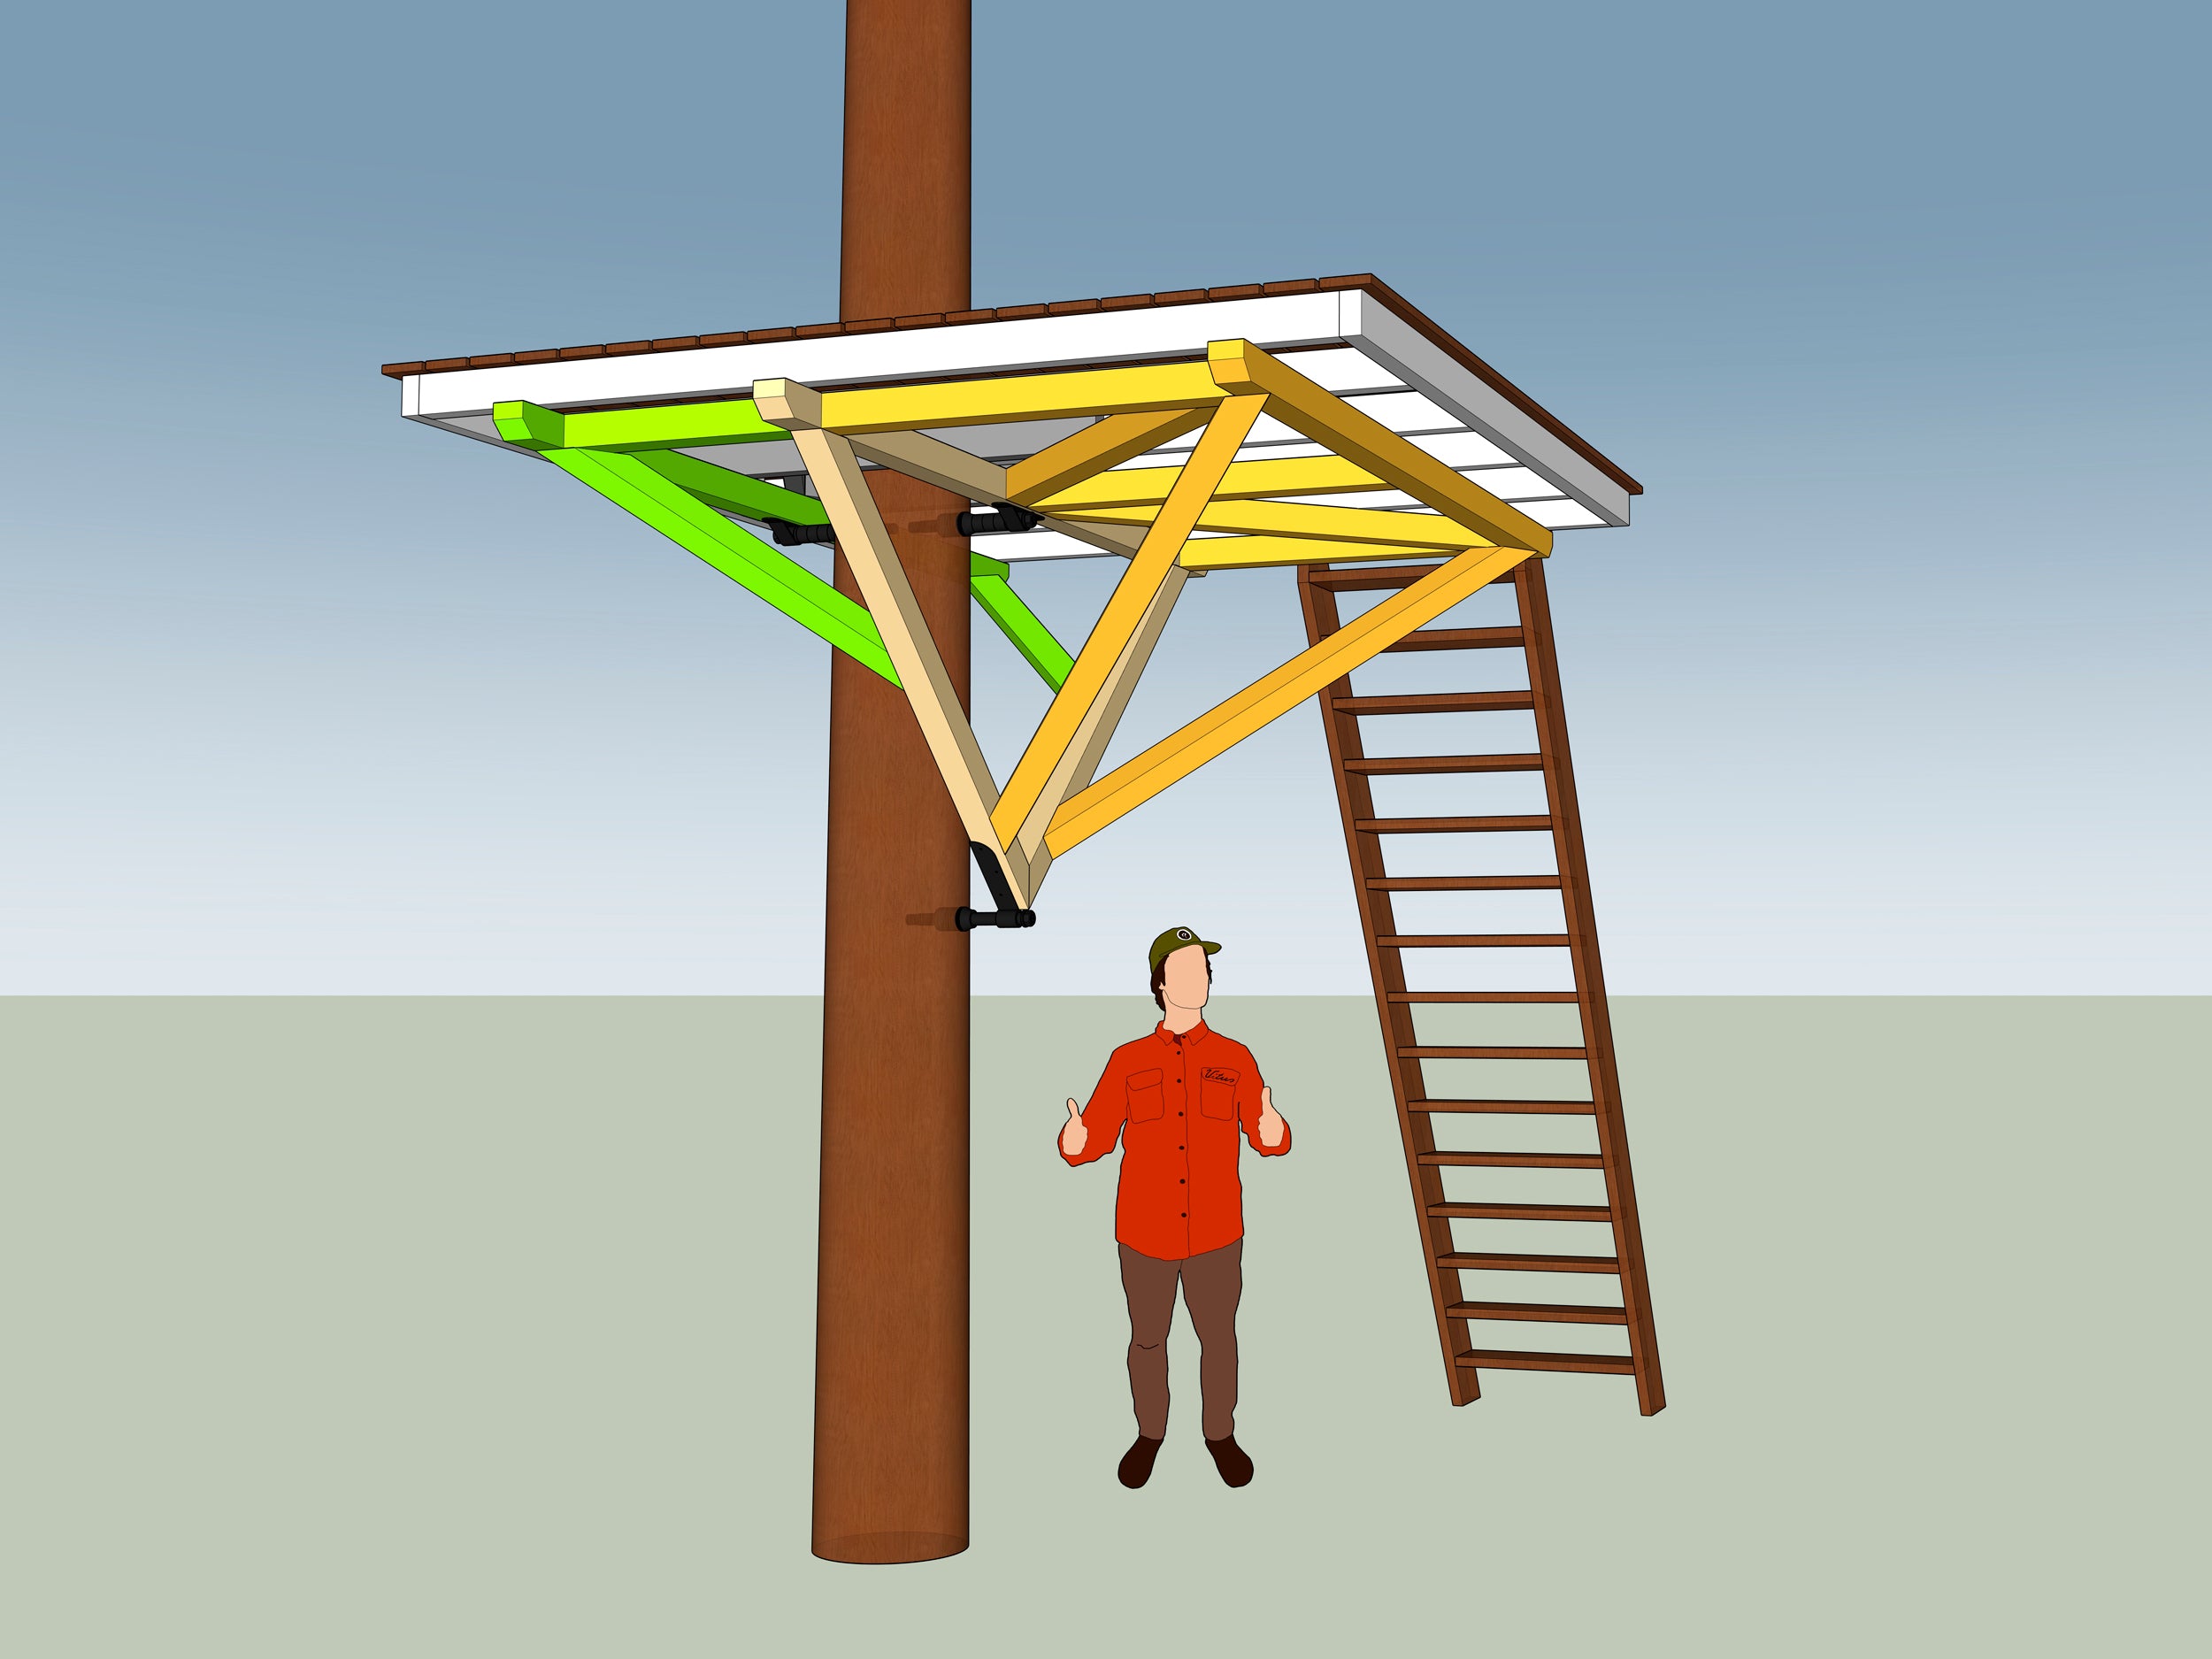
3D-Tribeam (yellow)
3D-Tribeams consist of a 2D-Tribeam with additional struts attached to increase the contact surface.
Extra struts (green)
Green indicates all additional struts and beams that are not part of the regular 3D-Tribeam. These are usually used to reinforce the platform.
Floor joists (white)
The floor joists are screwed onto the support structures from above and connect everything into a fixed unit.
1. Mounting elements at a glance
‘How do I attach a treehouse to a tree?’ It's easy: with specially designed fastening hardware.
Here are the 9 most important fastening techniques we use at our treehouse carpentry “baumbaron”:
1. Mounting elements at a glance
‘How do I attach a treehouse to a tree?’ It's easy: with specially designed fastening hardware.
Here are the 9 most important fastening techniques we use at our treehouse carpentry “baumbaron”:

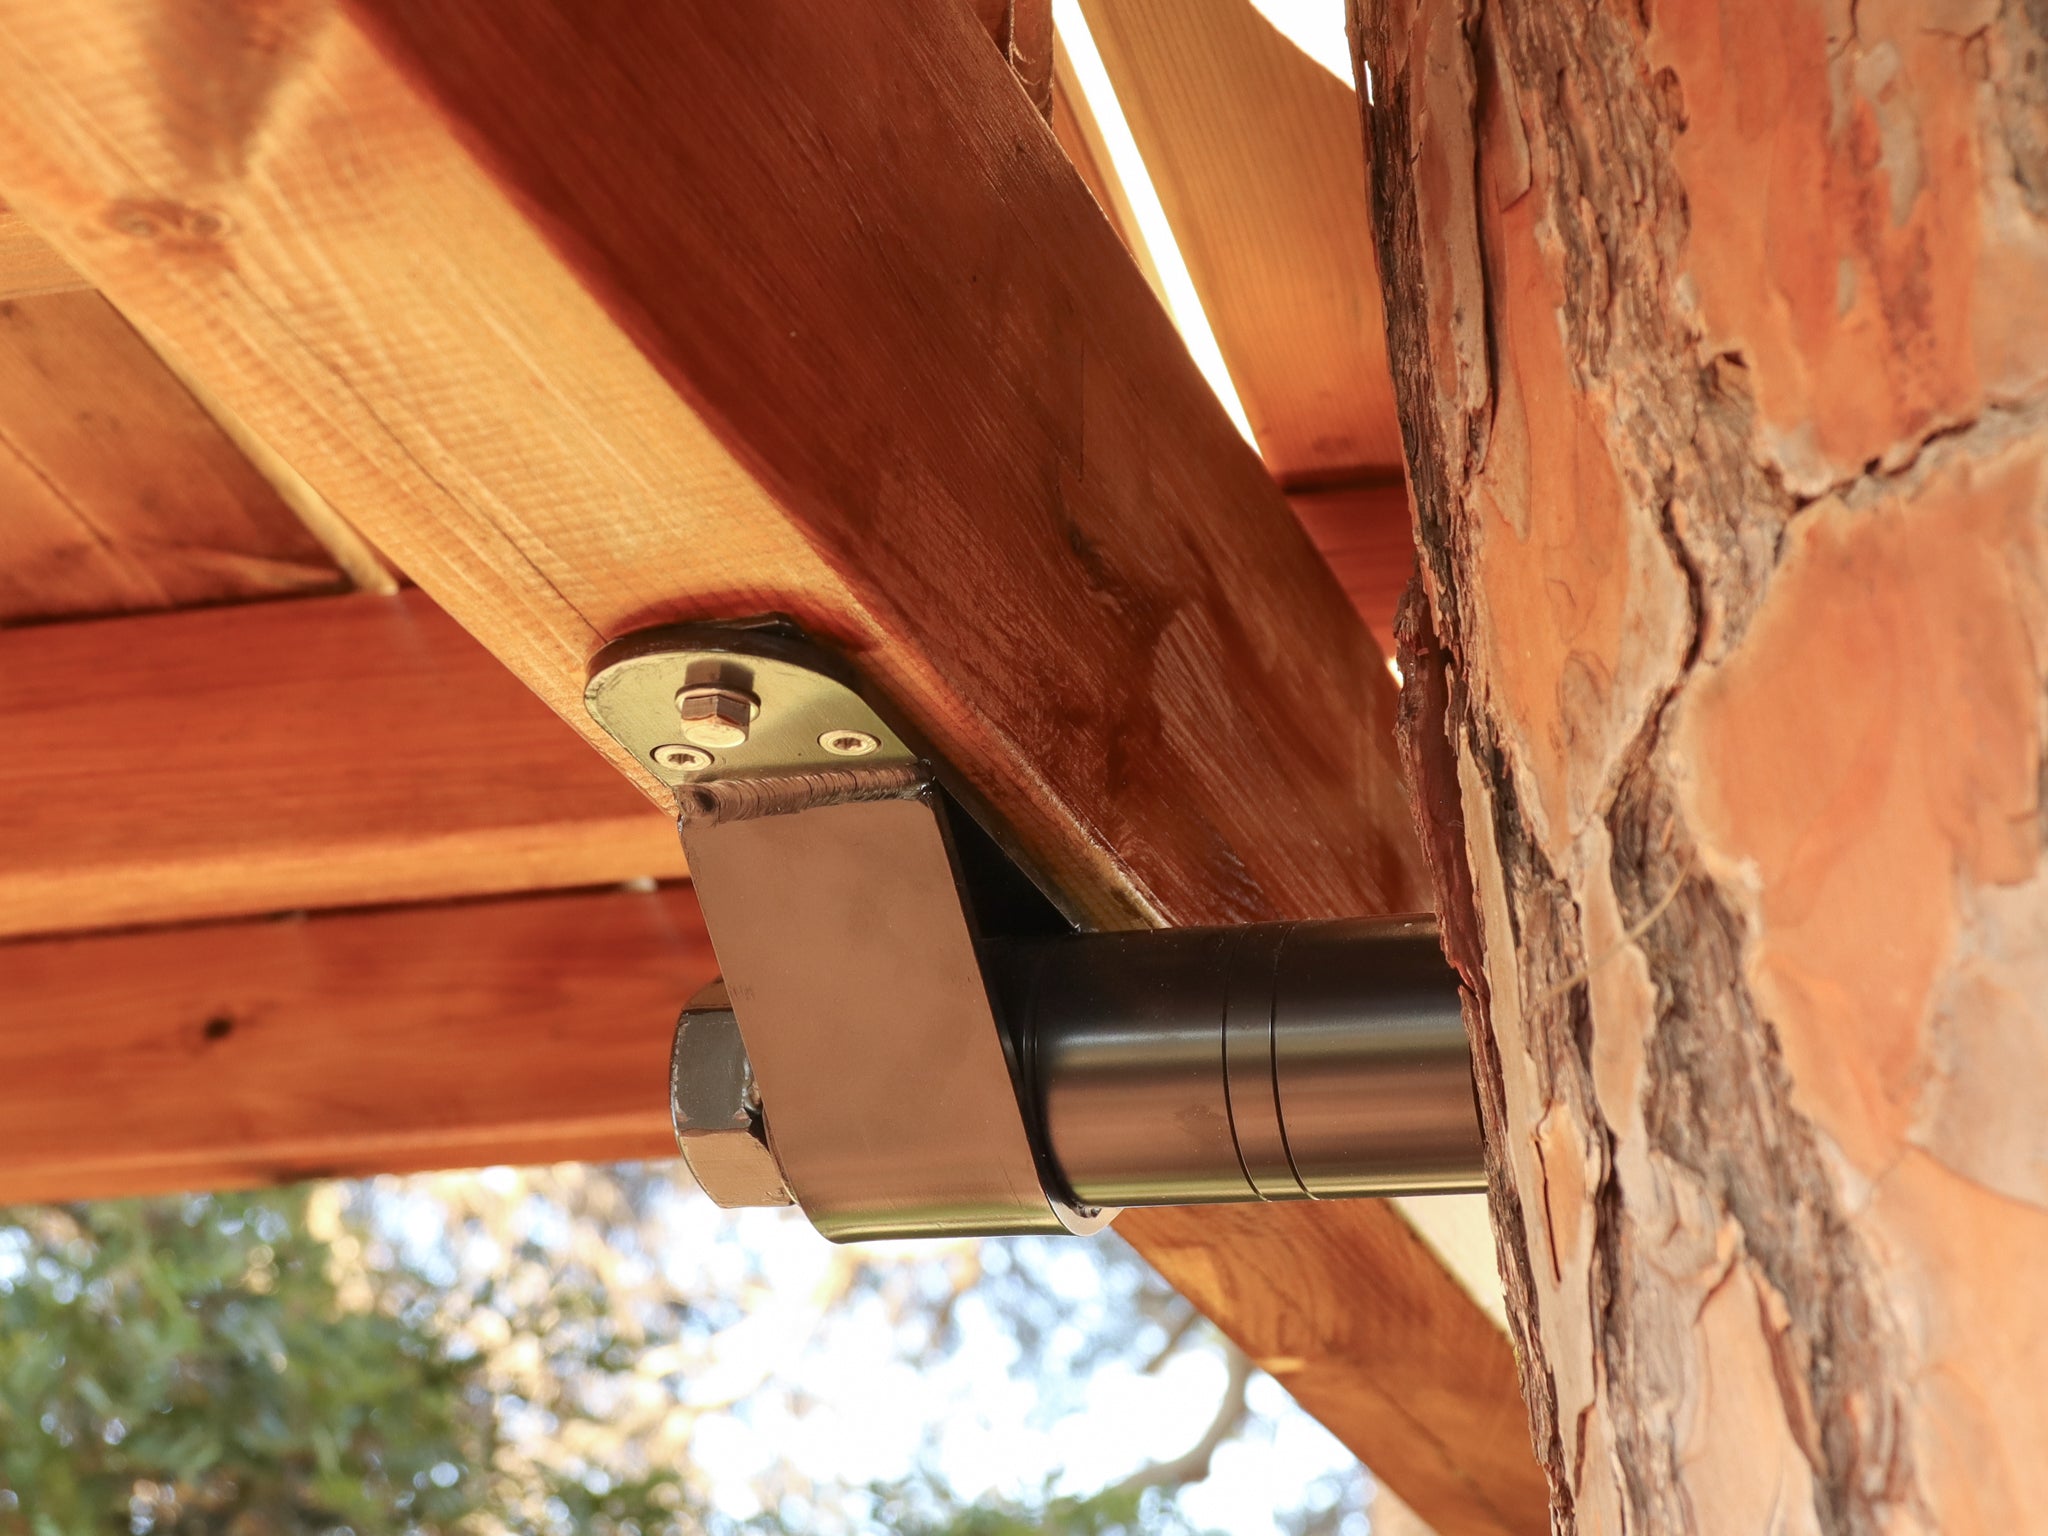
Fixed Beam Bracket
Tree Bolts + Fixed Beam Brackets hold the support structure and platform securely in place. The rings are used to fix the position.

Dynamic Beam Bracket
Movable brackets disconnect the support beam between several trees. The tree can move freely during storms and the construction is not damaged.

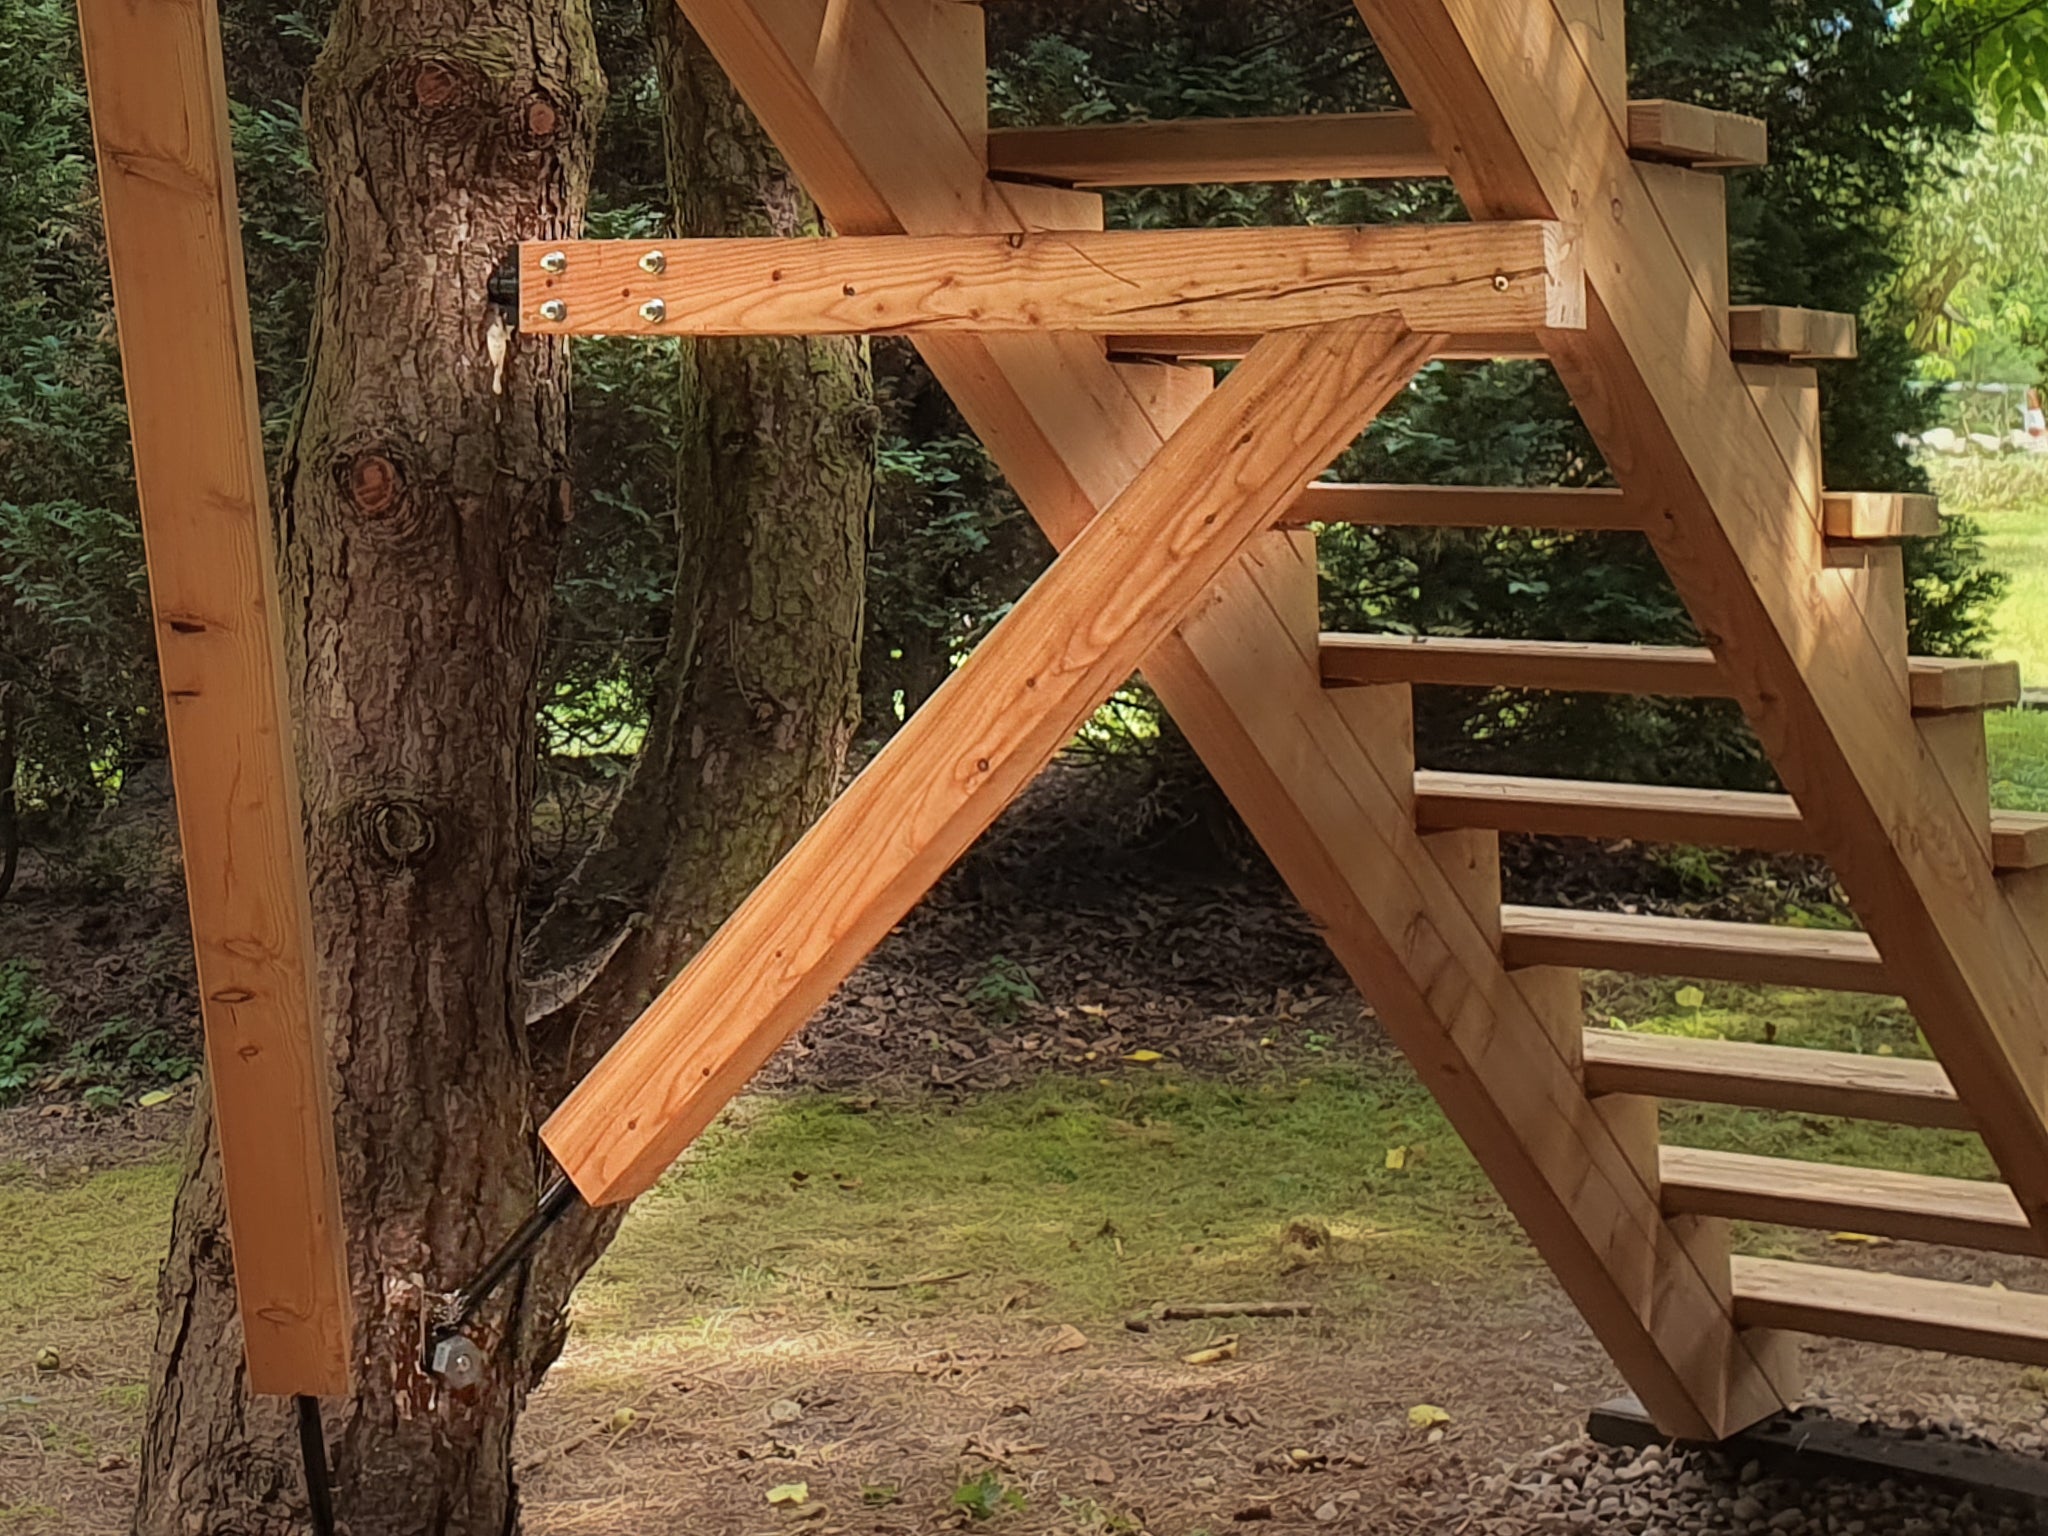
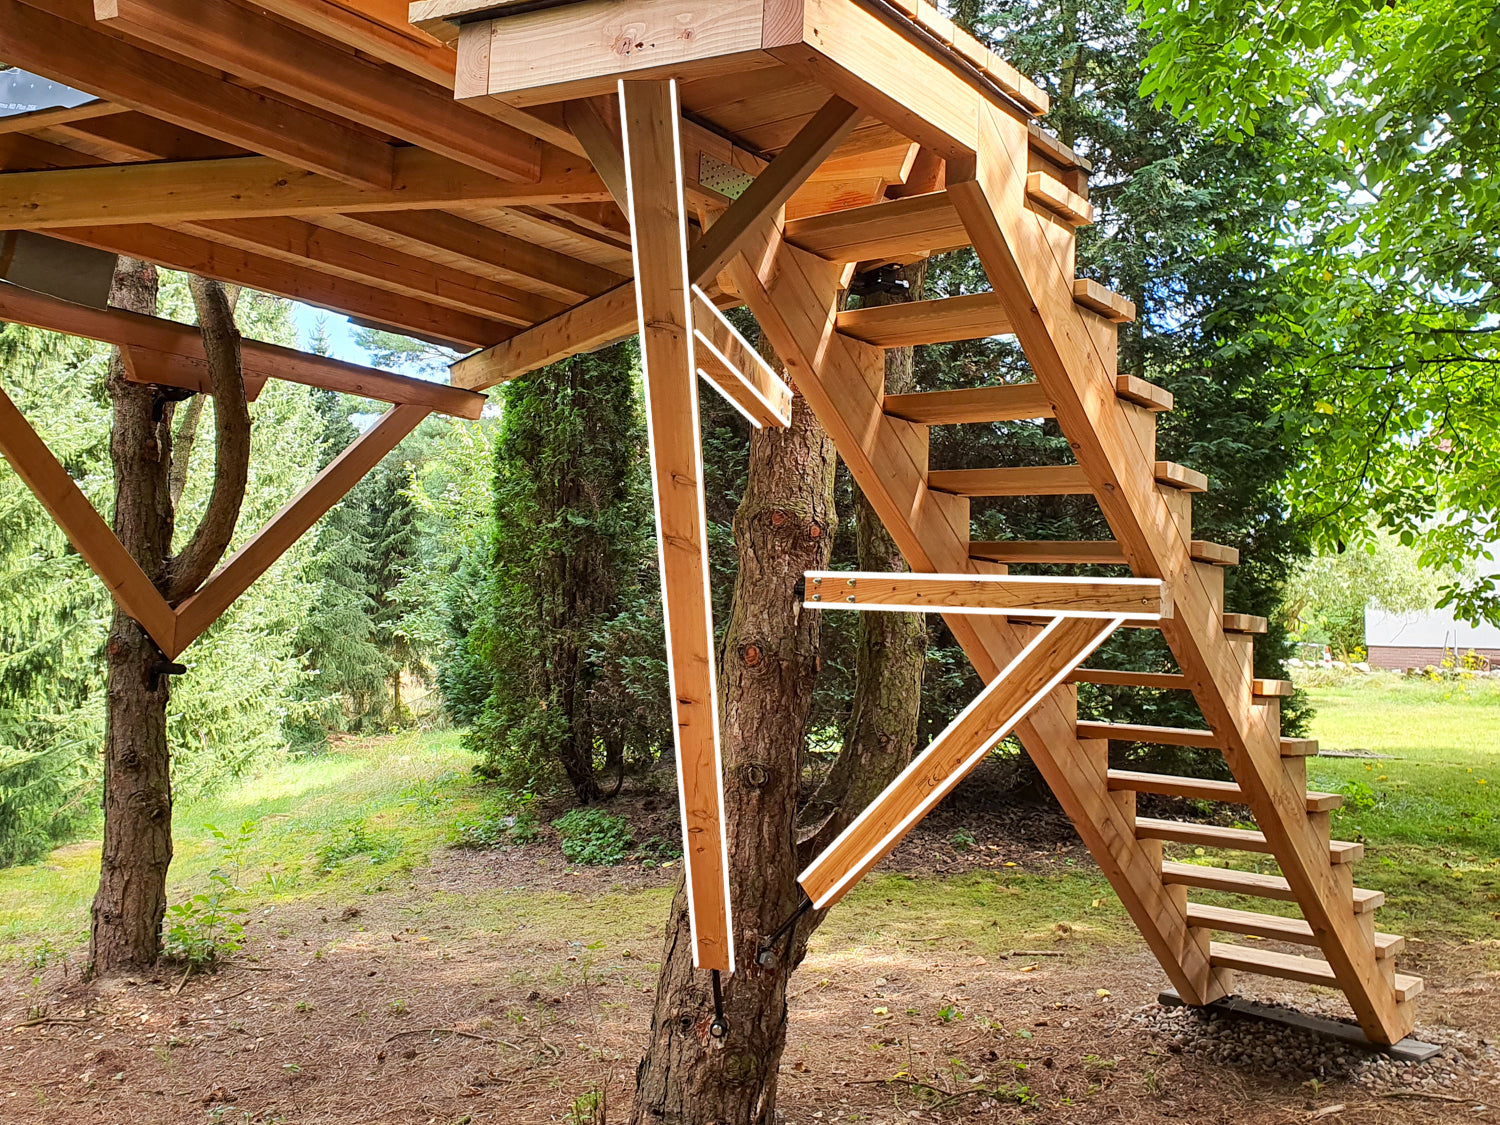
Triangular Support Structures
Triangles create a wide span for a stable platform. Size and shape are freely selectable – an absolute classic!

Strut – support from below
Struts are a flexible way to stabilize the platform from below. With height-adjustable struts, the platform can be perfectly aligned.

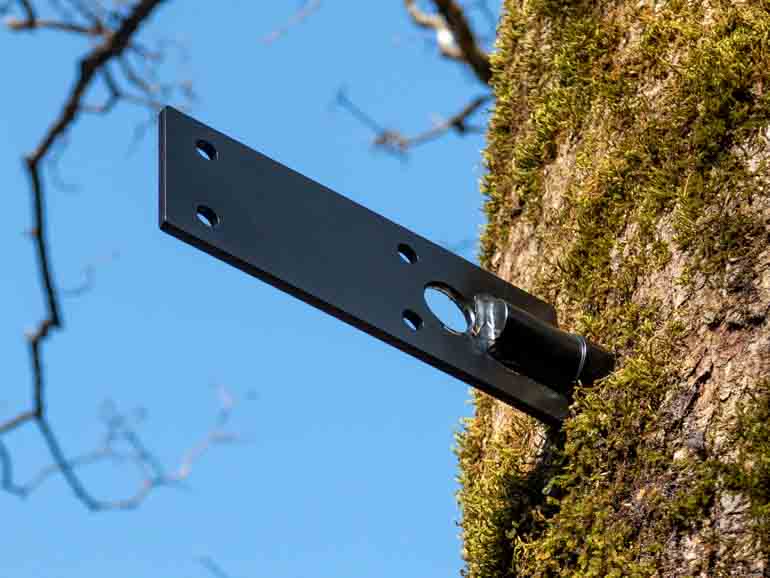
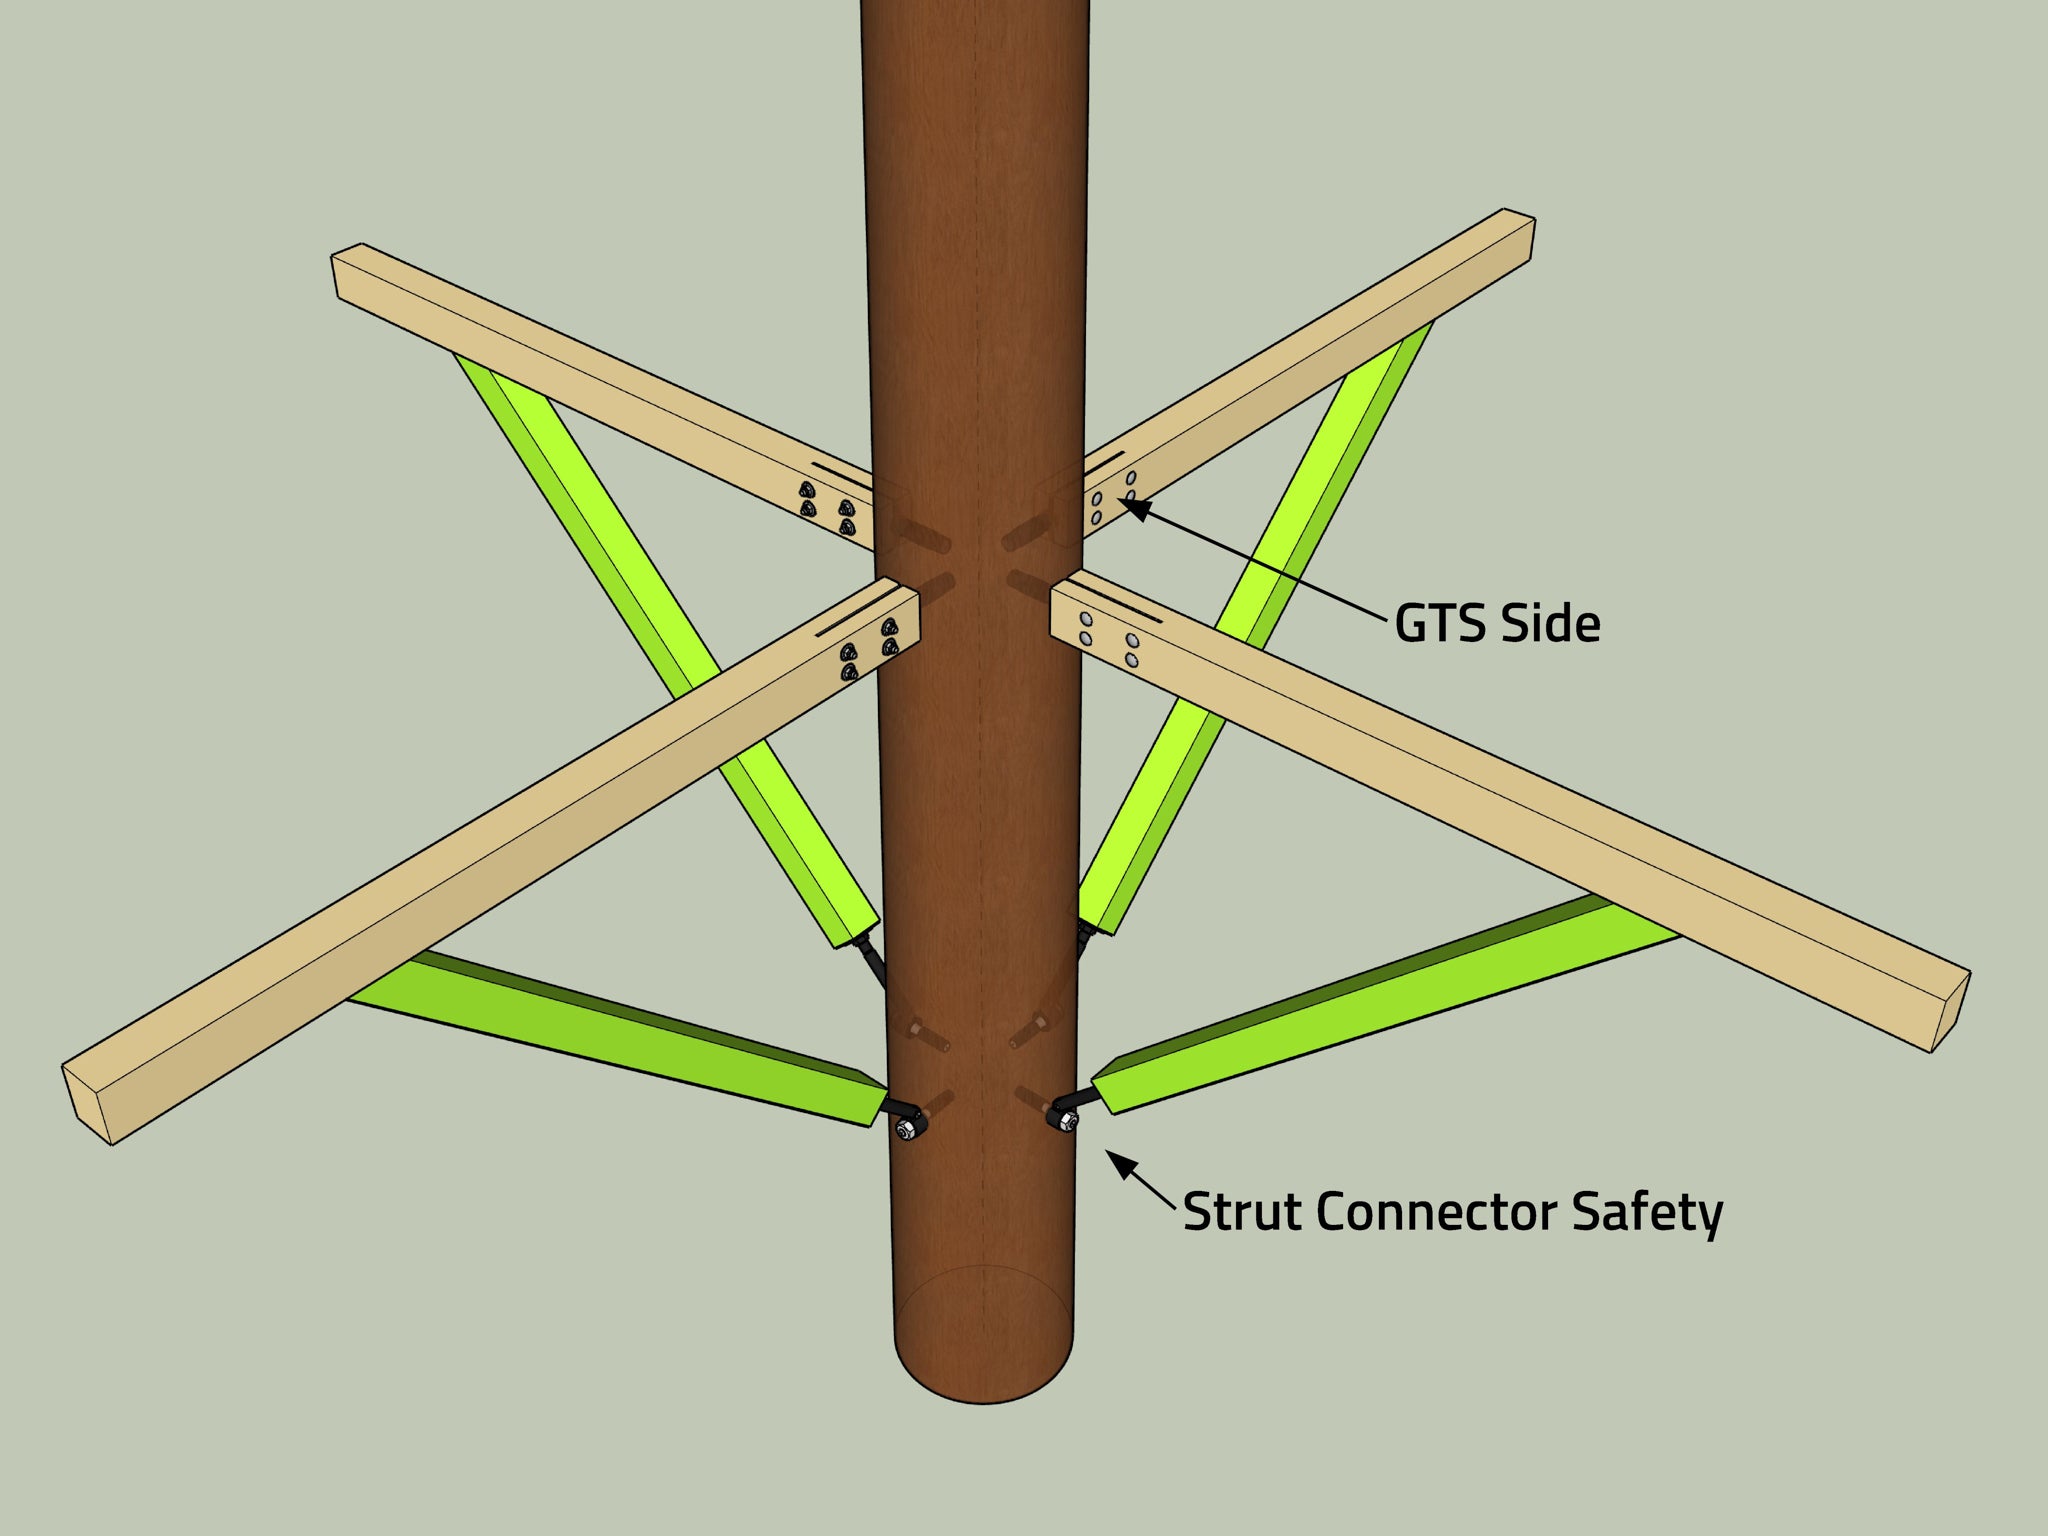
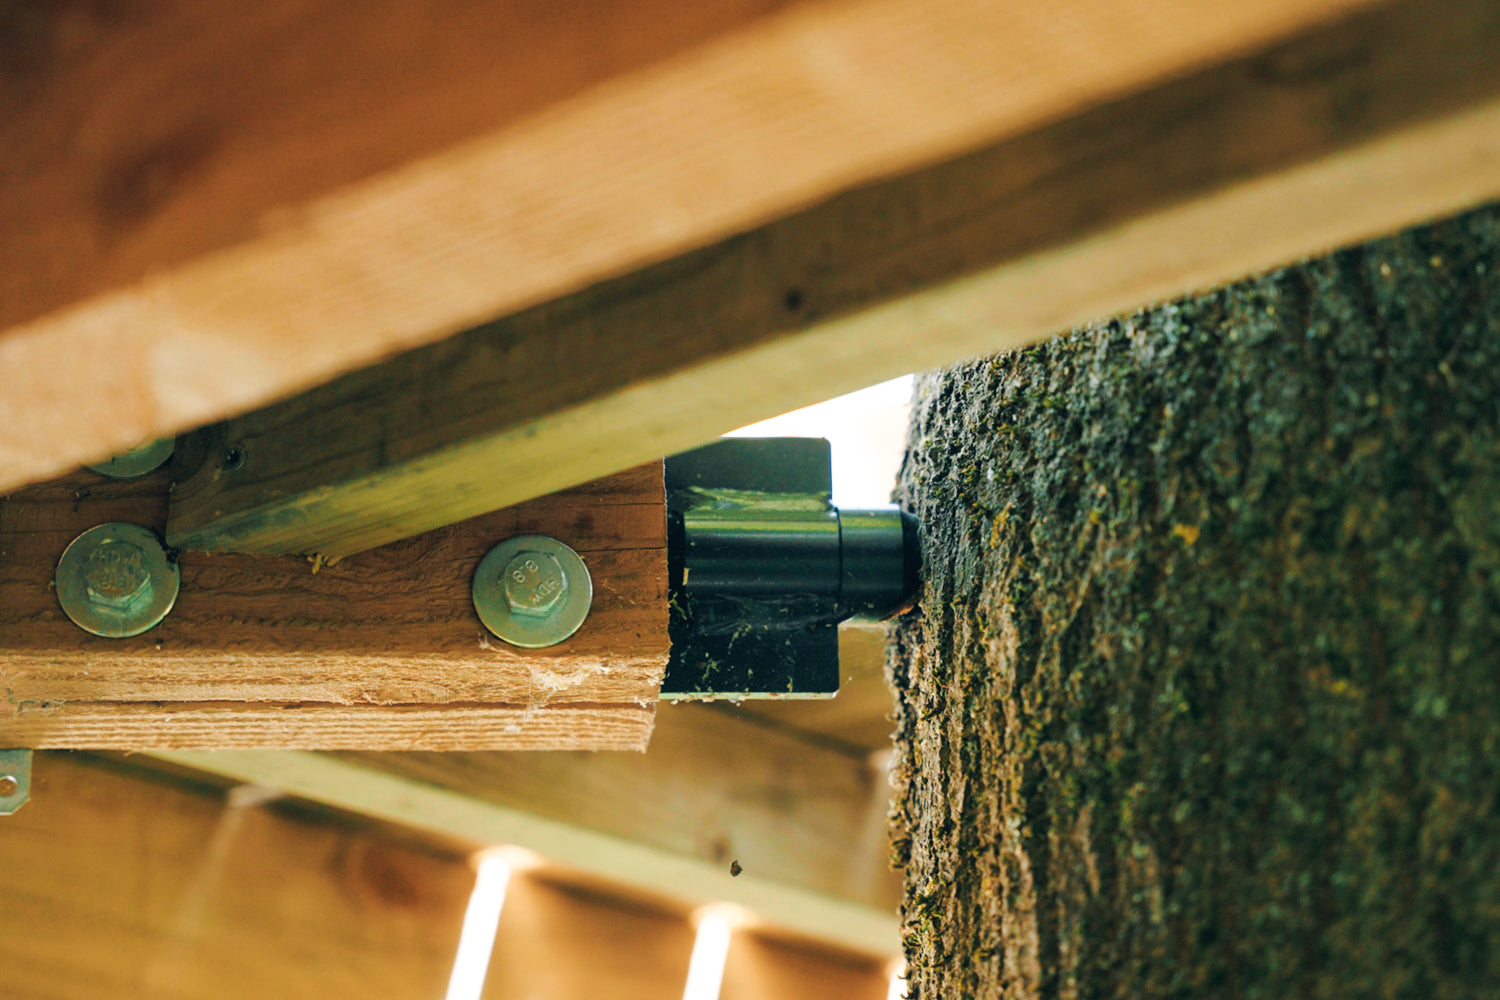
Side Tree Brace
Side Tree Braces with GTS Side always require a Strut to the tree in addition to the Crossbar. Ideal for smaller platforms and stairs.

Hanging from above using a cable
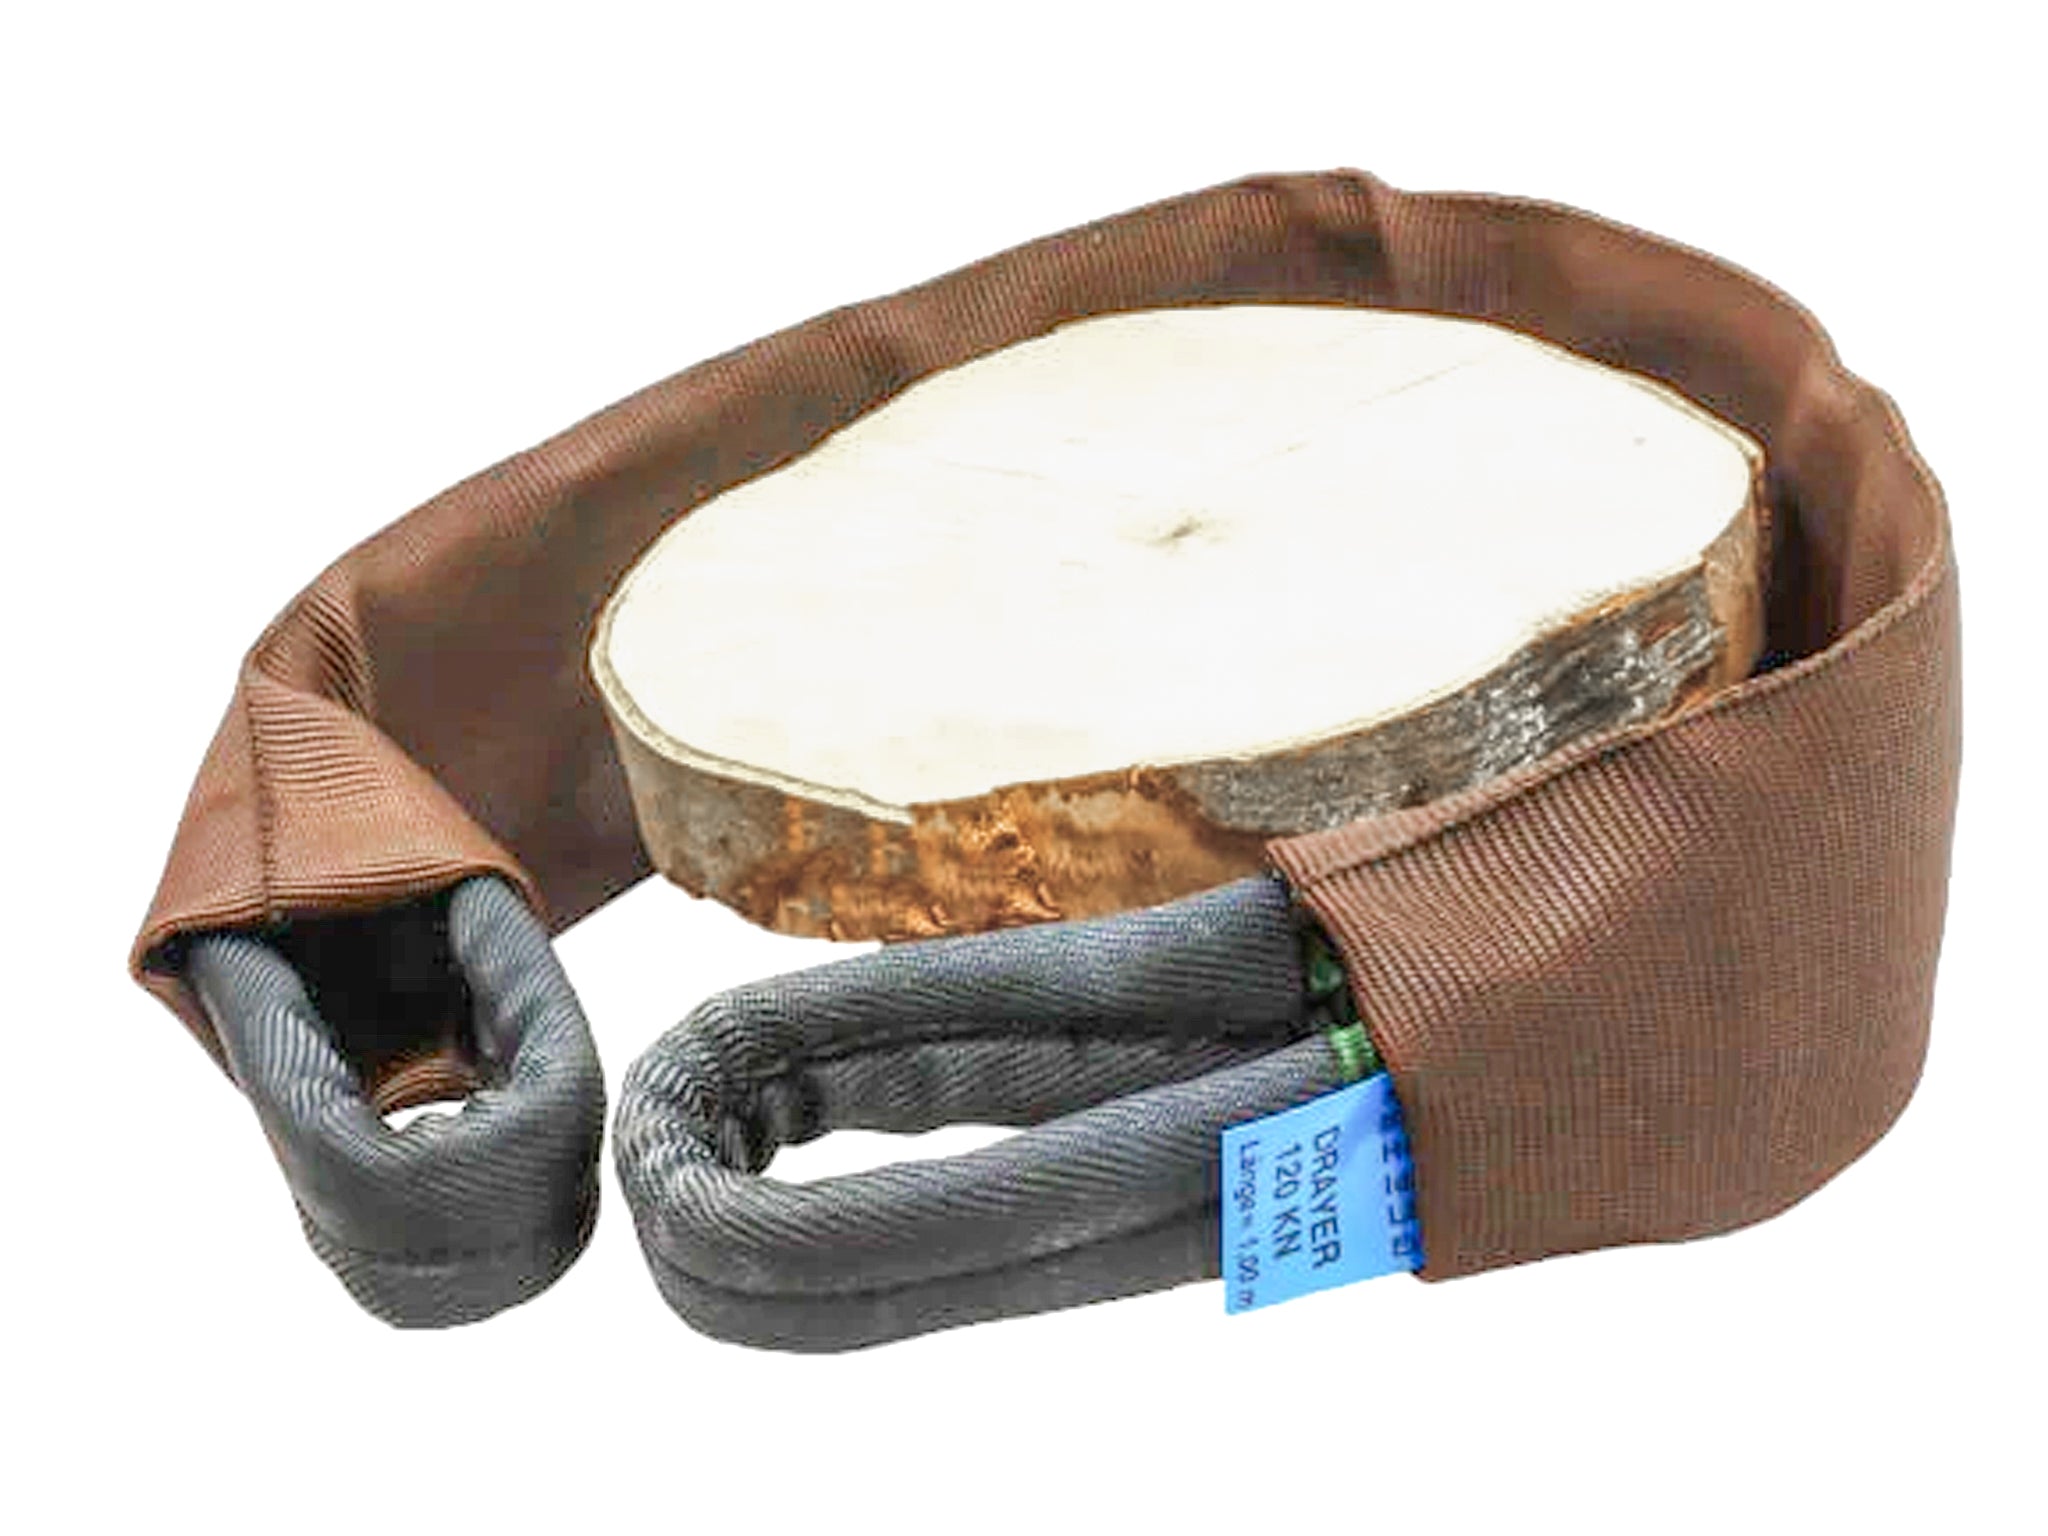
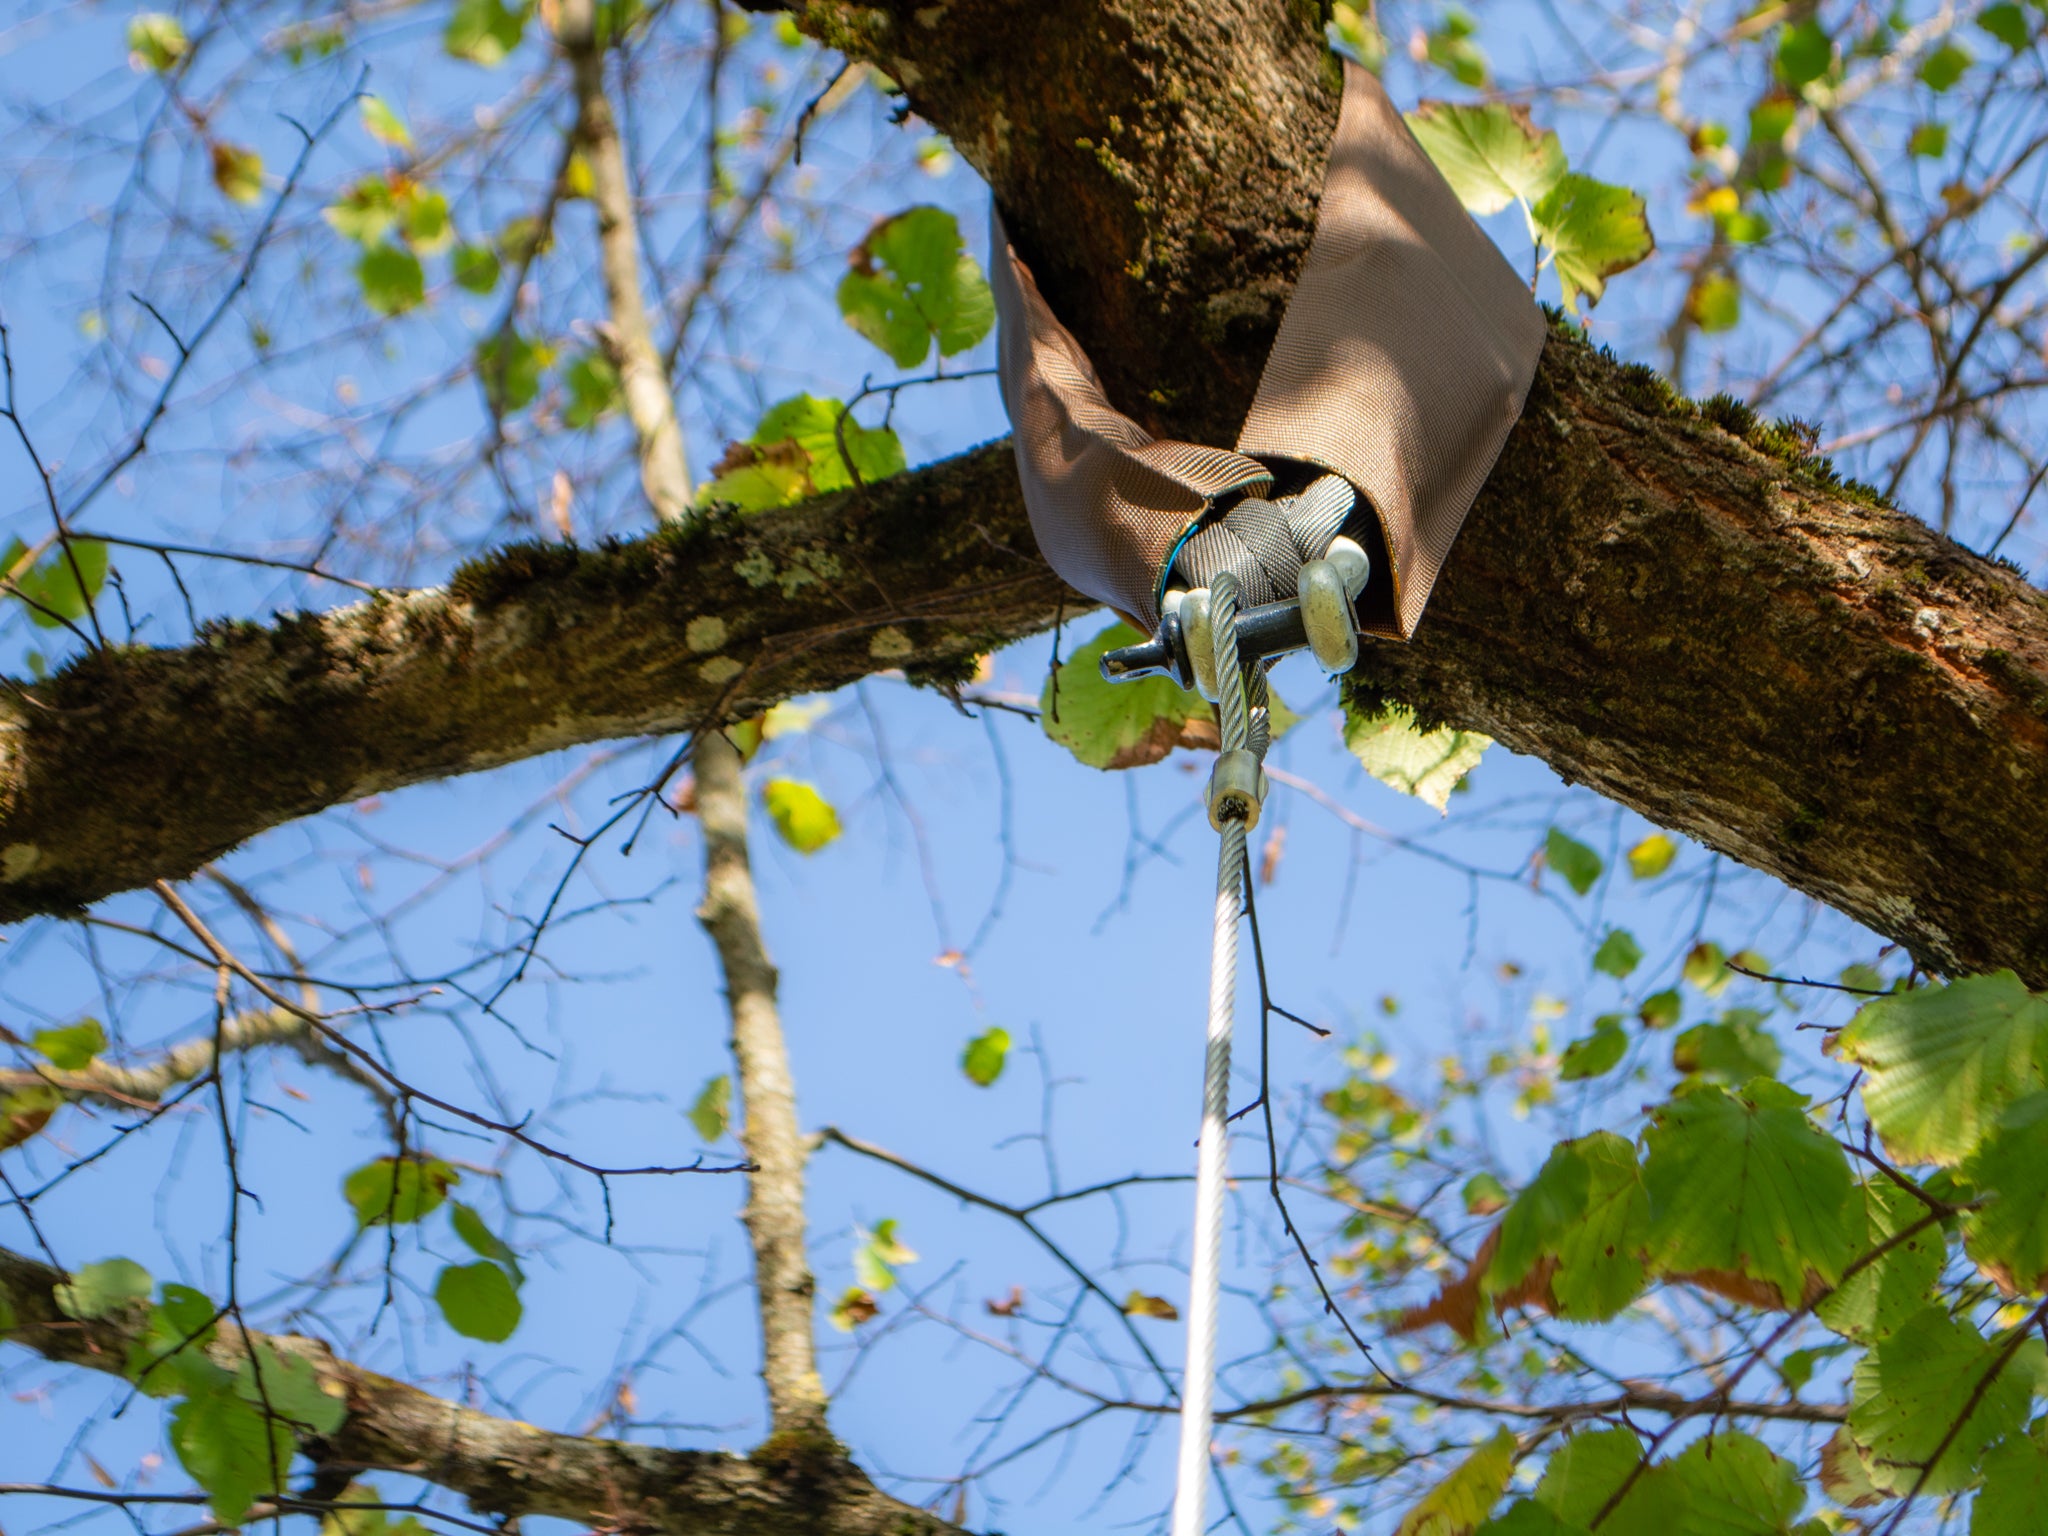
Cables are mainly used as additional safety and are easy to retrofit. Attachment points are Tree Support Slings or GTS Screws.

Side attachment with cable
Tree-friendly tensioning with wide Tree Support Sling – ideal for attaching suspension bridges or flying foxes to trees.

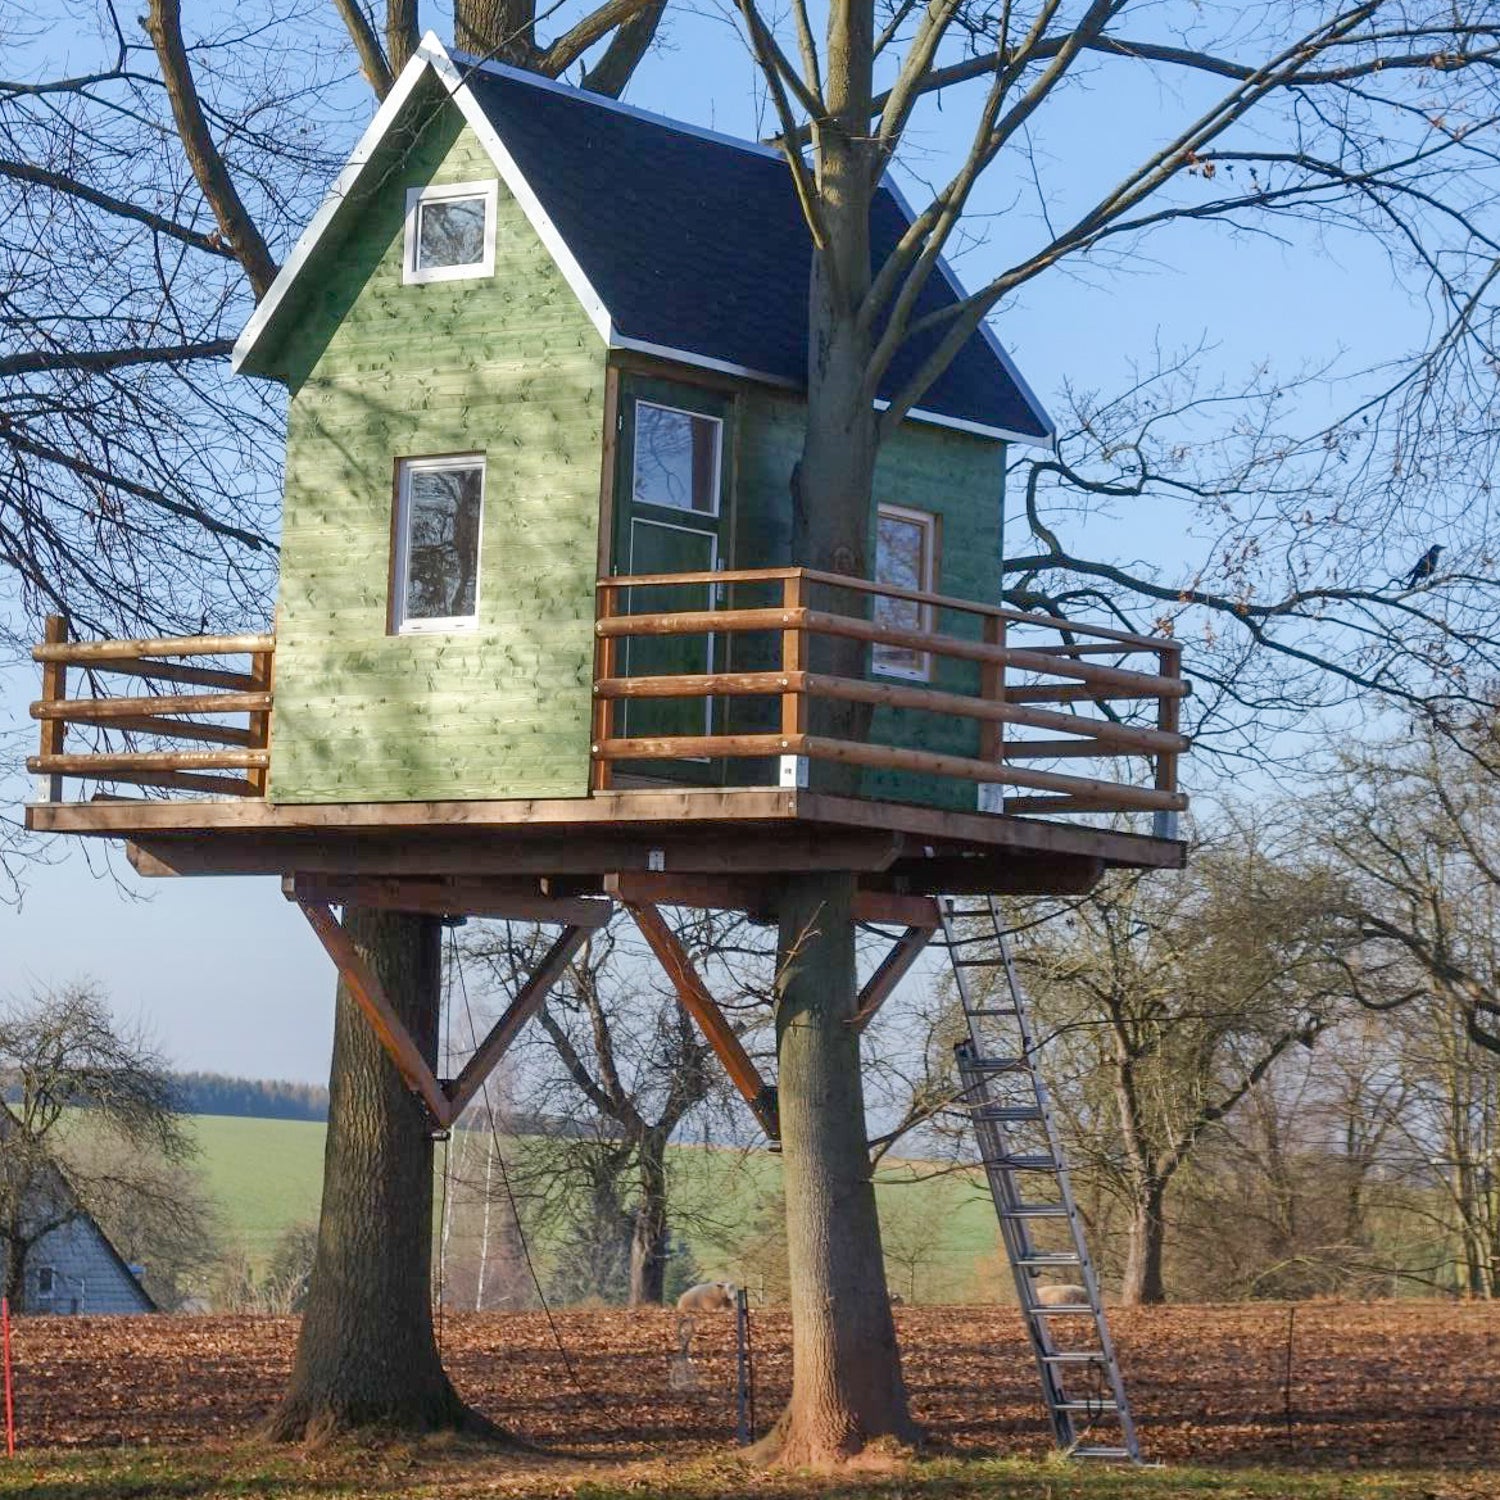
Concrete-encased support / raised stilt treehouse
With additional stilts, you can enlarge the platform of your treehouse as desired or provide additional support for overloaded parts.

Staircase set in concrete
With a staircase (or climbing wall, etc.) firmly set in concrete, you can additionally stabilize your wobbly platform.
Our fastening elements
In our shop, you will find all the parts you need for secure fastening to the tree!


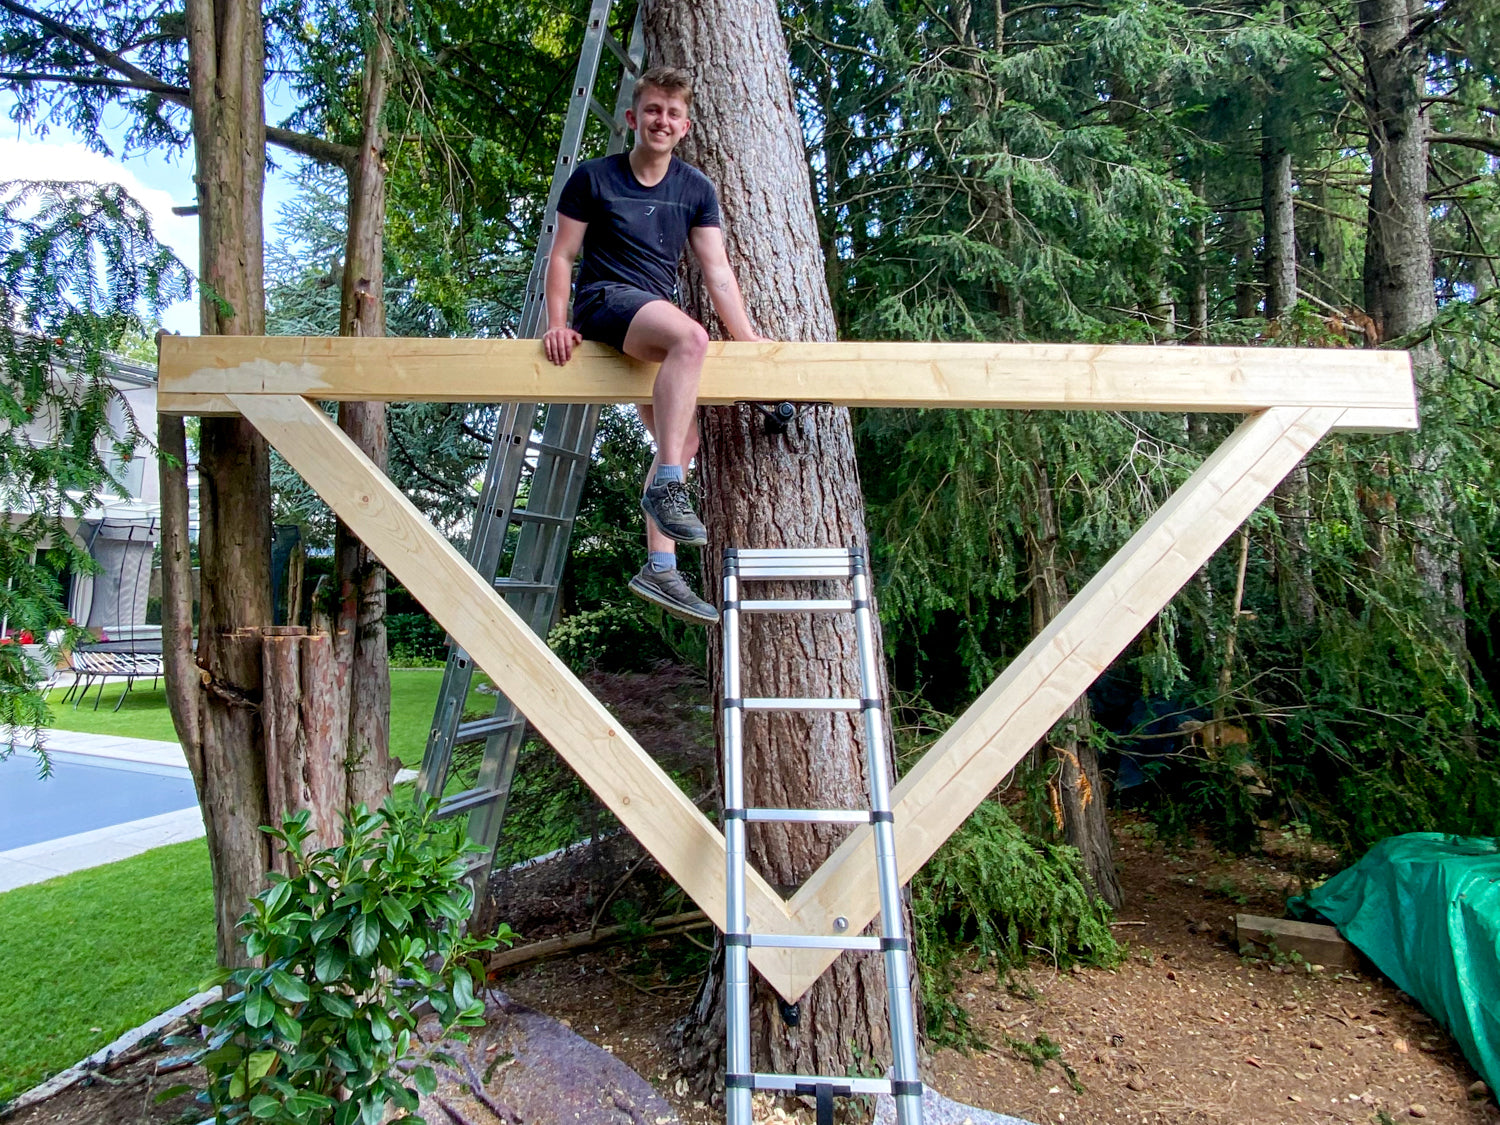
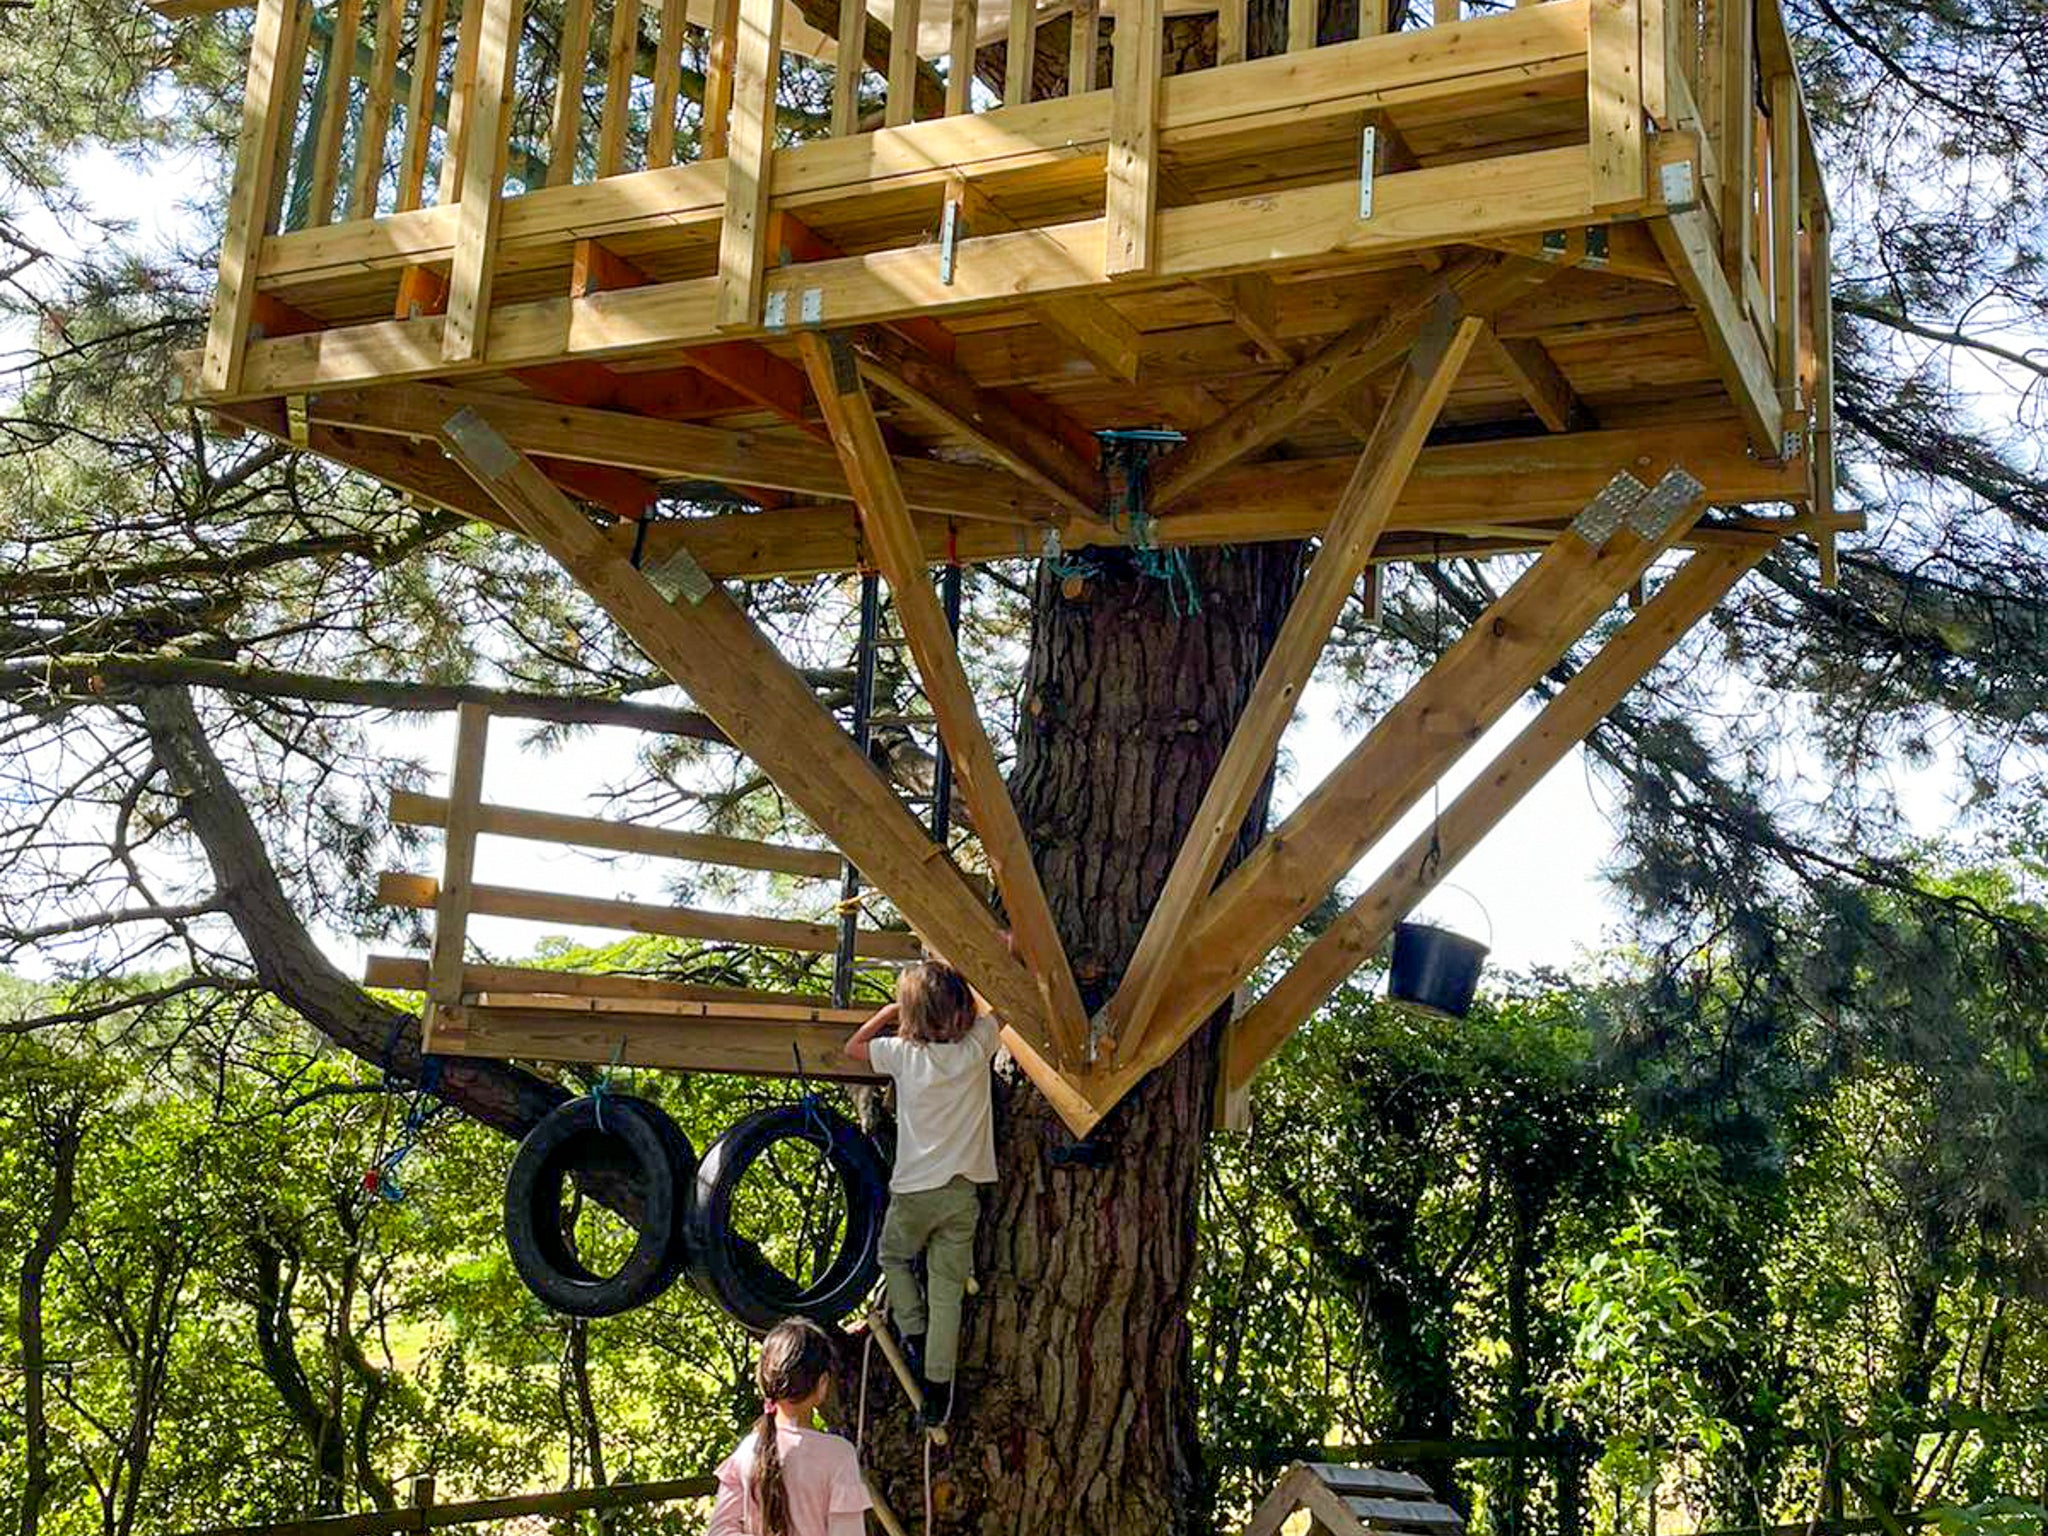
2. Triangular Support Structures ‘2D’
Triangles are the most important and versatile support elements in treehouse construction! The wooden triangle is attached to the tree trunk with two tree bolts. The advantages:
✔ Triangles are robust and safe
✔ Large spans for stable platforms possible
✔ Can be extended with struts as required, depending on the load (3D-Tribeams)
✔ Tree trunk can be slightly thinner – tree bolts mounted on top of each other require less space
When and where are triangles used?
Tribeam Support Structures are incredibly versatile and in many cases the best solution for securing the platform to the tree in a stable and safe manner. The only ‘disadvantage’ is that the struts under the platform are in the way when you need space there.
Triangles as a universal solution
✔ Ideal support structure for all platform sizes: 6 to 40 m² (430 ft²)
✔ Wide support surface for stable platform
✔ Upper joist: 1 to 6 m (3,3 ft) in length
✔ Vertical spacing of GTS Screws: 1,3 to 3,5 m (4,9 ft)
✔ 3D Struts can also be retrofitted to support wobbly platforms
Beam dimensions for triangles
Here are a few guidelines for normal loads:
Strut:
- Up to 2 m (6,6 ft) in length: 8x8 cm
- Up to 3 m (9,8 ft) in length: 10x10 cm
- Up to 4 m (13,1 ft) in length: 12x12 cm
Joist:
- Up to 4 m (13,1 ft) in length: 10x10 cm
- Up to 5 m (16,4 ft) in length: 14x10 cm
- up to 6 m (19,7 ft) in length: 16x10 cm
For strut lengths over 3 m (9,8 ft), we recommend installing additional intermediate struts to reduce the buckling length and improve load distribution.
You can find more detailed information on calculating the wooden beams in step 11.
Pro tips for assembly
- To avoid surprises on the construction site (crooked trunk, thick branch, etc.), we recommend making the triangle out of roof battens and placing it in the desired position on the tree using a long spirit level – if it fits, it's good to go!
- It is best to prefabricate the triangle on a smooth surface on the ground and mount the Tribeam Bracket securely.
- For the time being, only loosely screw on the upper beam bracket (2 short wood screws) – this allows you to align the triangle perfectly in the tree.
- Secure the upper beam bracket with Position-Rings to prevent the beam from sliding outwards (lever arm!).
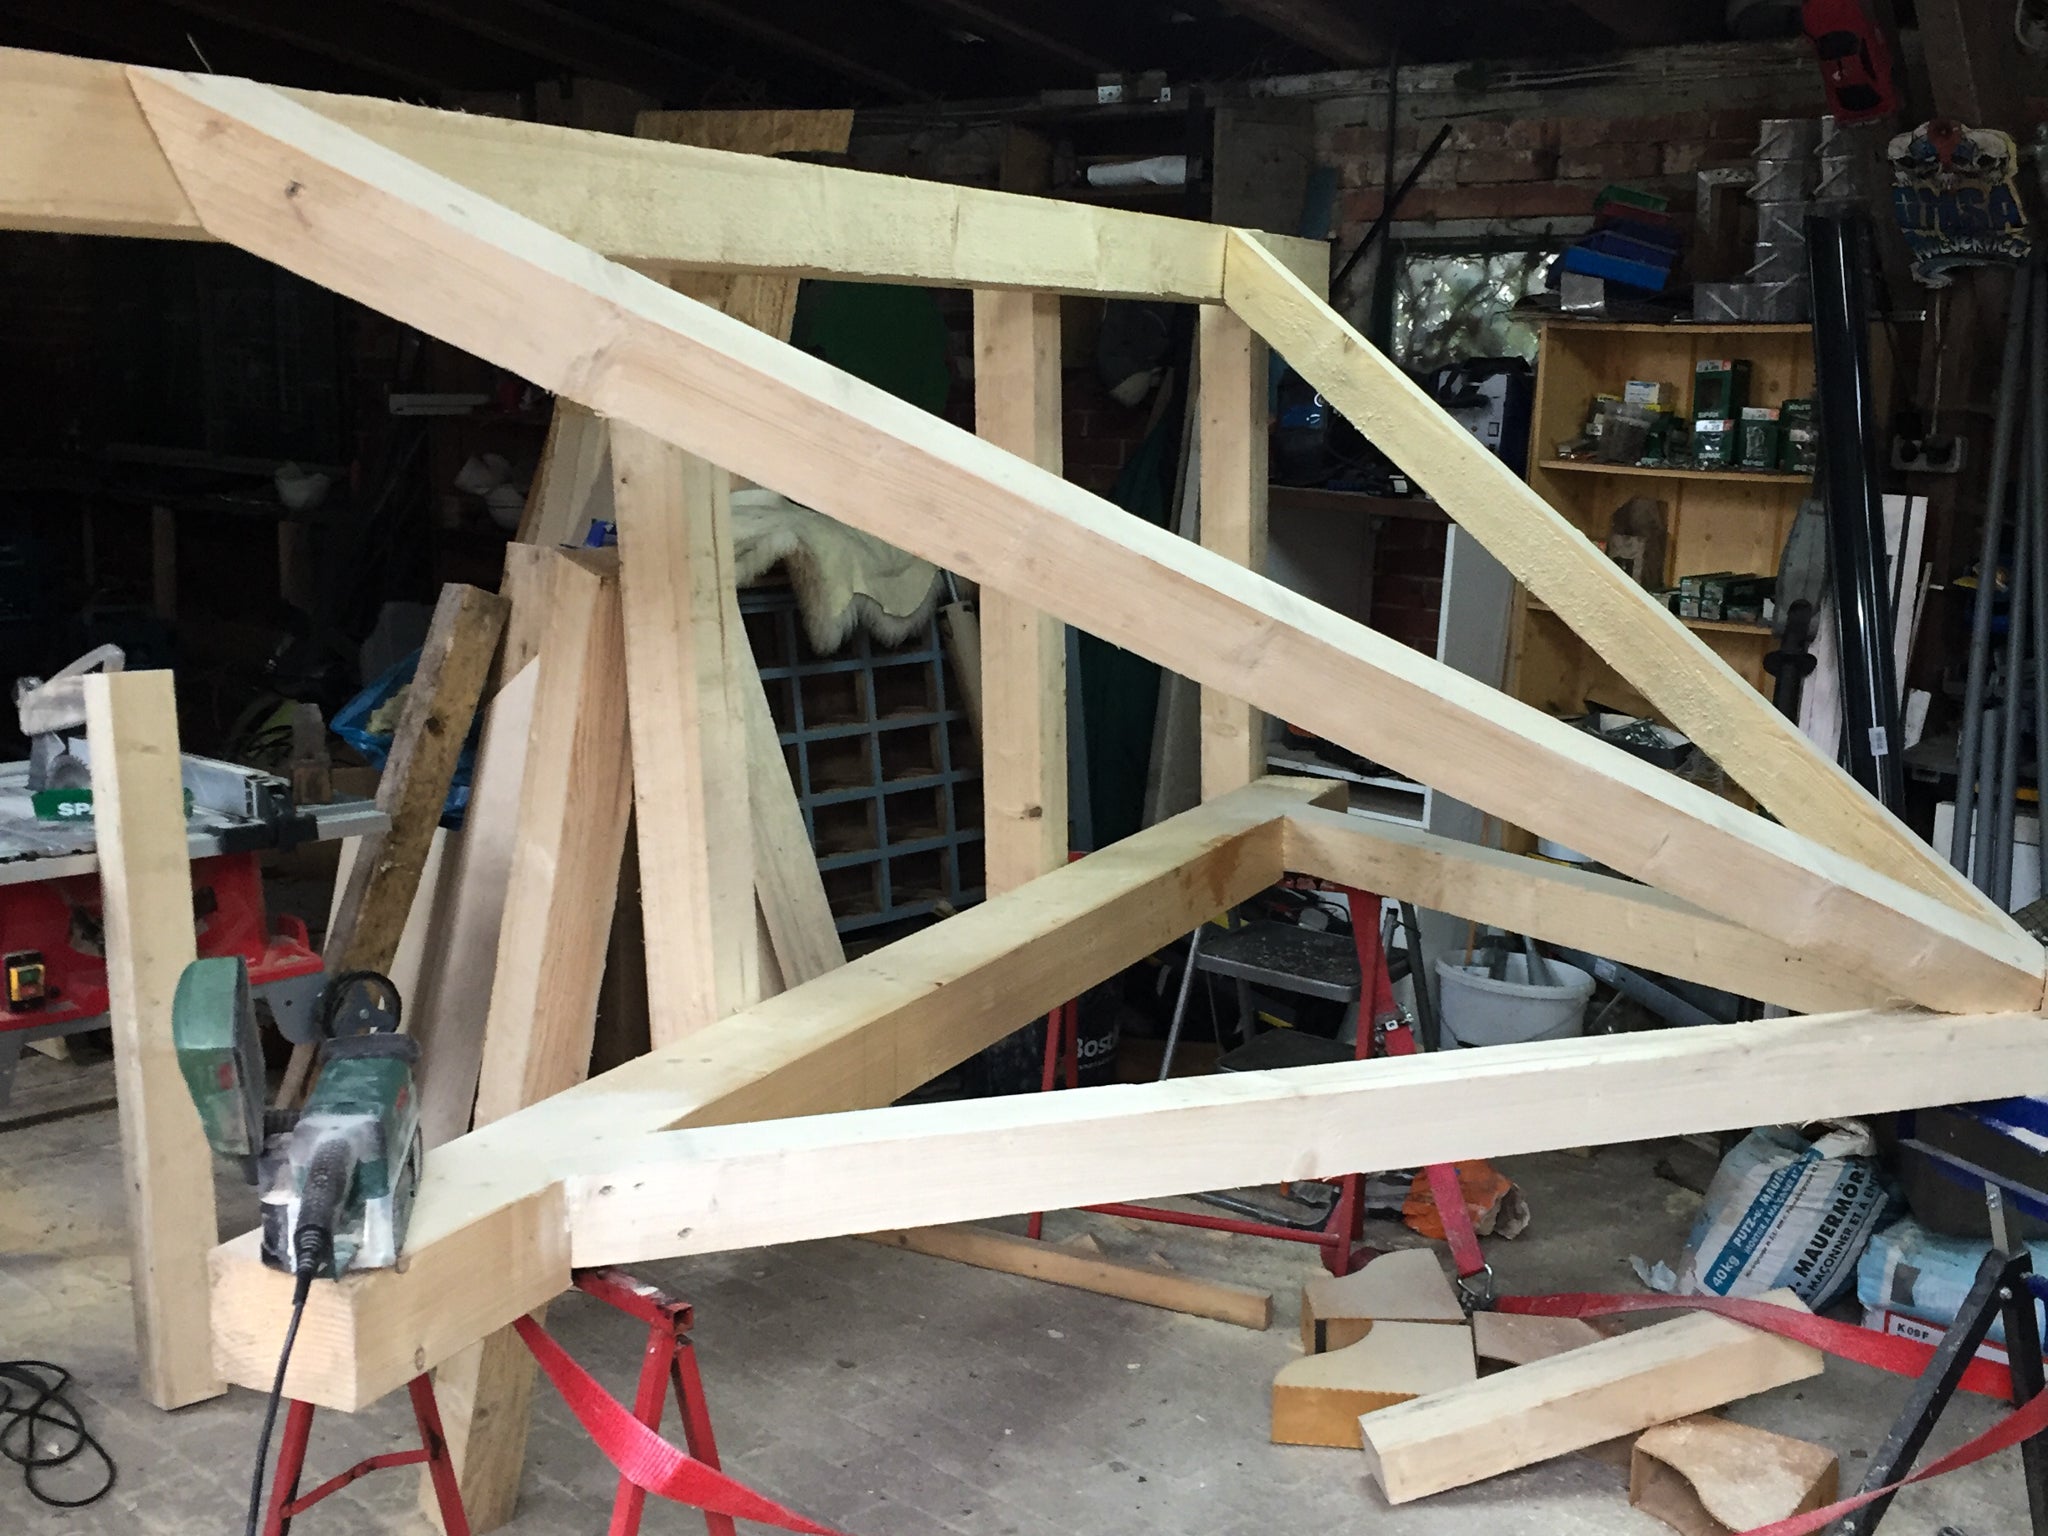
Instructions: Building 2D-Tribeams
Examples and tips for installation

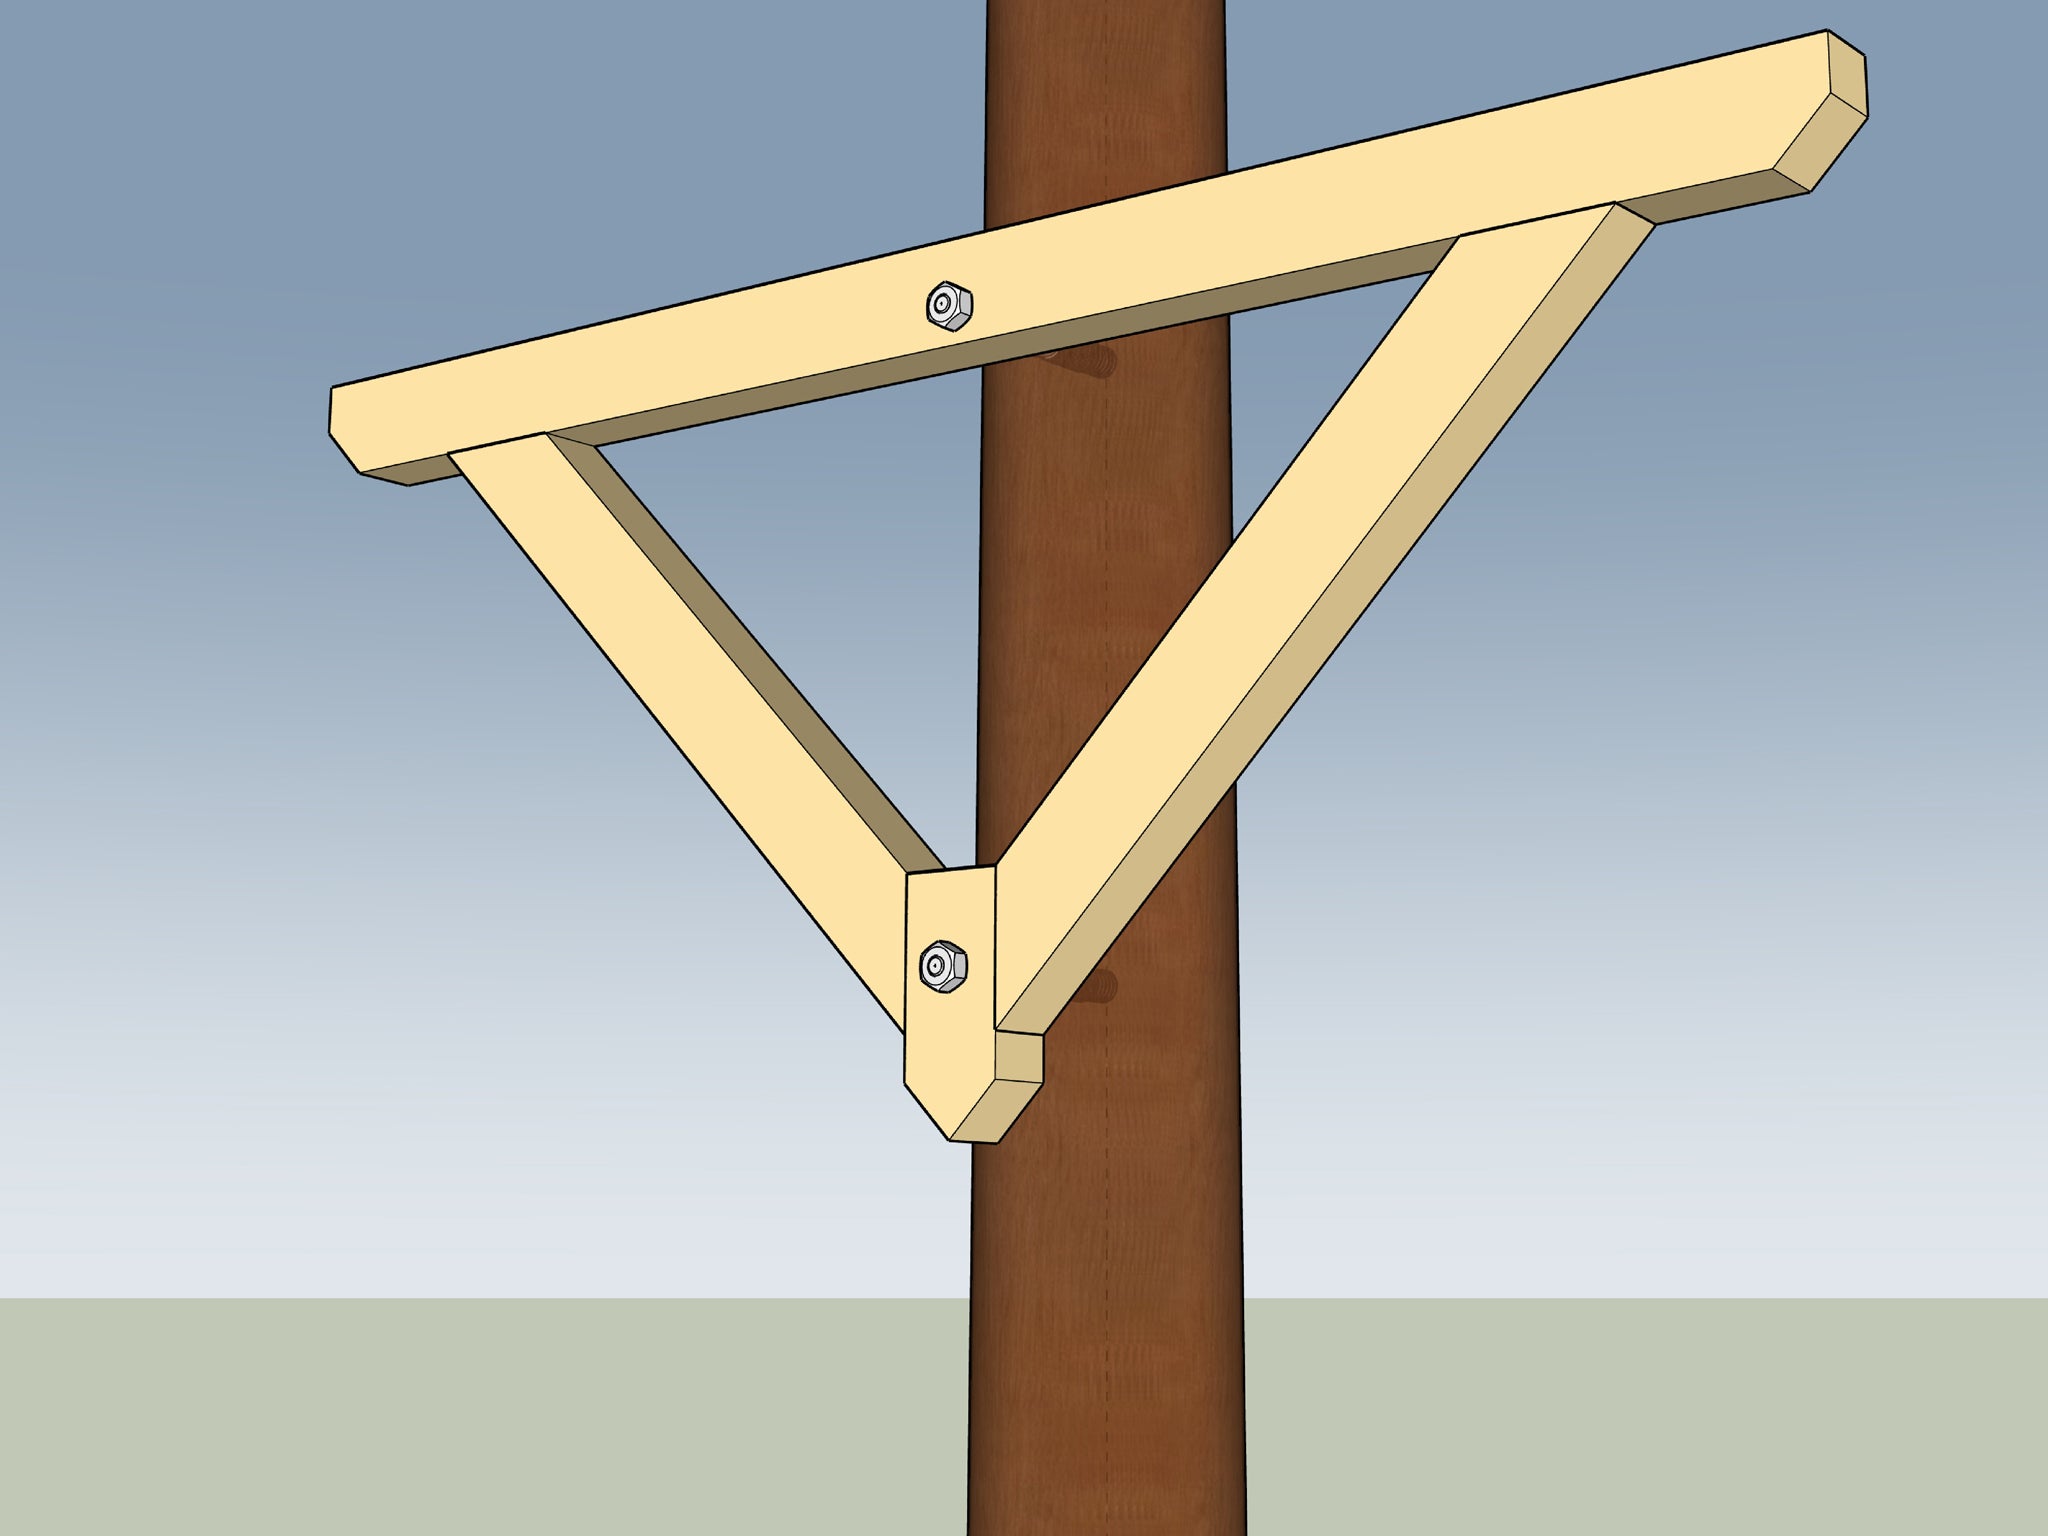
Why a triangle?
A single beam would rotate around the screw axis of the treebolt. To prevent this, you need a rigid triangle ...

High vertical load capacity
A Tribeam Kit consists of: Fixed Beam Bracket top + Tribeam Bracket bottom. Vertical loads are transferred to the tree through the two Tree Bolts!

Horizontal: light play
The triangle is rigid and cannot tip sideways. Nevertheless, the triangle remains slightly rotatable around the central axis, which dampens wind fluctuations.

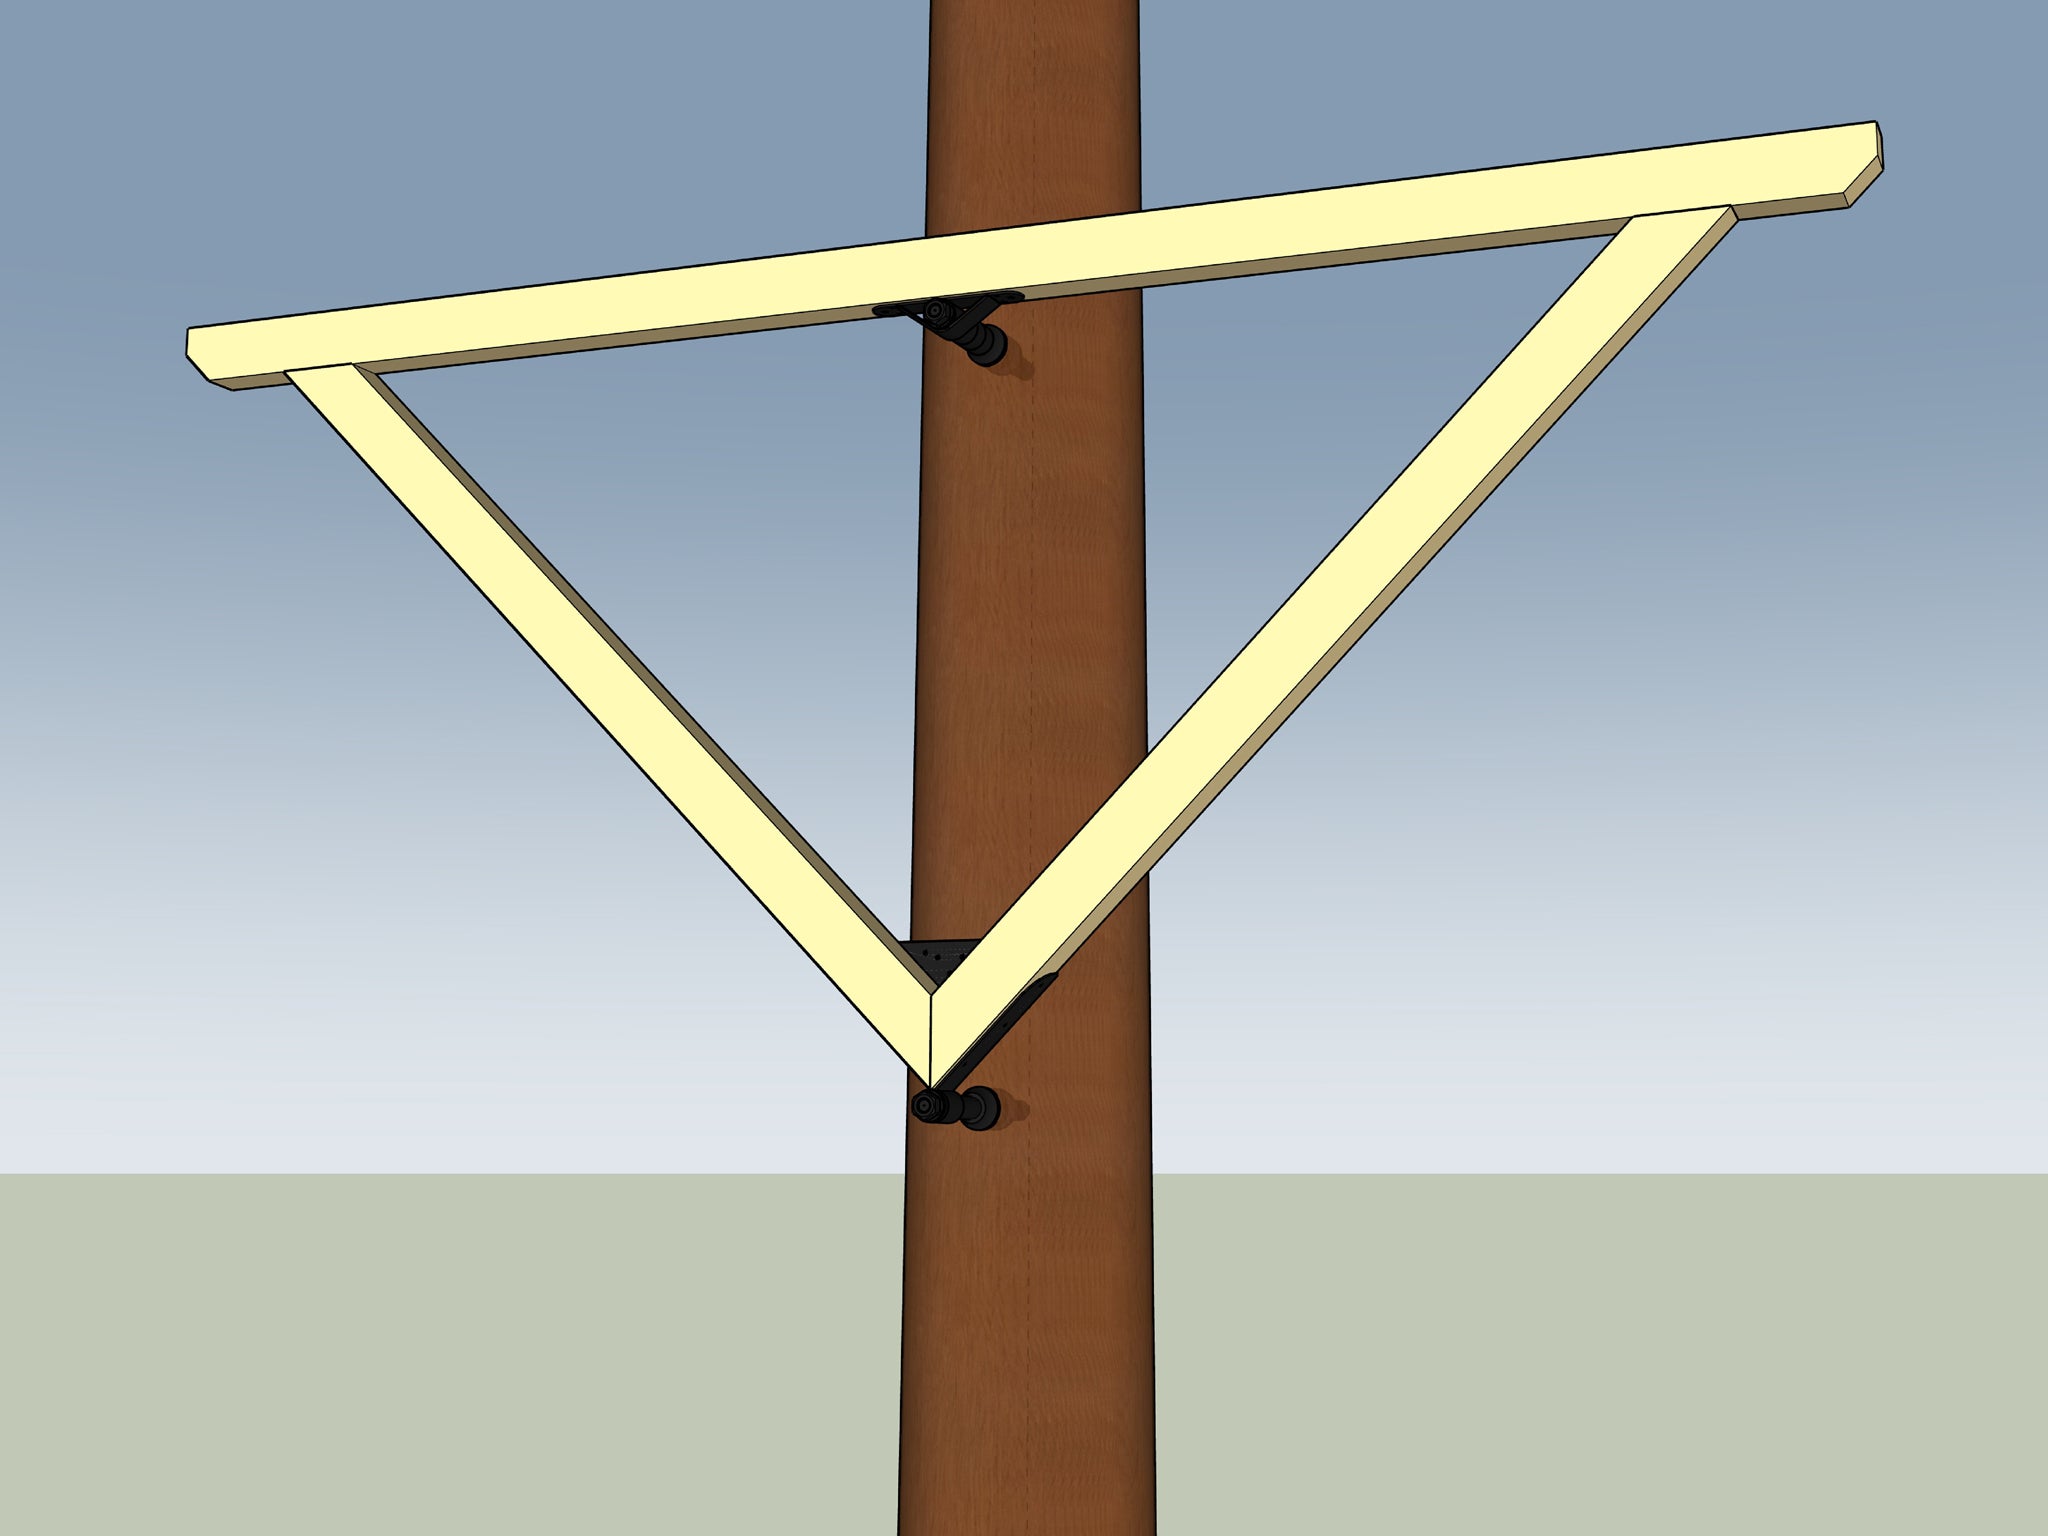
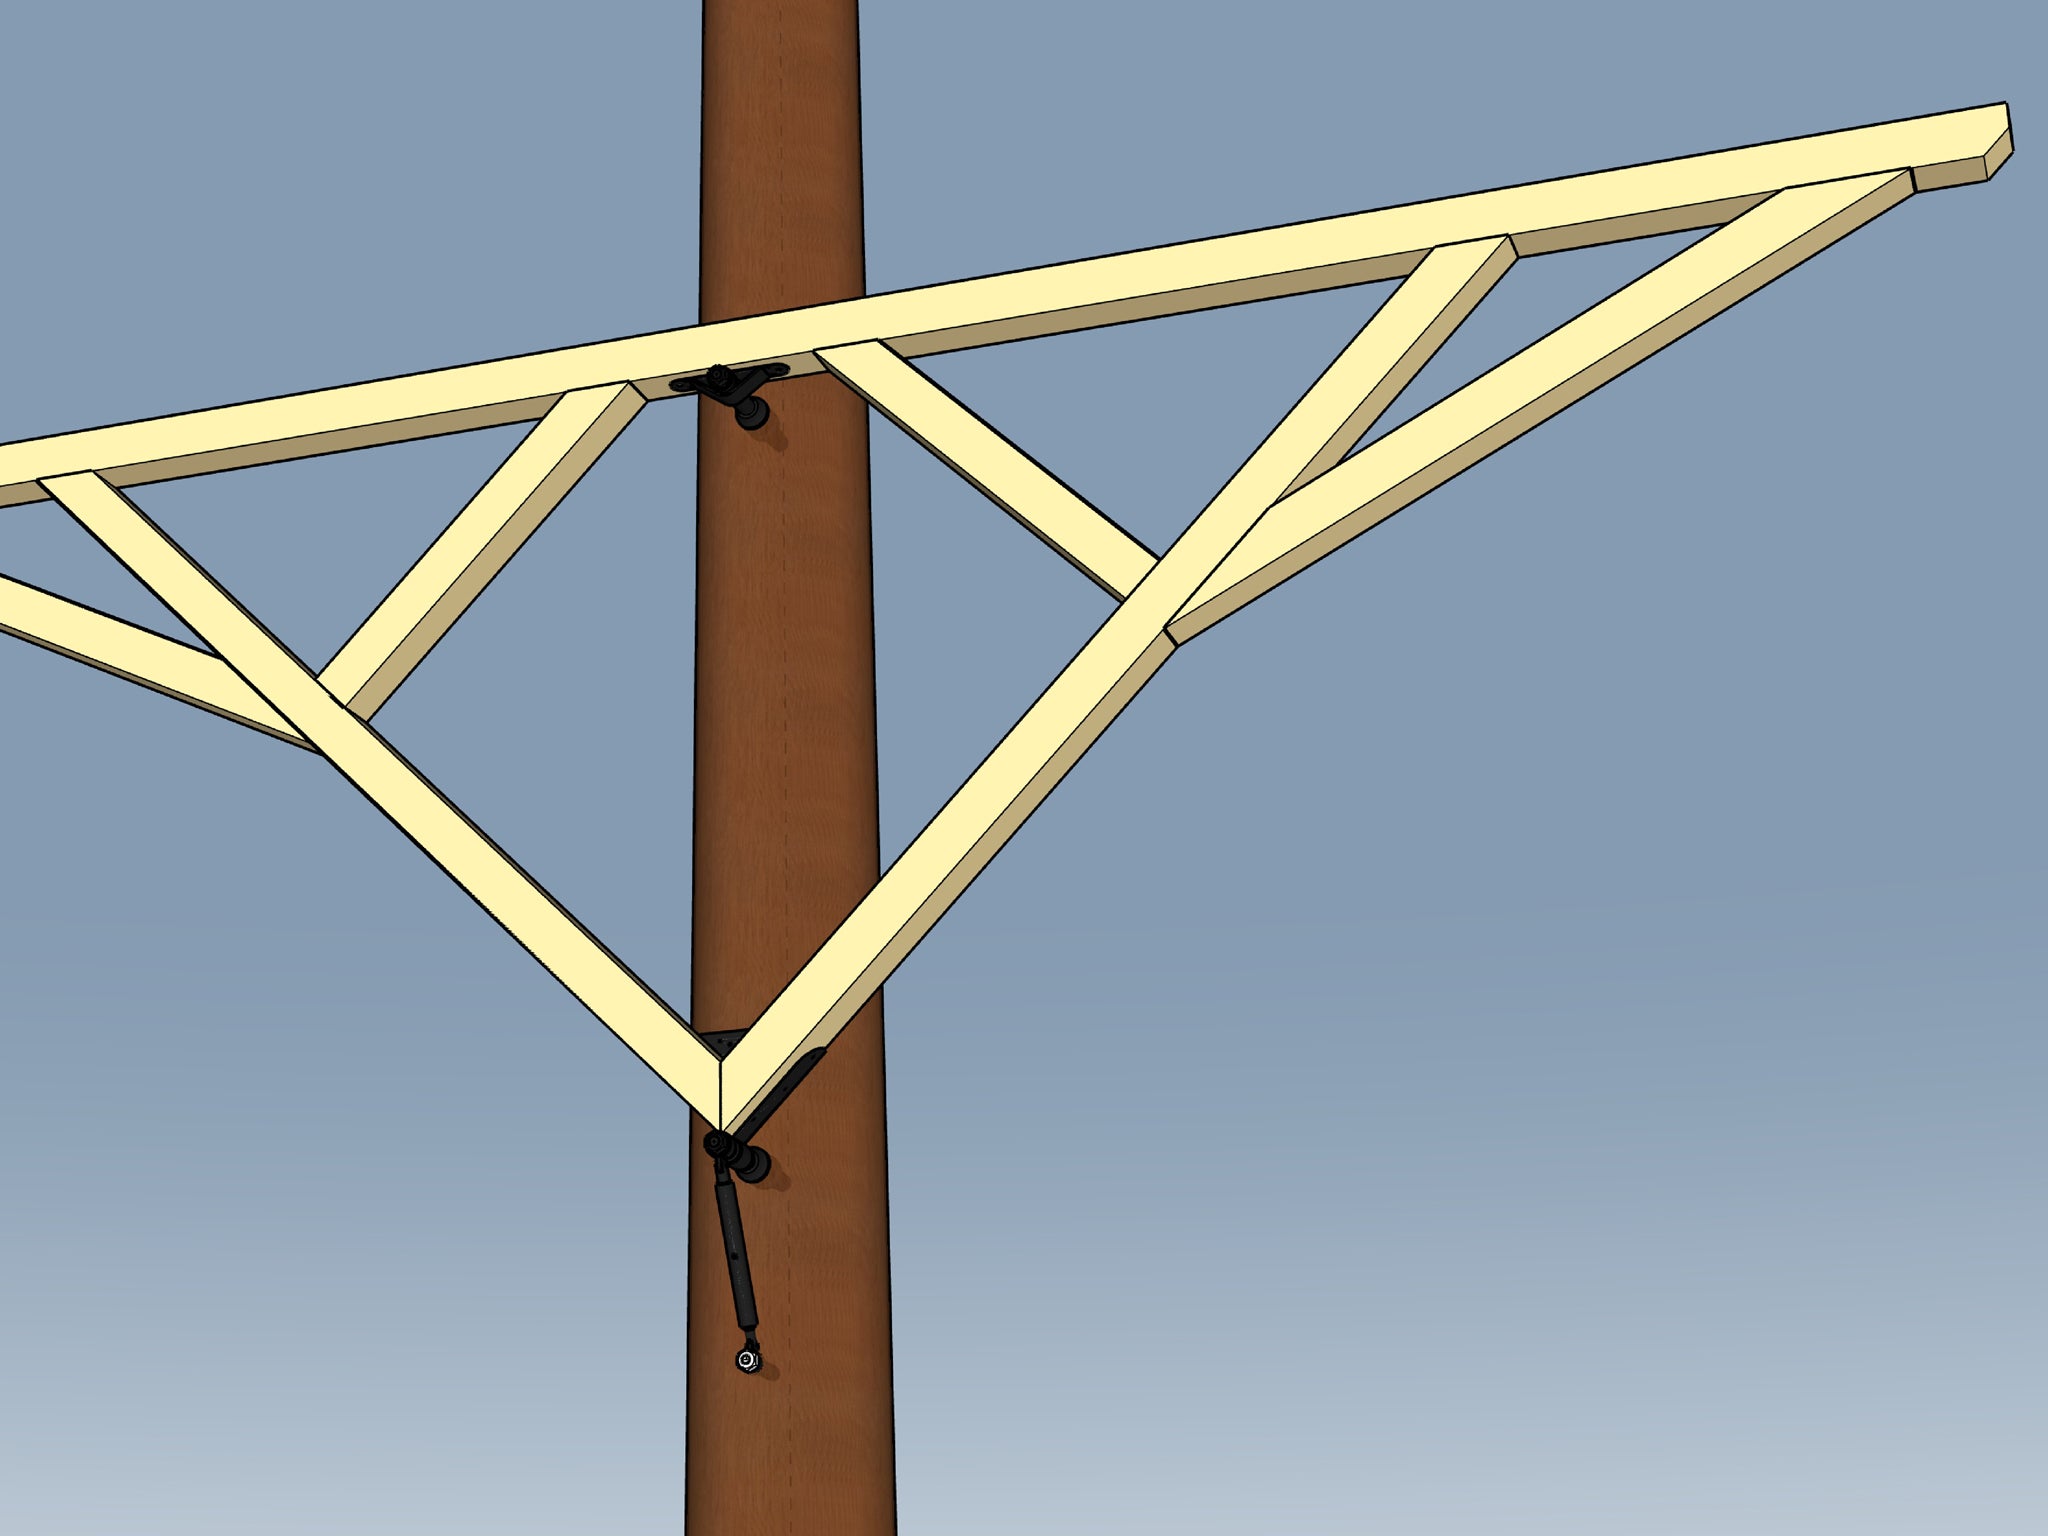
Classical, symmetrical triangle
This is the standard triangle with 90° bracket.
The guy in the picture is me: Vitus – professional treehouse builder and founder of TheTreehouse.Shop – I'll help you build your treehouse ;)

Reinforced 2D-Tribeam
For heavy loads, you can reinforce the triangle with additional struts – this prevents the long struts from bending and distributes the load more evenly across the beams. You can use wooden wedges to reinforce the upper strut connection.

How to screw the wooden beams together
The beams are usually butt-jointed and screwed directly with wood screws: partial and full thread wood screws; ø 6 - 8 mm; galvanised.
For high loads, they are additionally reinforced with PU glue or angle plates.

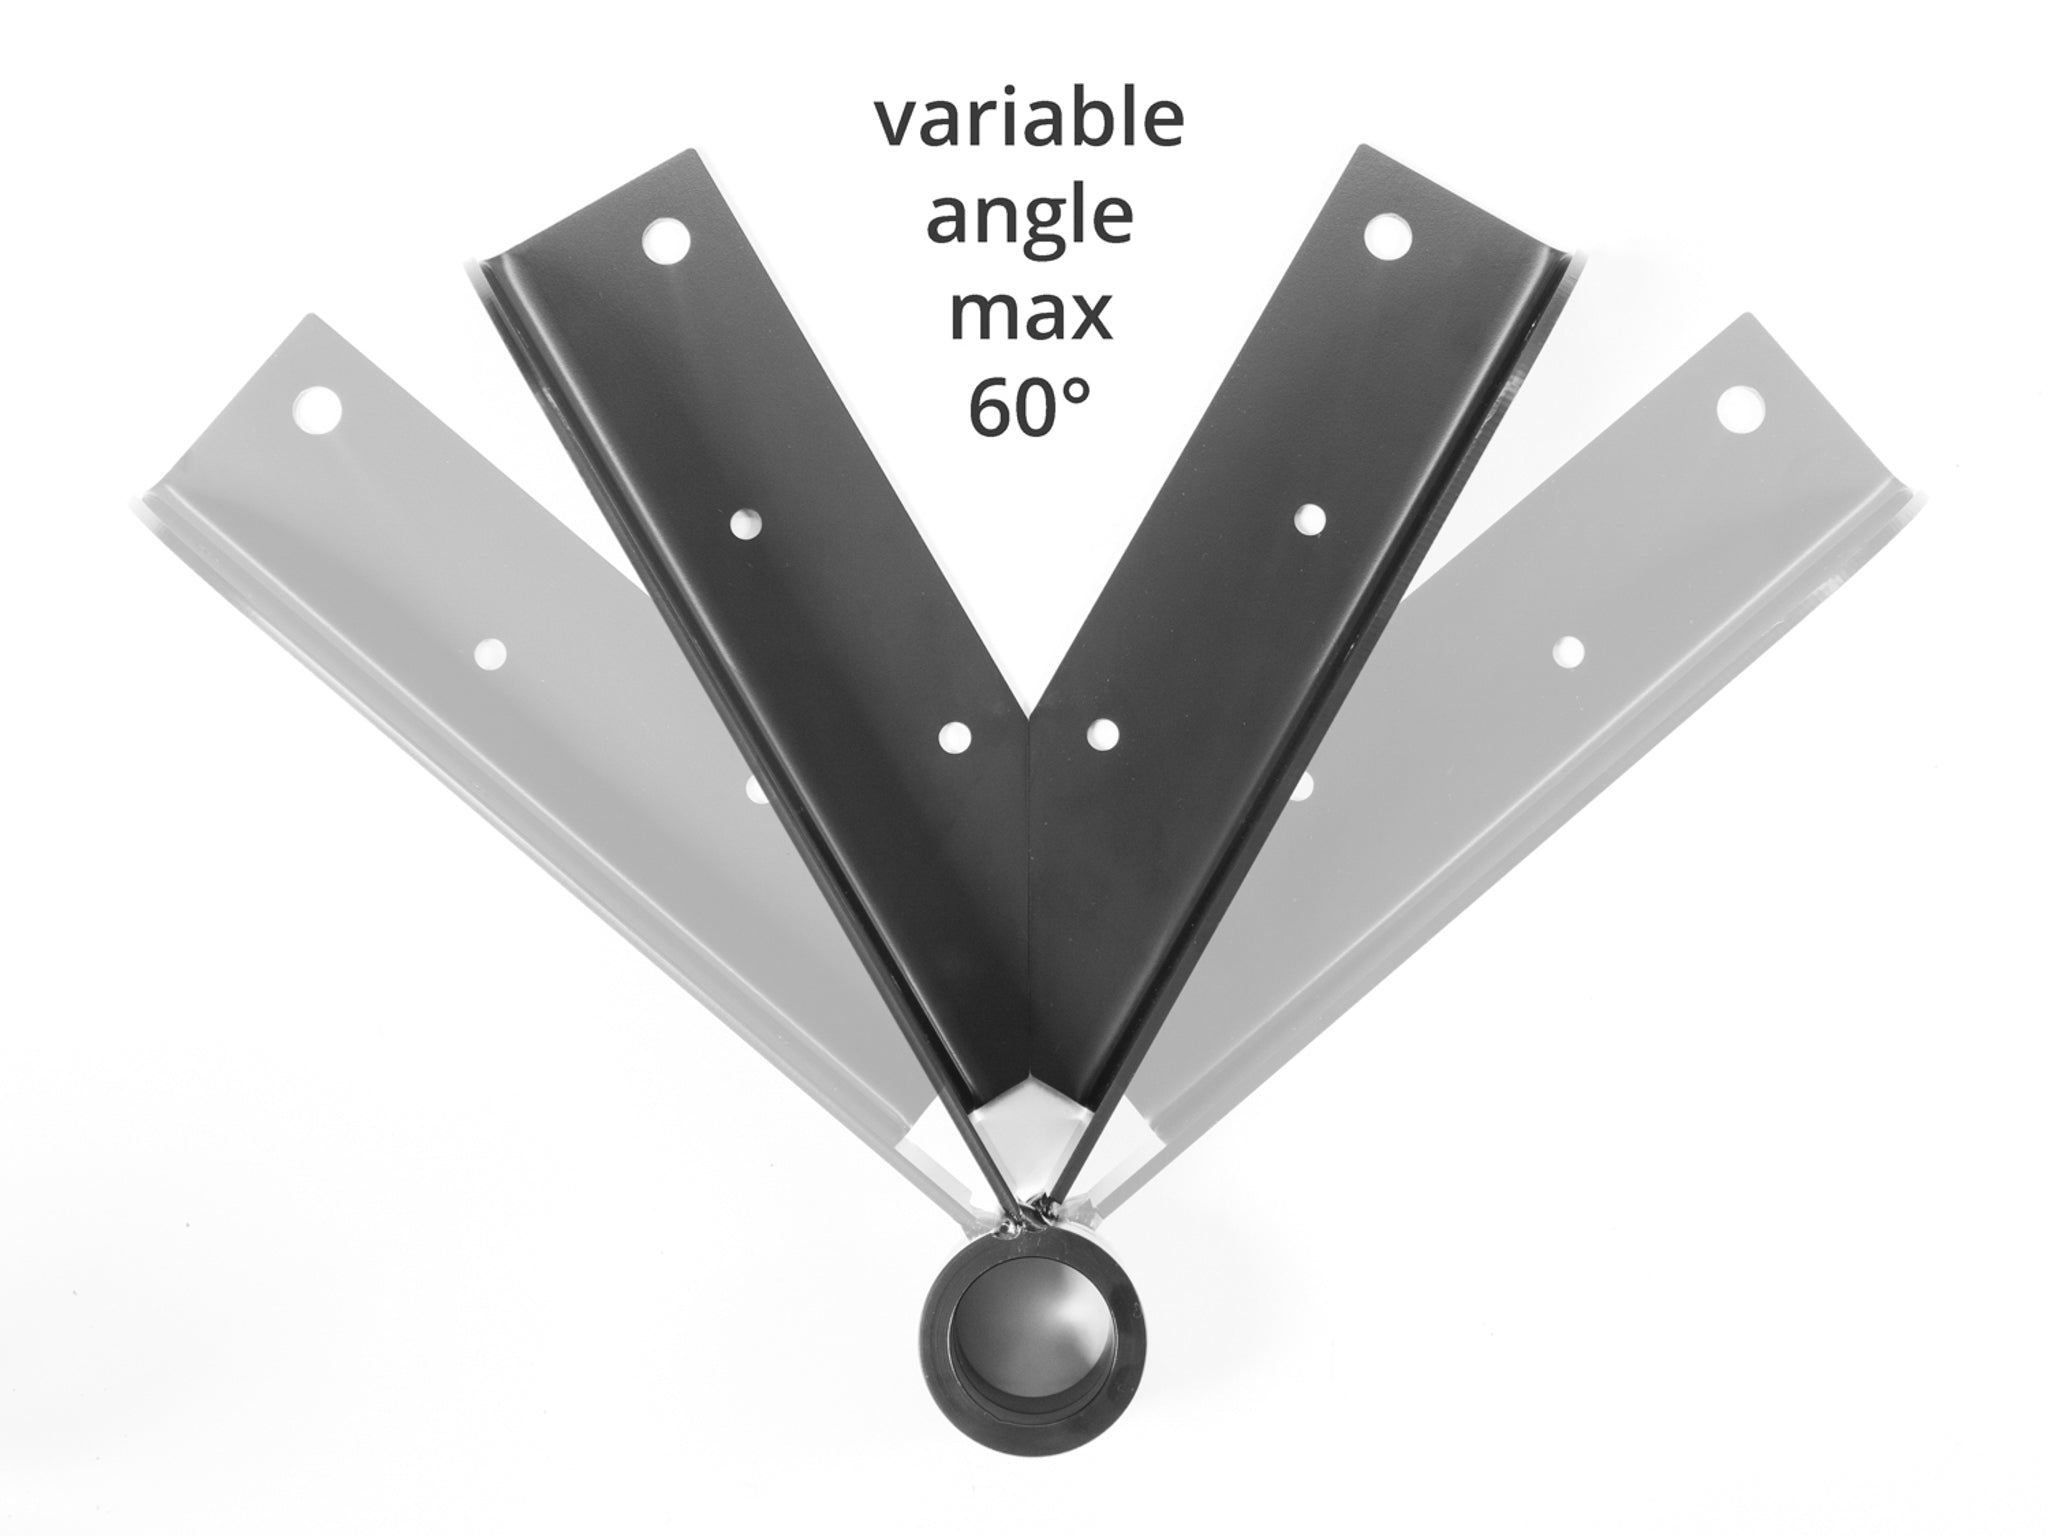
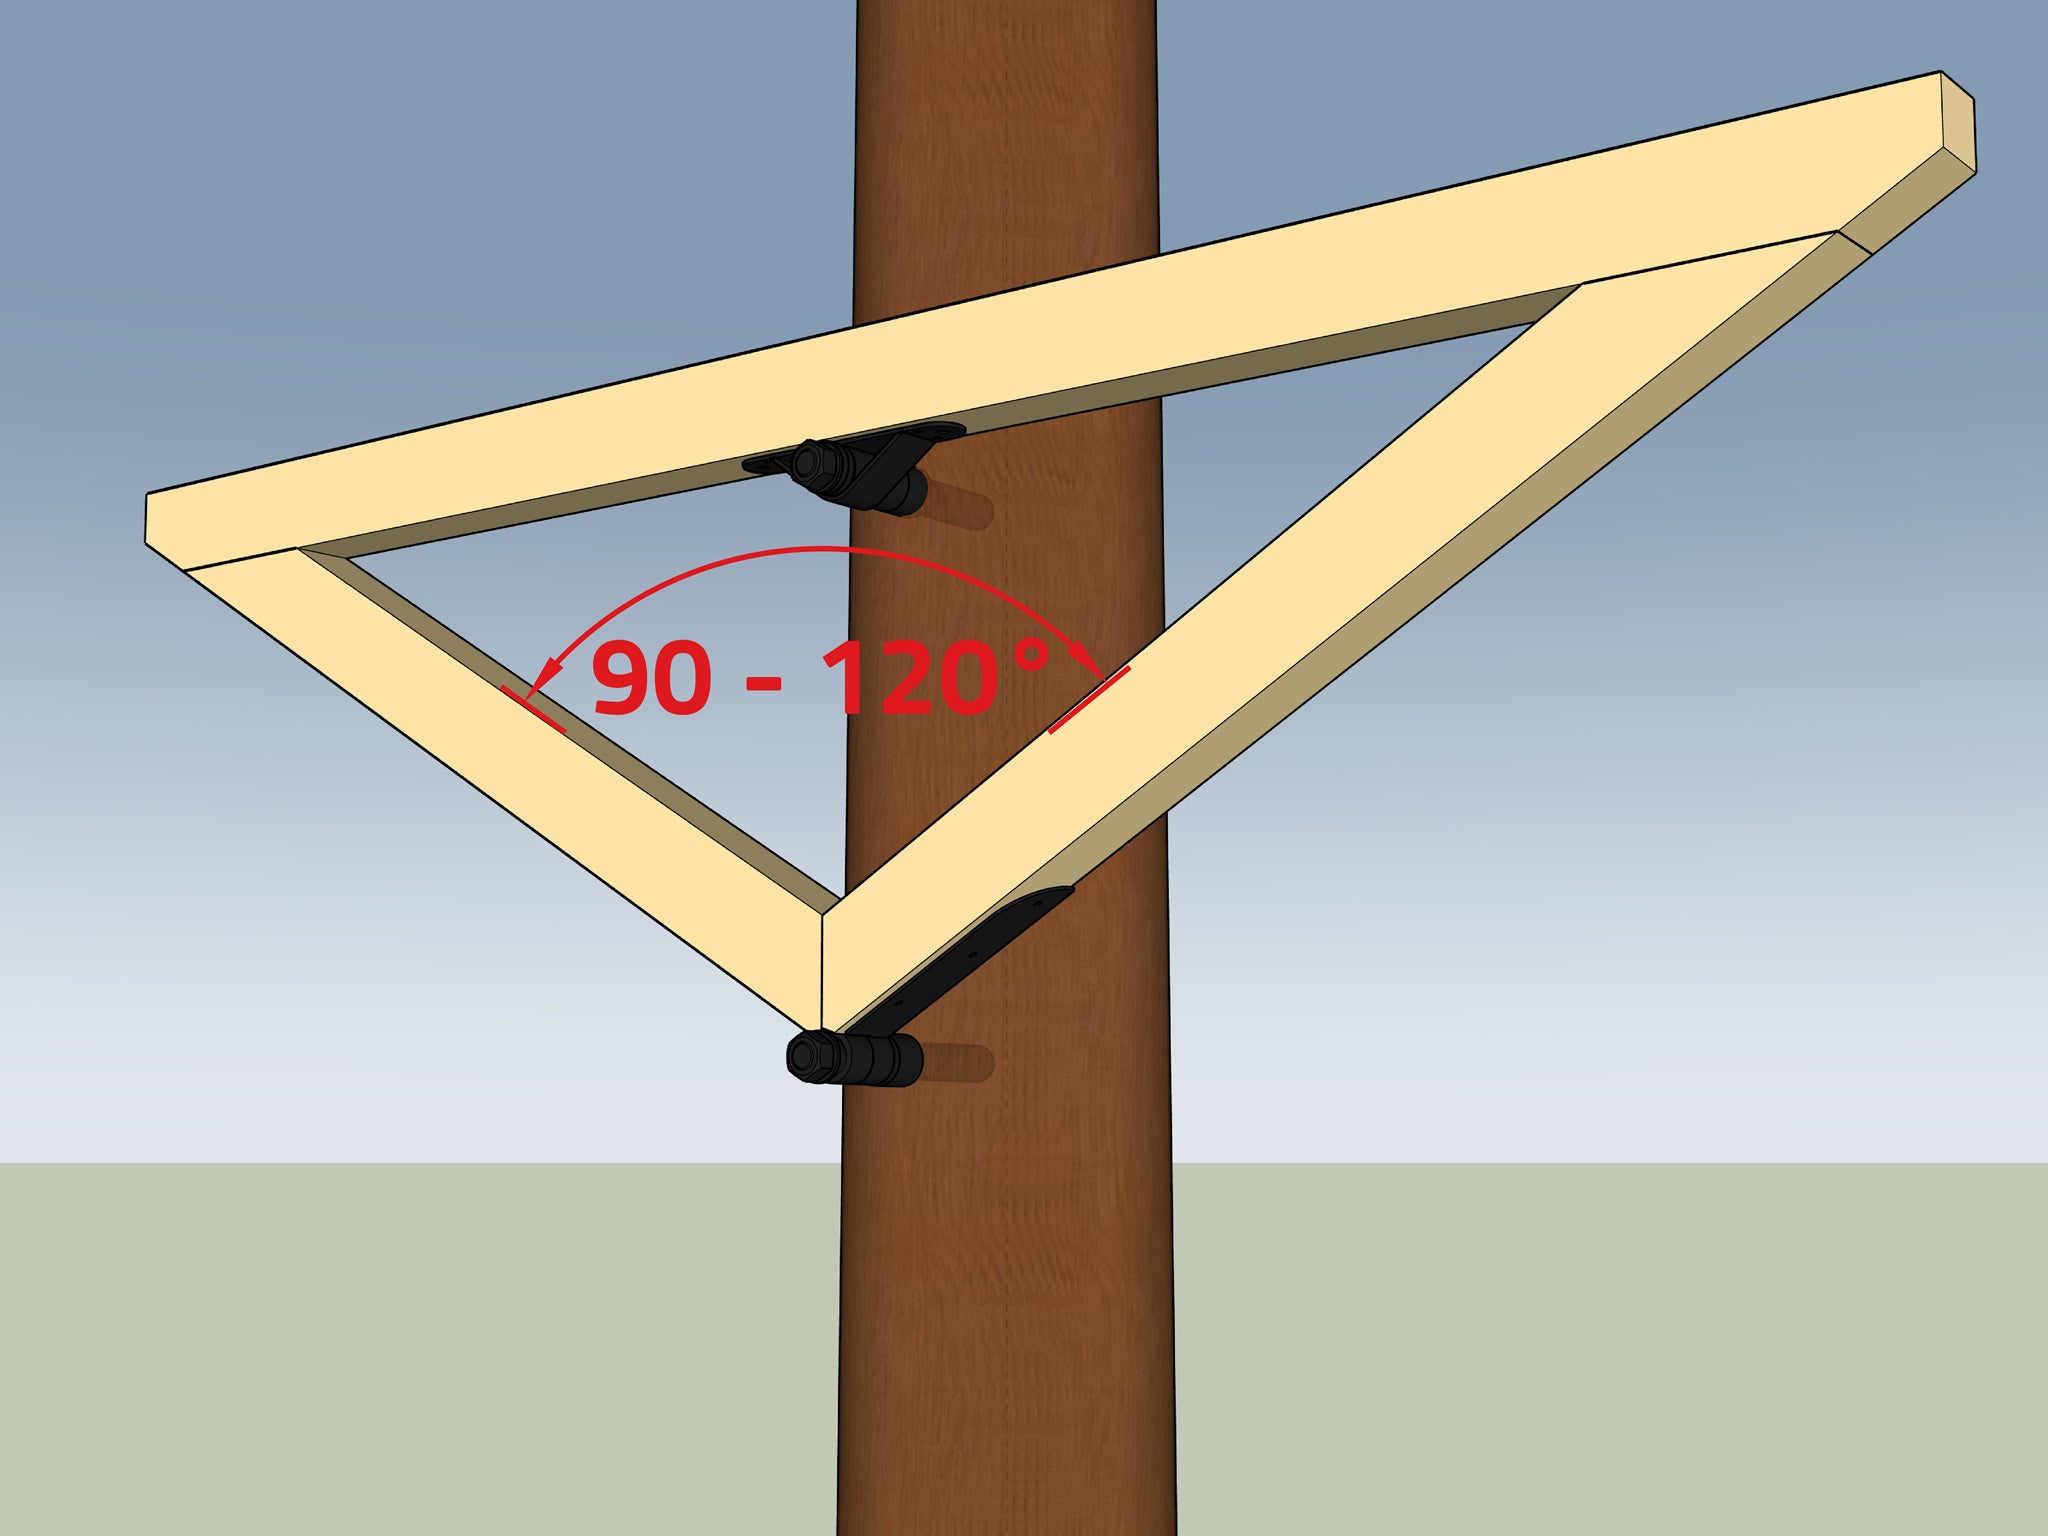
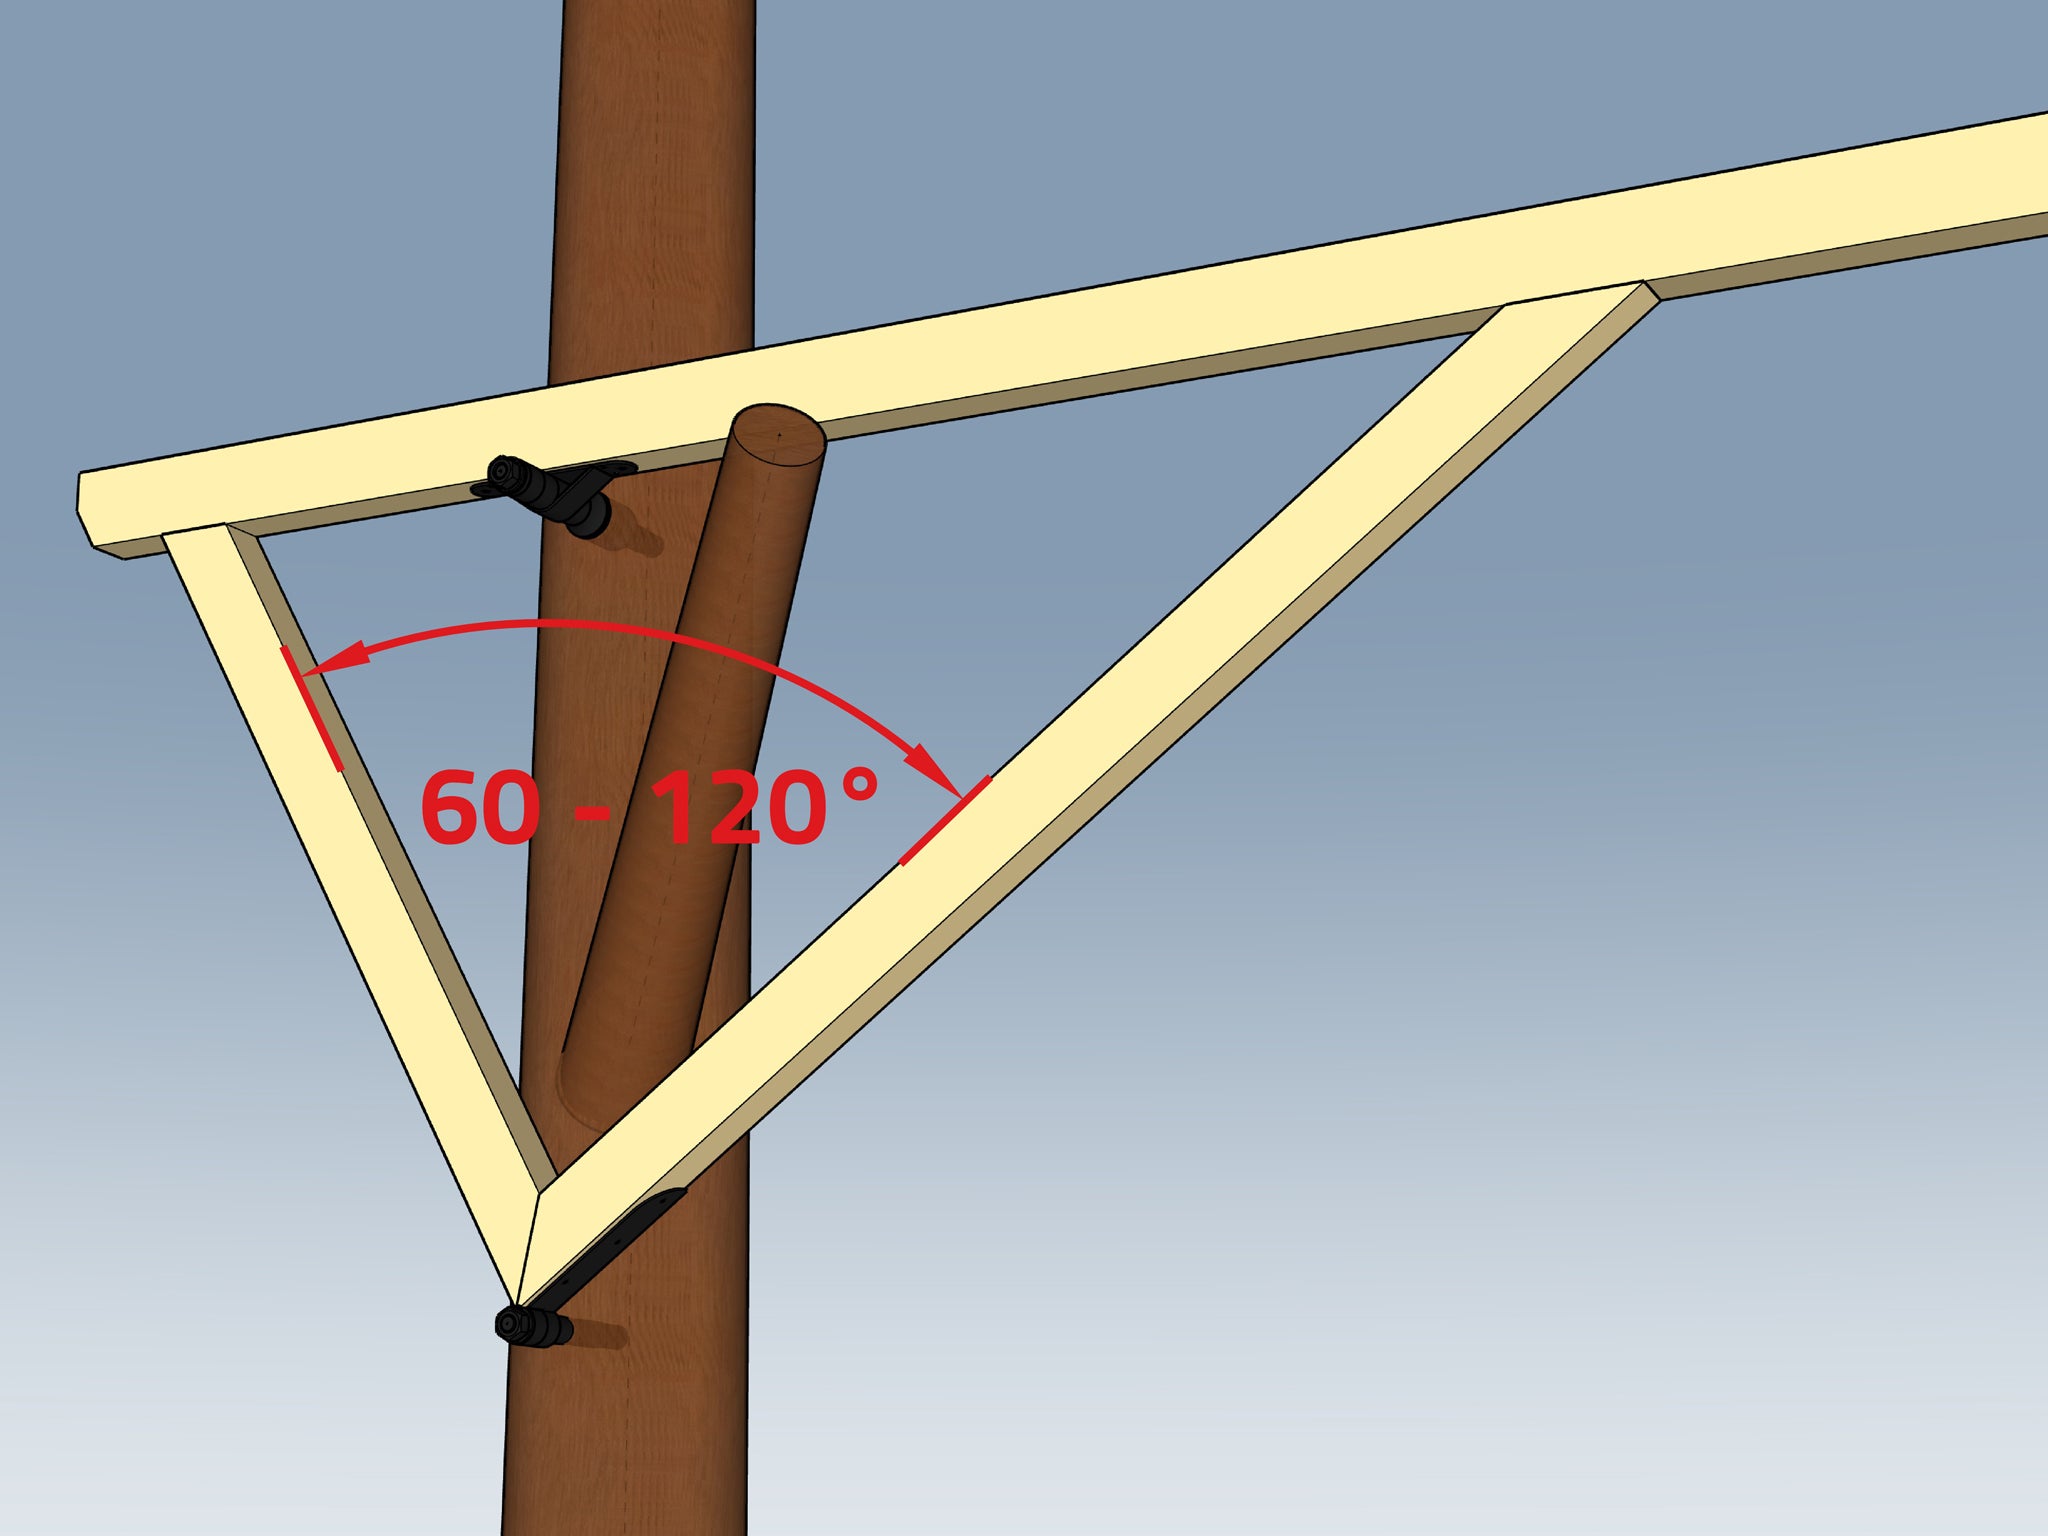
Sharp strut angle up to 60°
With the Tribeam Bracket Vario 60°, the strut angle can be freely adjusted so that branches can be avoided, for example.
The more acute the angle, the more load can be absorbed vertically.

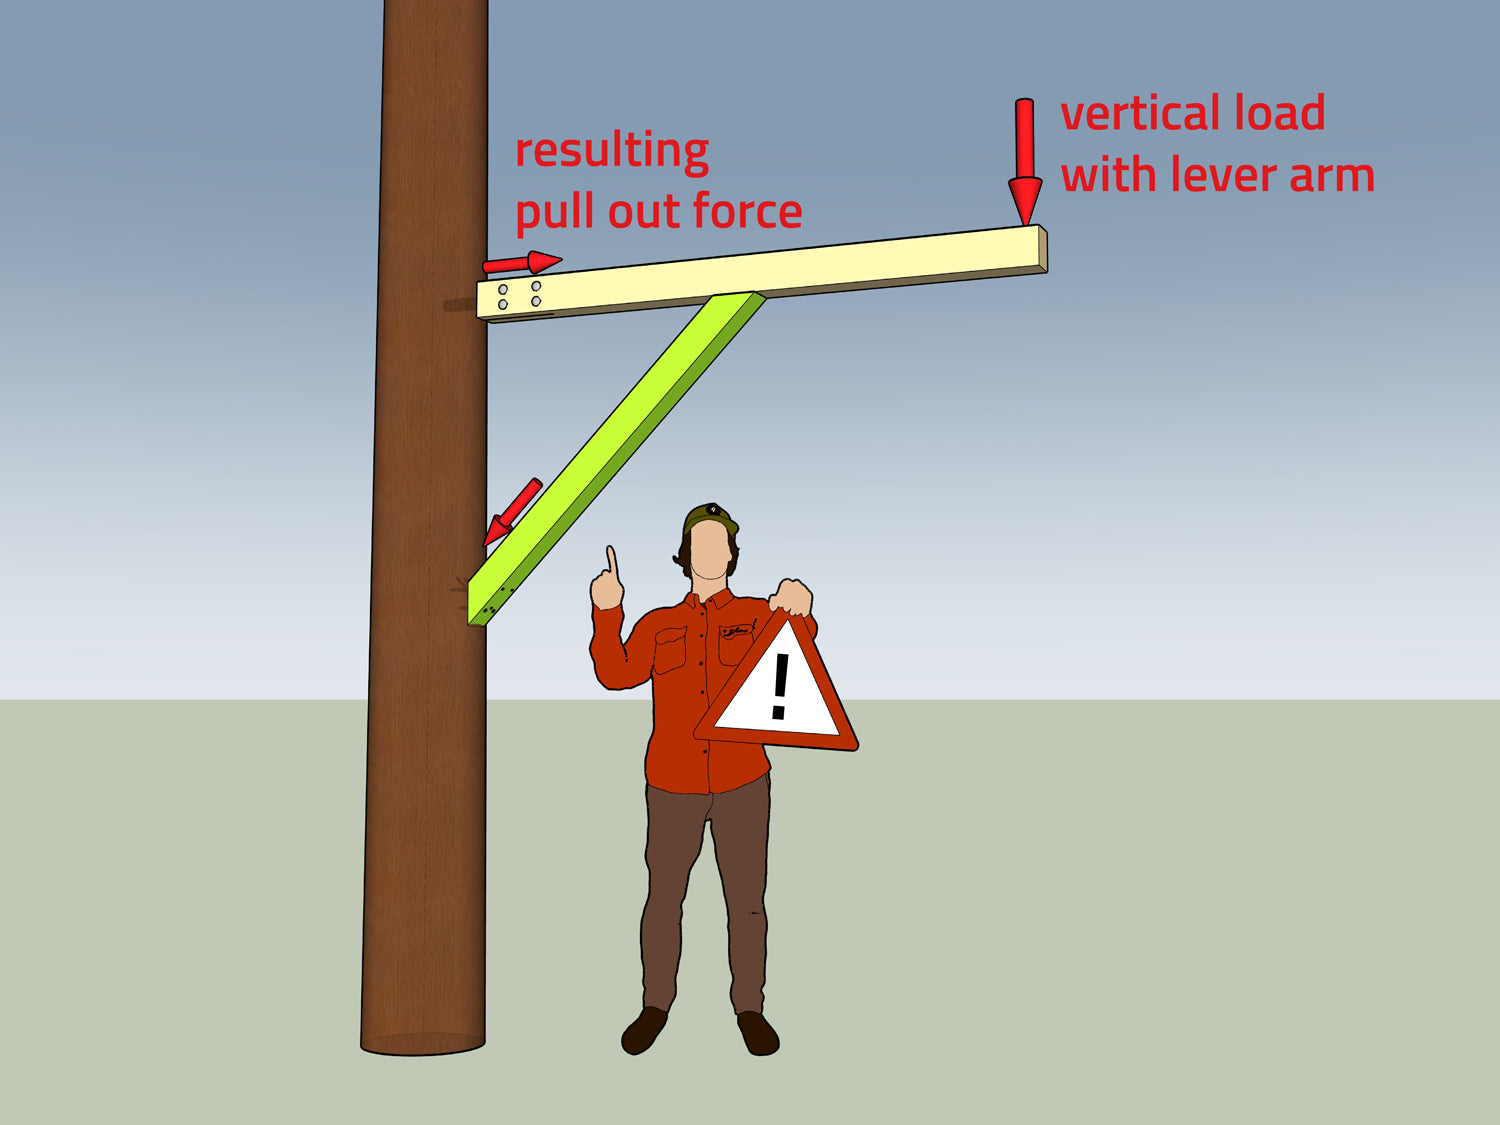
Flat strut angle up to 120°
Flat triangles can also be an elegant solution. However, the angle at the lower bracket should not be too flat (max. 120°), as otherwise the horizontal forces on the tree bolt will be too strong.

Horizontal forces on the lever arm!
Caution with long lever arms: The flatter the angle and the further out the load, the greater the horizontal load on the lower tree bolt: Load across the wood grain – wood is less resistant to lateral forces than to forces along the grain!
Our Tribeam Kits
In our shop, you can get customised kits for all platform sizes, from 6 to 50 m² (64,6 ft²).


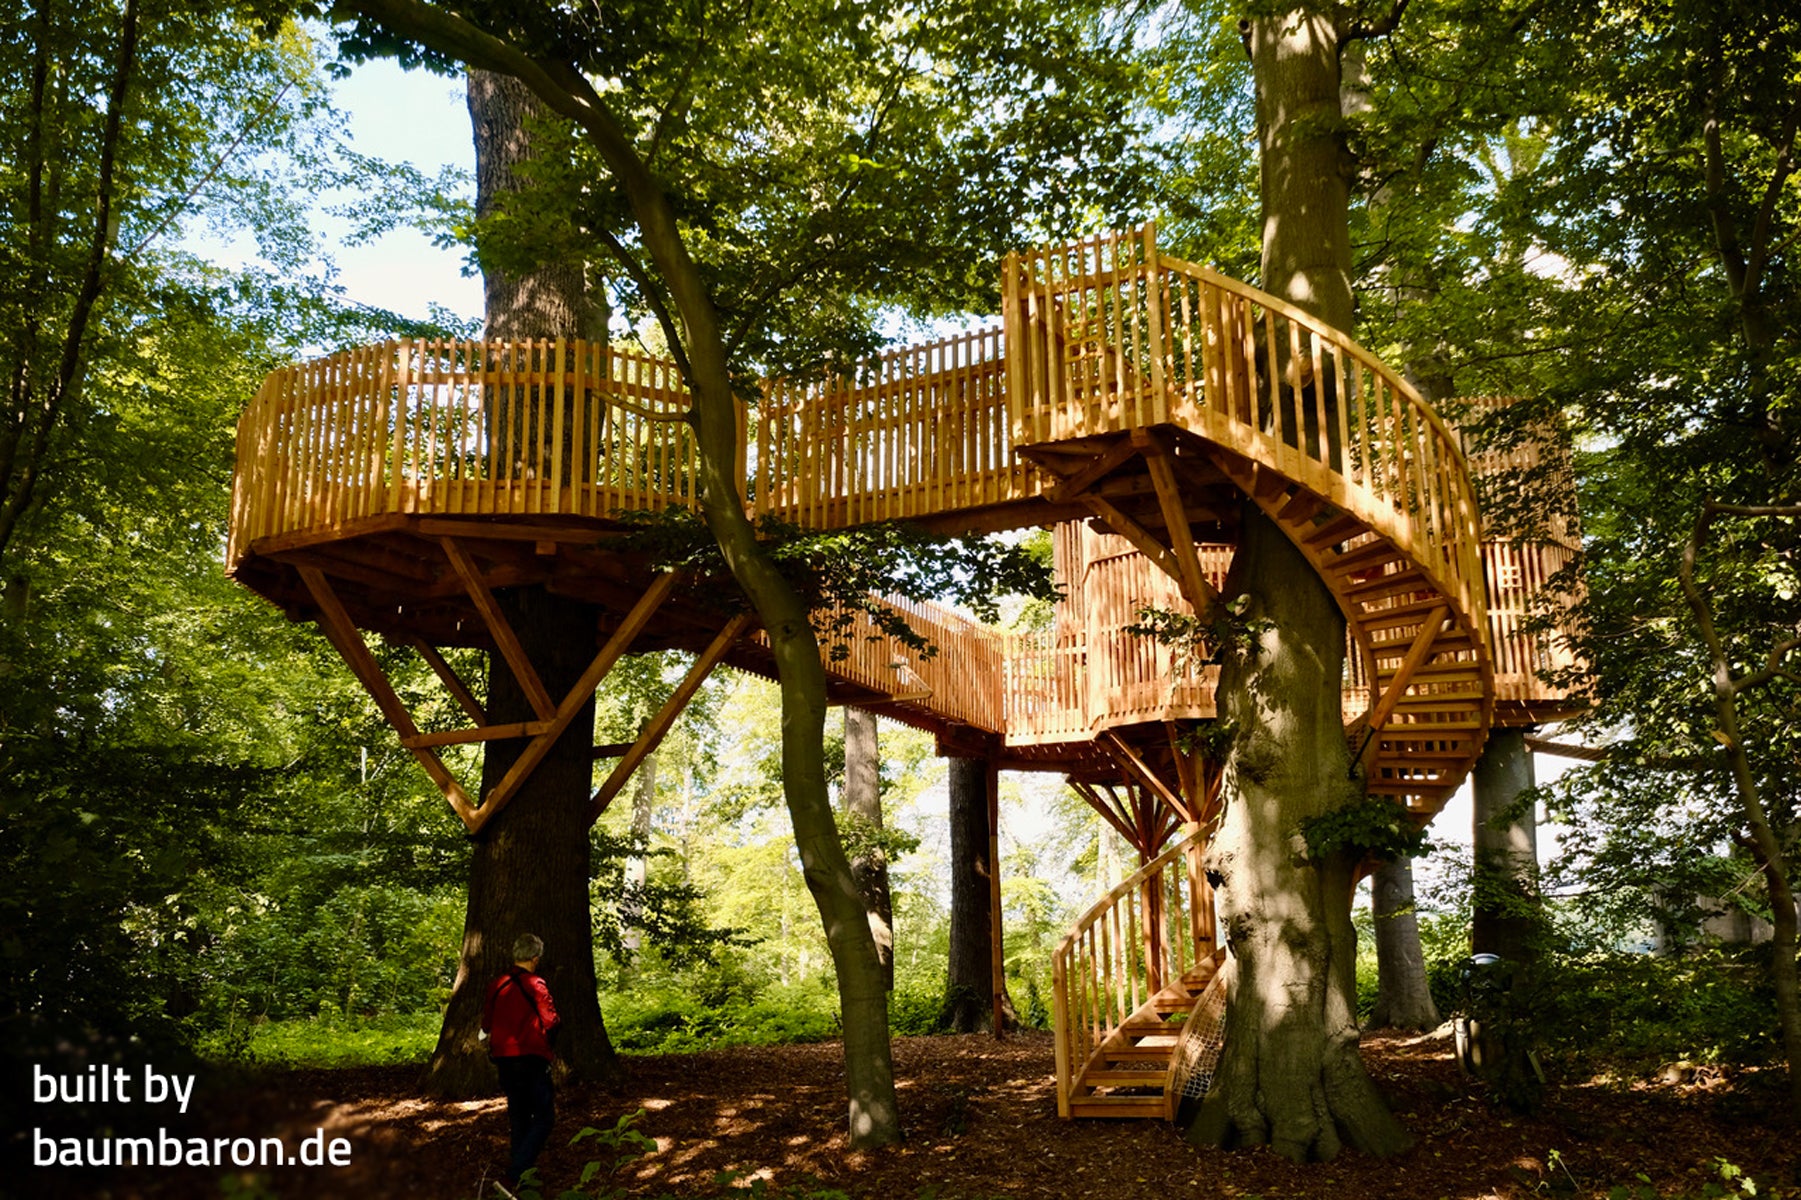
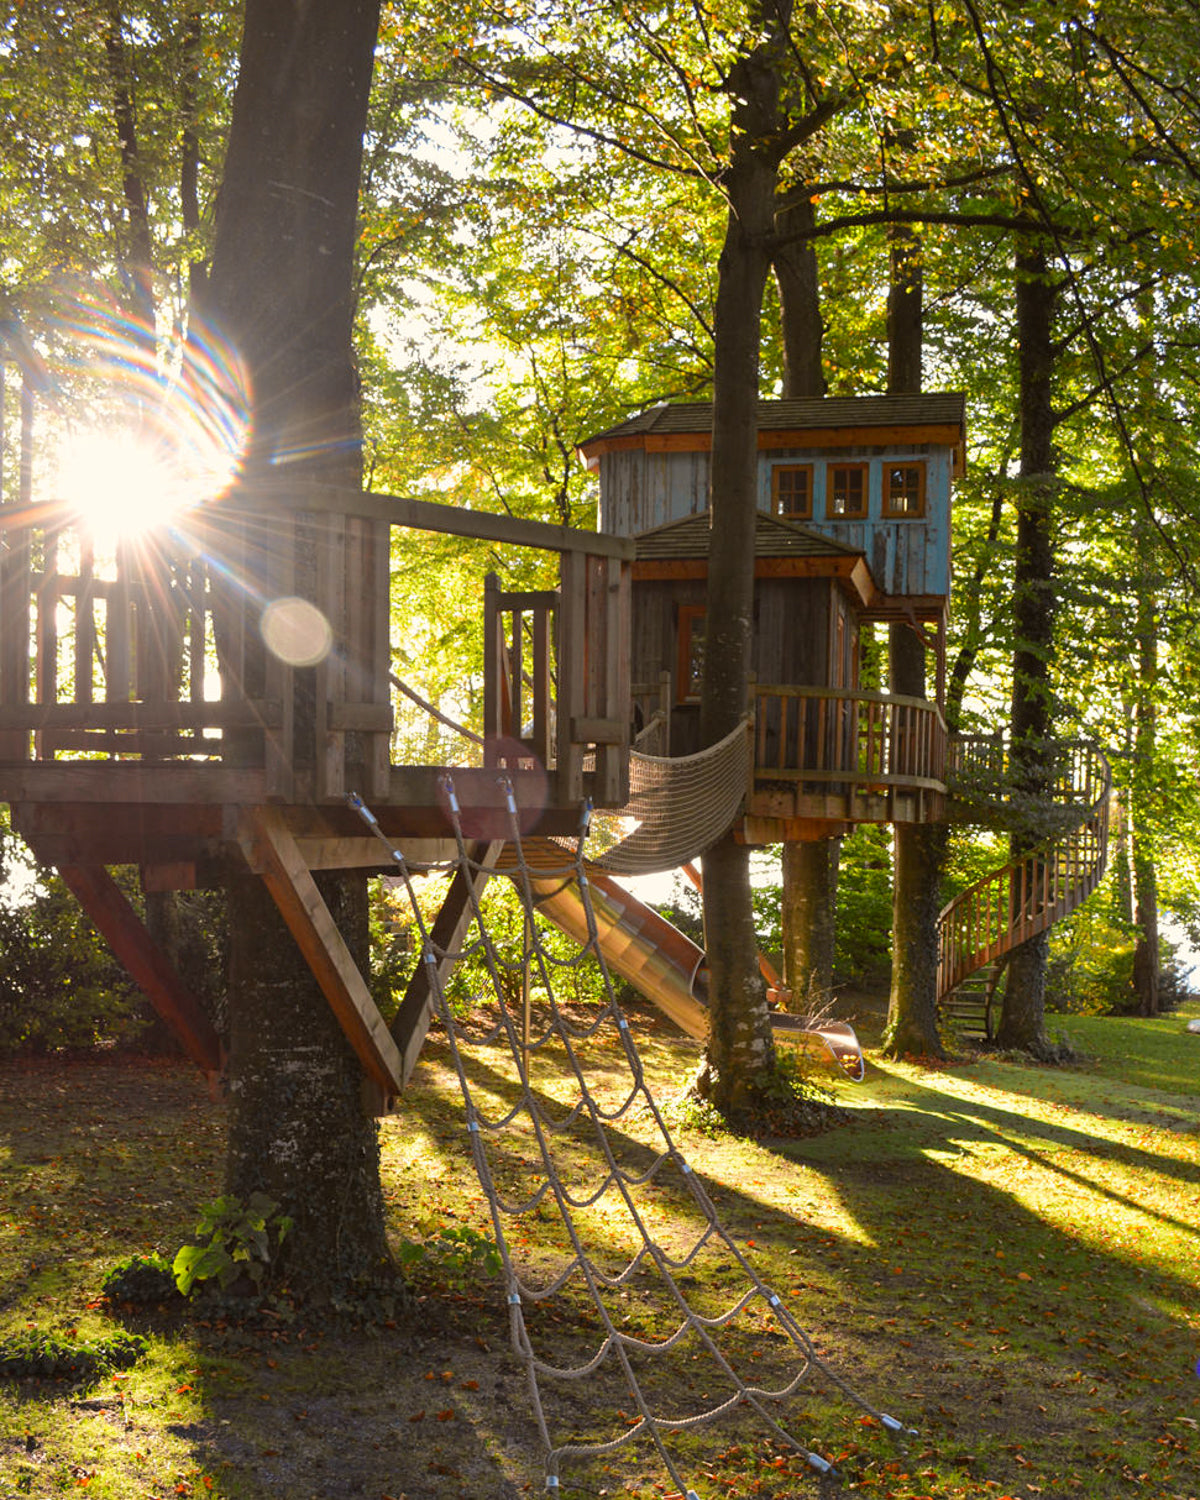
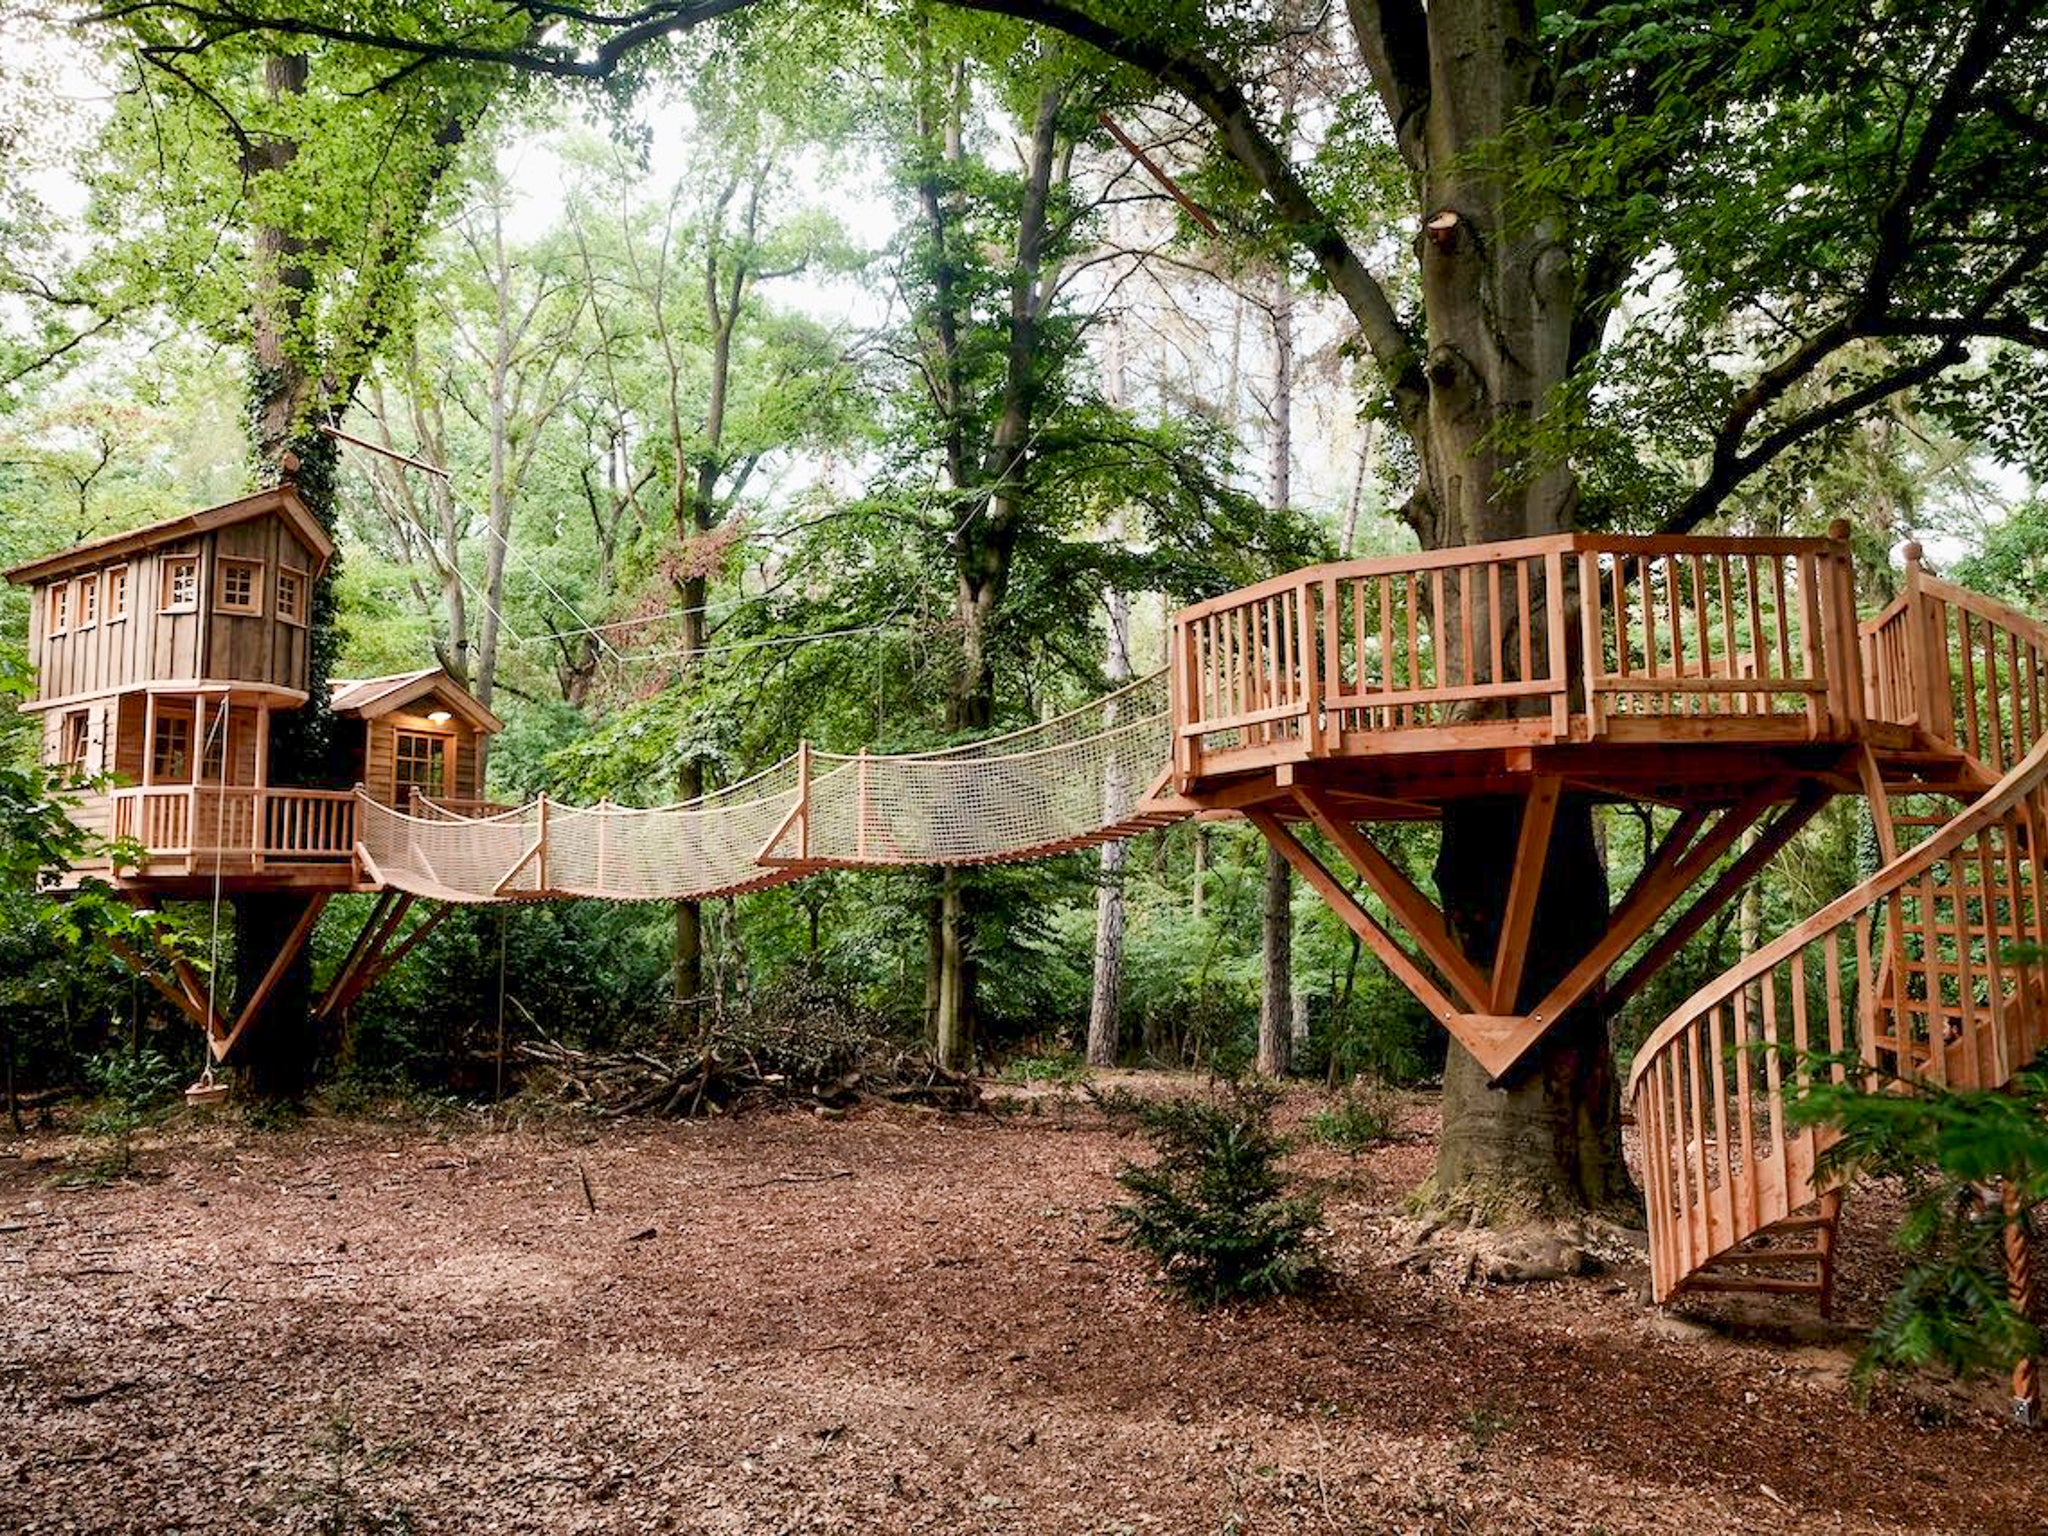
What our customers have built with it
Real projects. Real treehouses. Real inspiration.
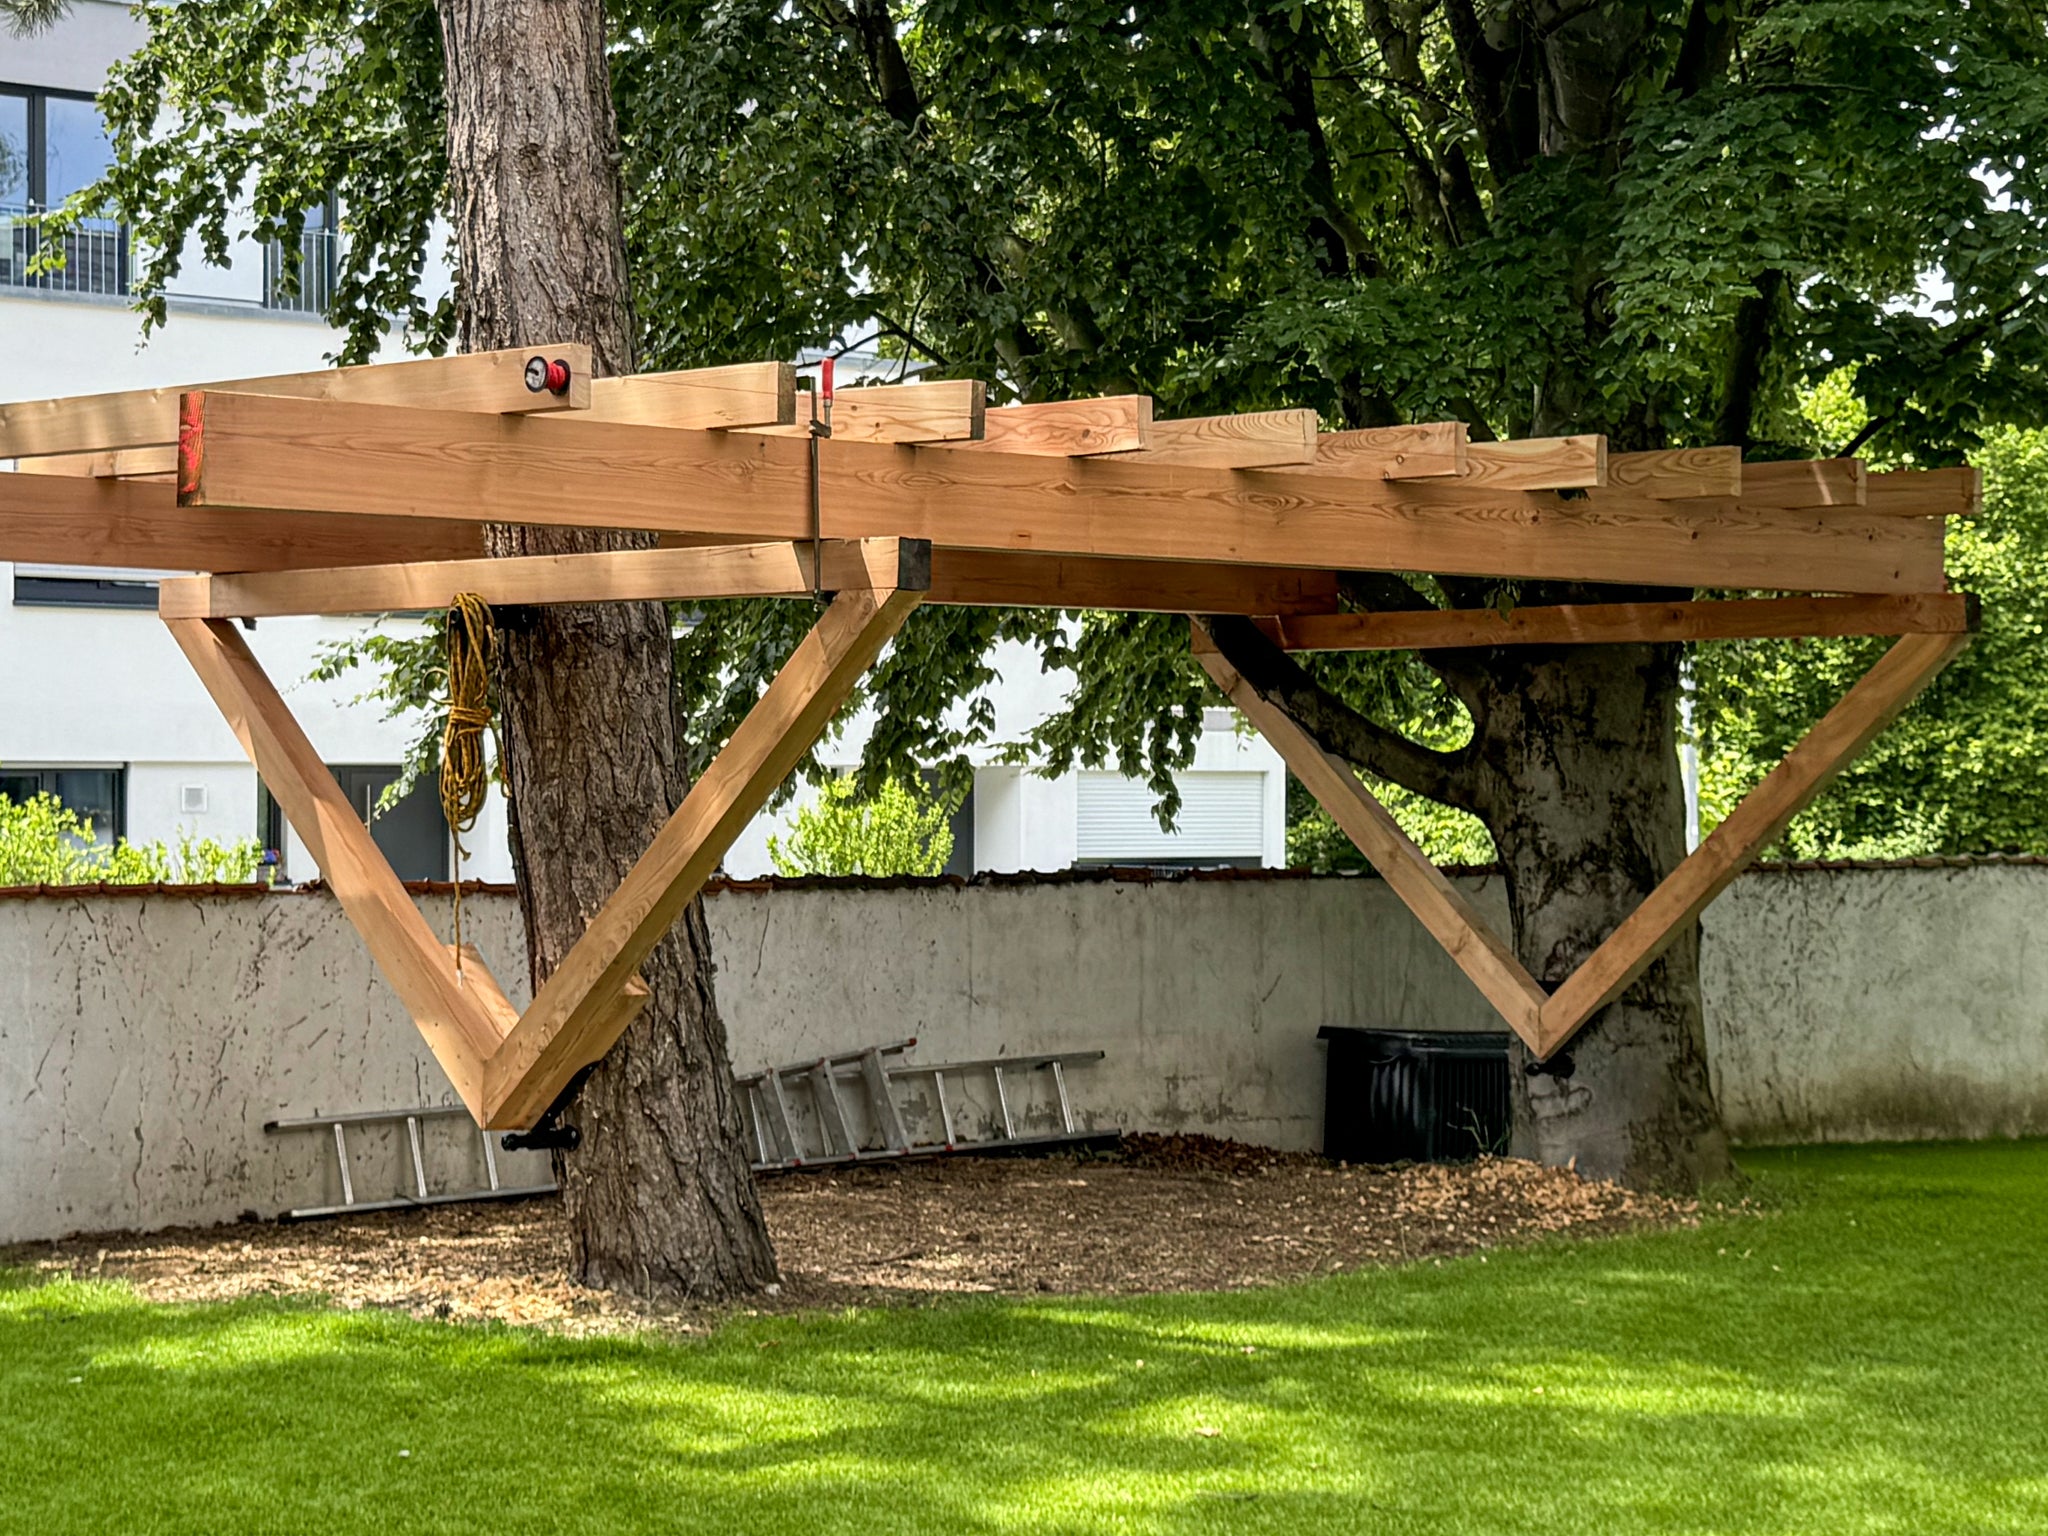

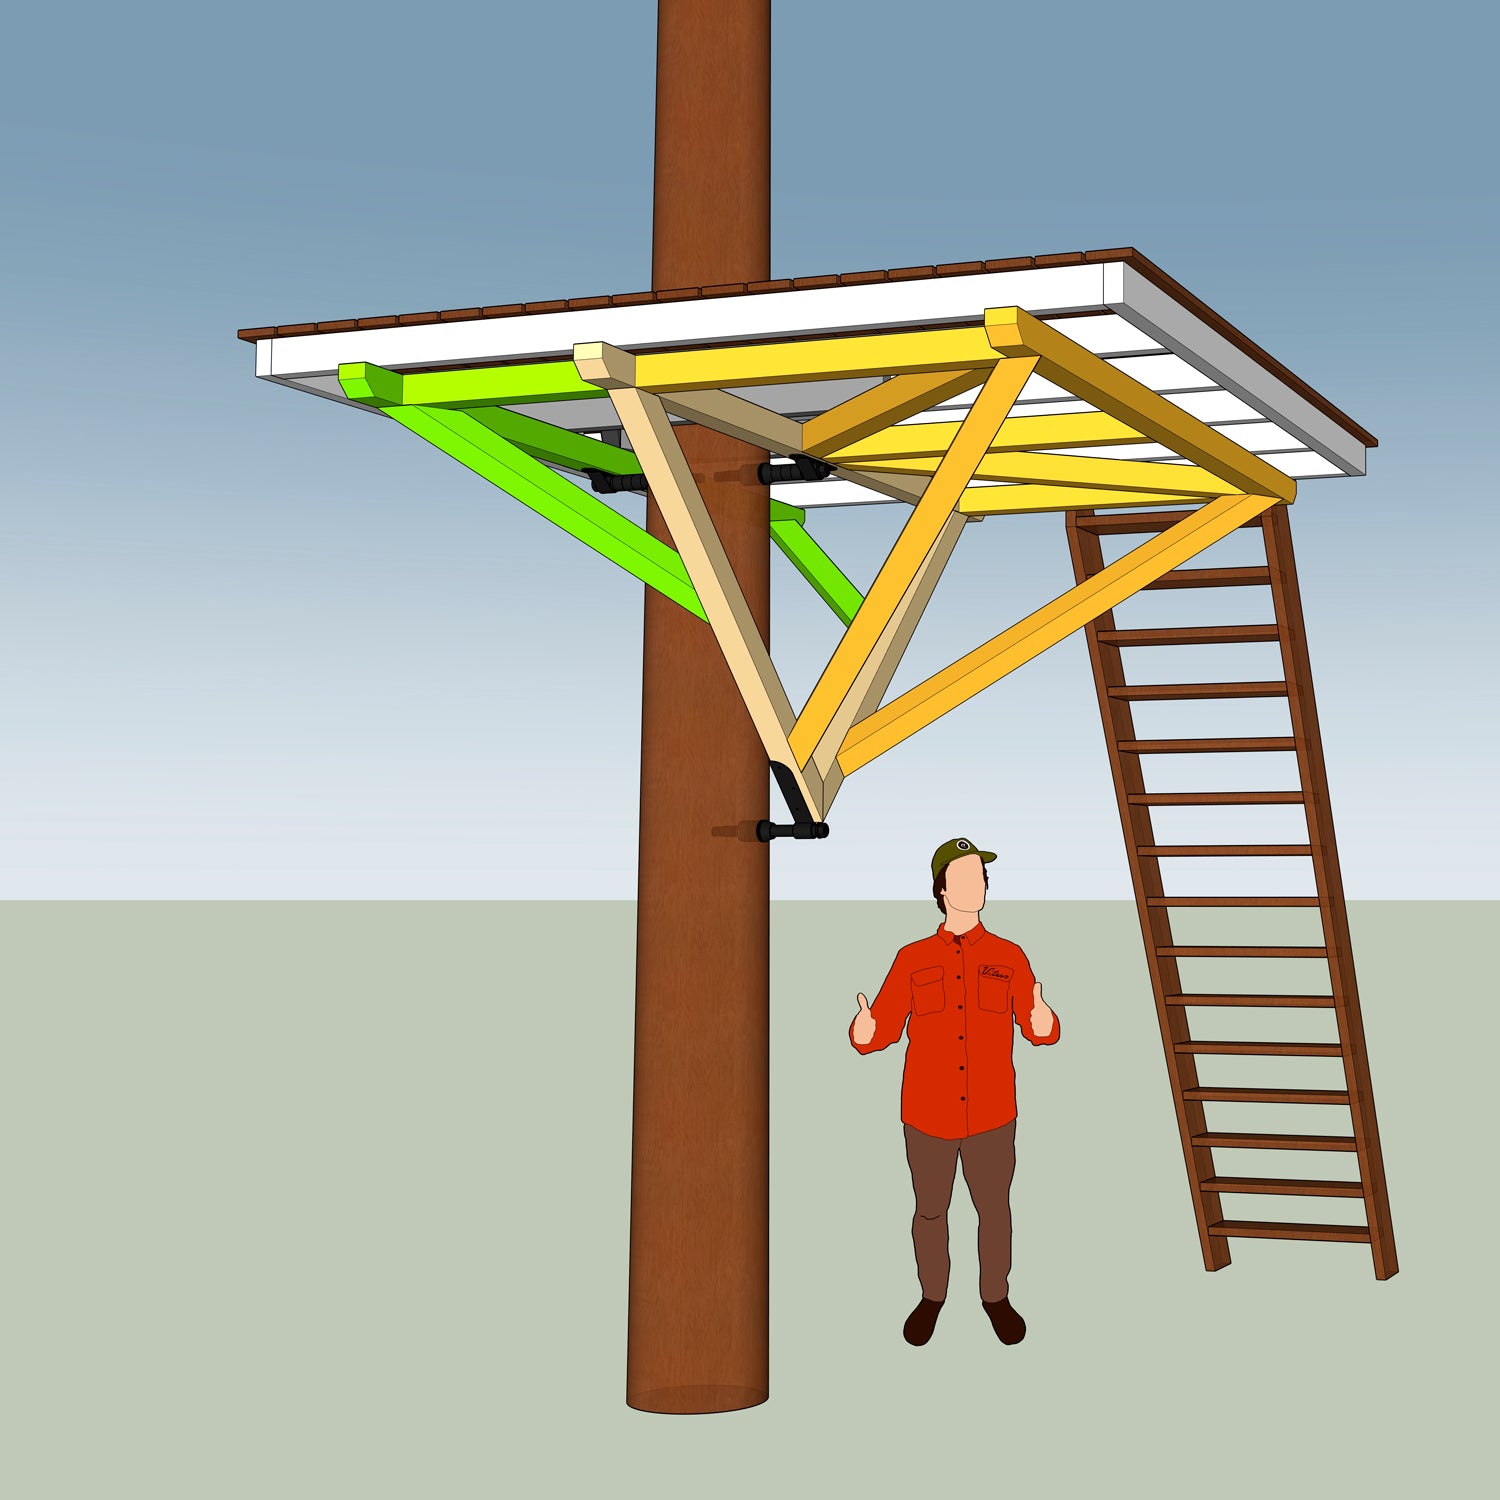
3. Triangular Support Structures ‘3D’
3D-Tribeams are used for large and far-out platforms. In addition to the side struts, they also have struts at the front and/or rear.
The stable base is always formed by a 2D-Tribeam – the additional struts are screwed directly to the 2D-Tribeam or mounted on the GTS using Strut Connectors.
Instructions: Build a 3D-Tribeam
Examples and tips for assembly

From 2D to 3D
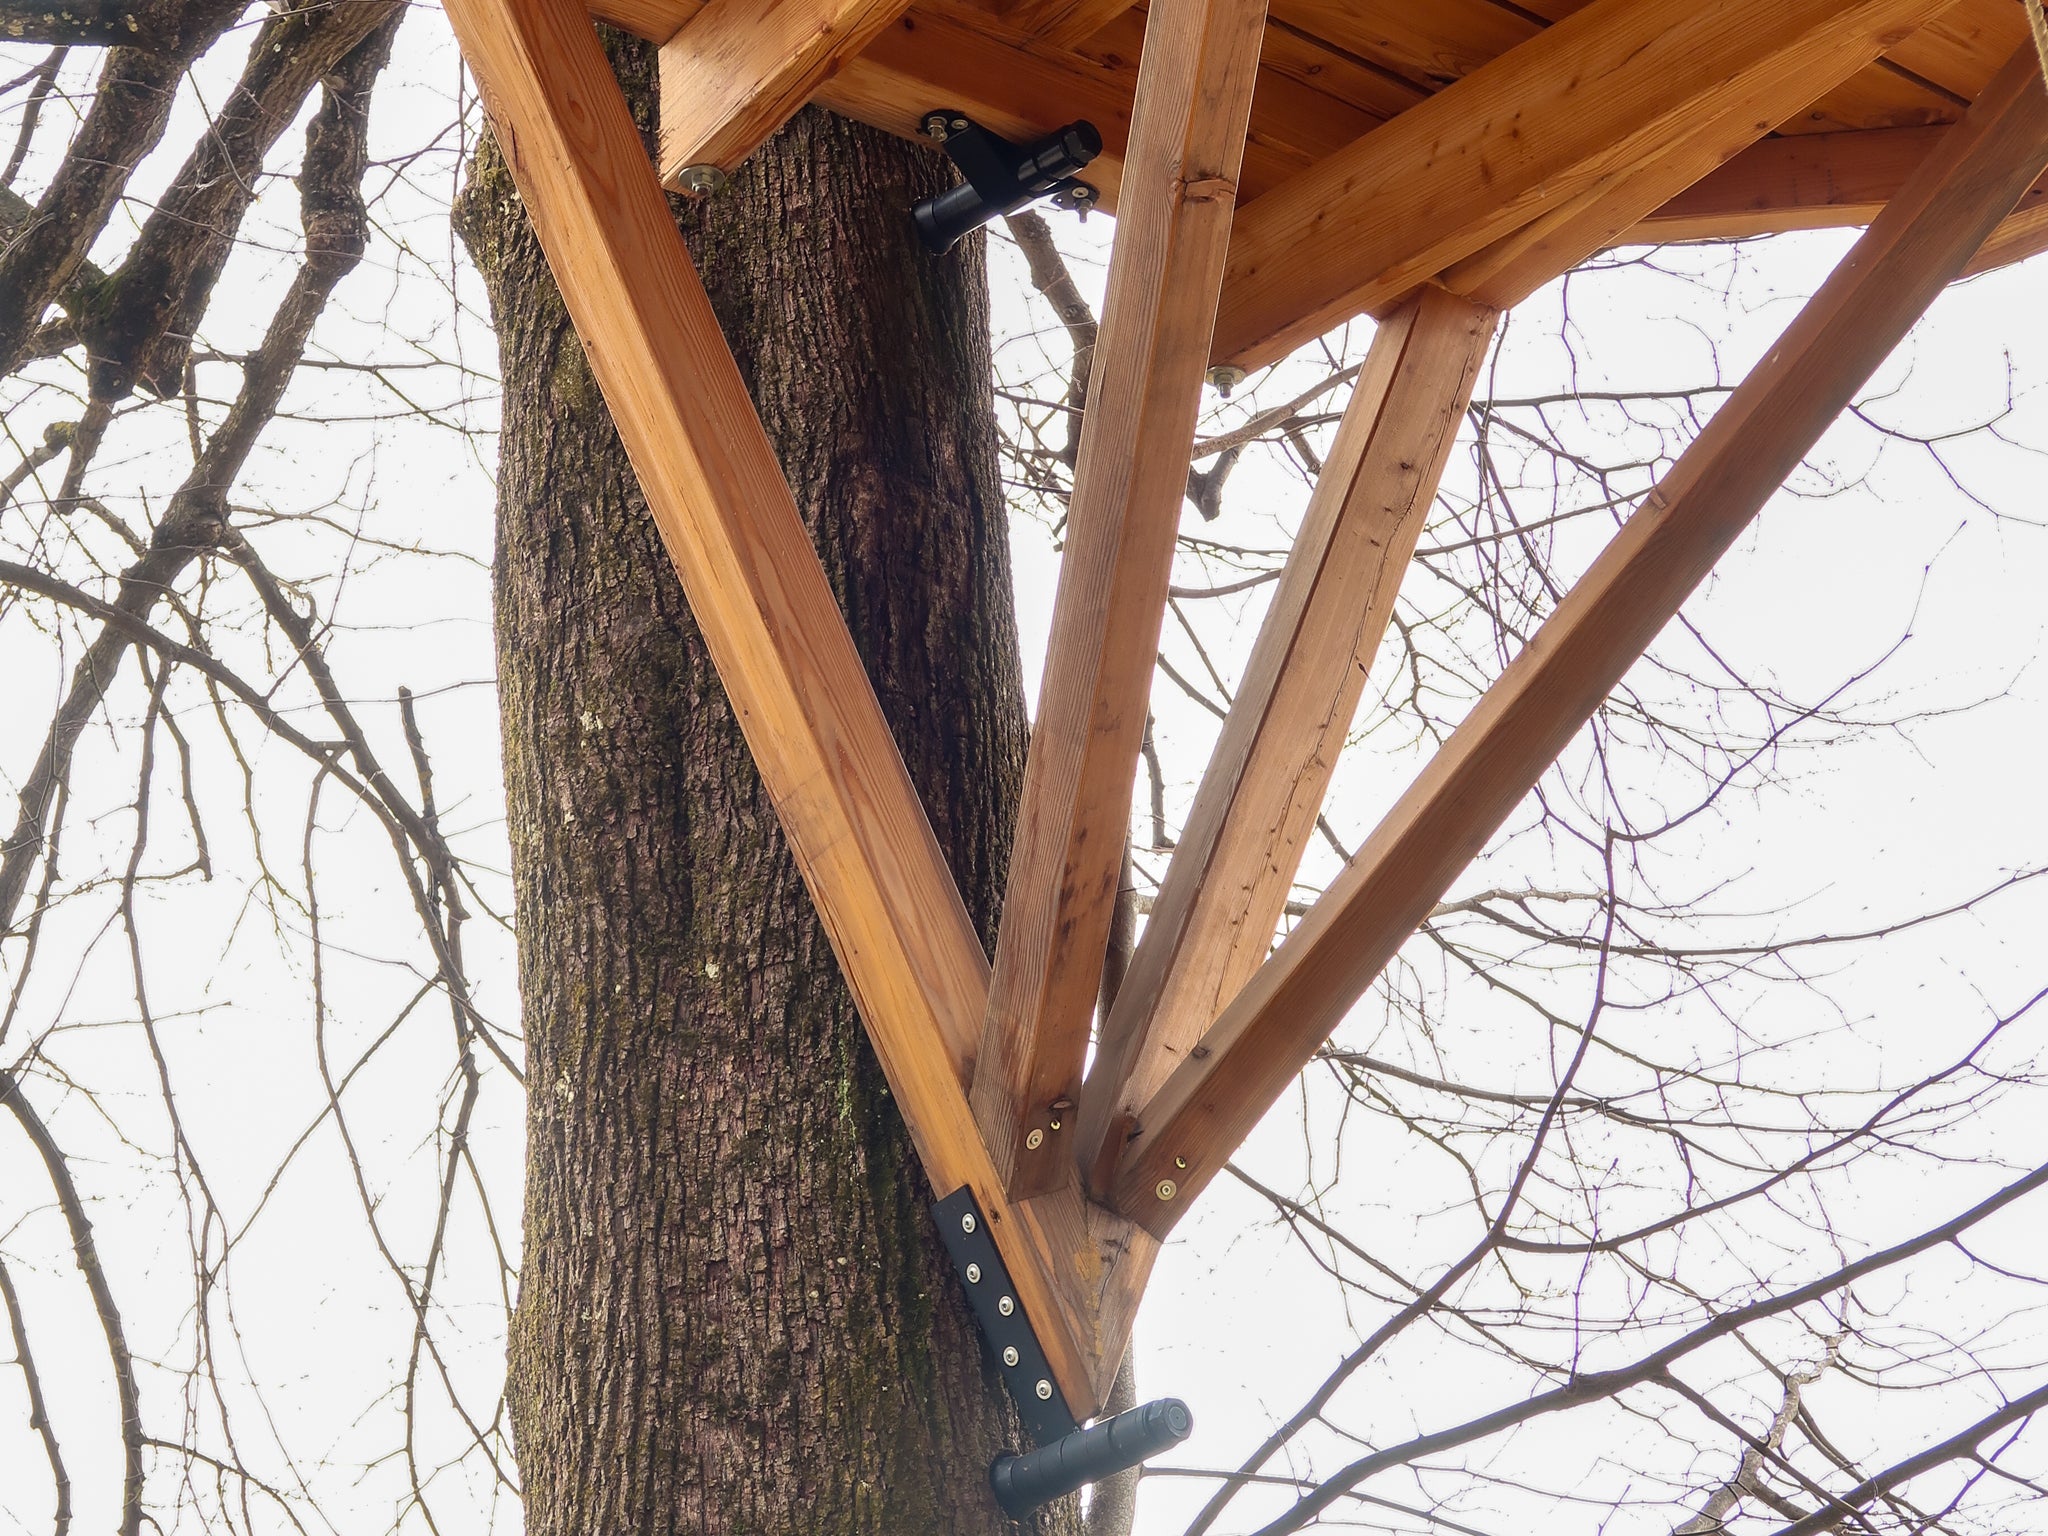
Here you can see a simple 3Dsupportstructure for a treehouse platform. The additional struts (yellow) are simply screwed onto the existing 2D-Tribeam (beige).

Simple support structure with 45° struts
45° angles are not only statically optimal, but also much easier to manufacture, as most machines can handle this angle and fewer mistakes can be made.

Strut limited to 30°
The 3D struts must also be limited to a maximum of 30°. This is for structural reasons (horizontal forces!) and because the maximum adjustable angle or counter angle for machines is 60°.

Rotated struts with 45°
It gets a little more complicated if the struts have a tilt angle as well as a rotation angle, i.e. they are fanned out. For this, you should already have some previous DIY experience and good spatial awareness.

Fanned struts with 60°
Sharp angles, e.g. 60° struts, can be very attractive. However, they are more complicated to manufacture, as many machines reach their limits here and errors are more noticeable.
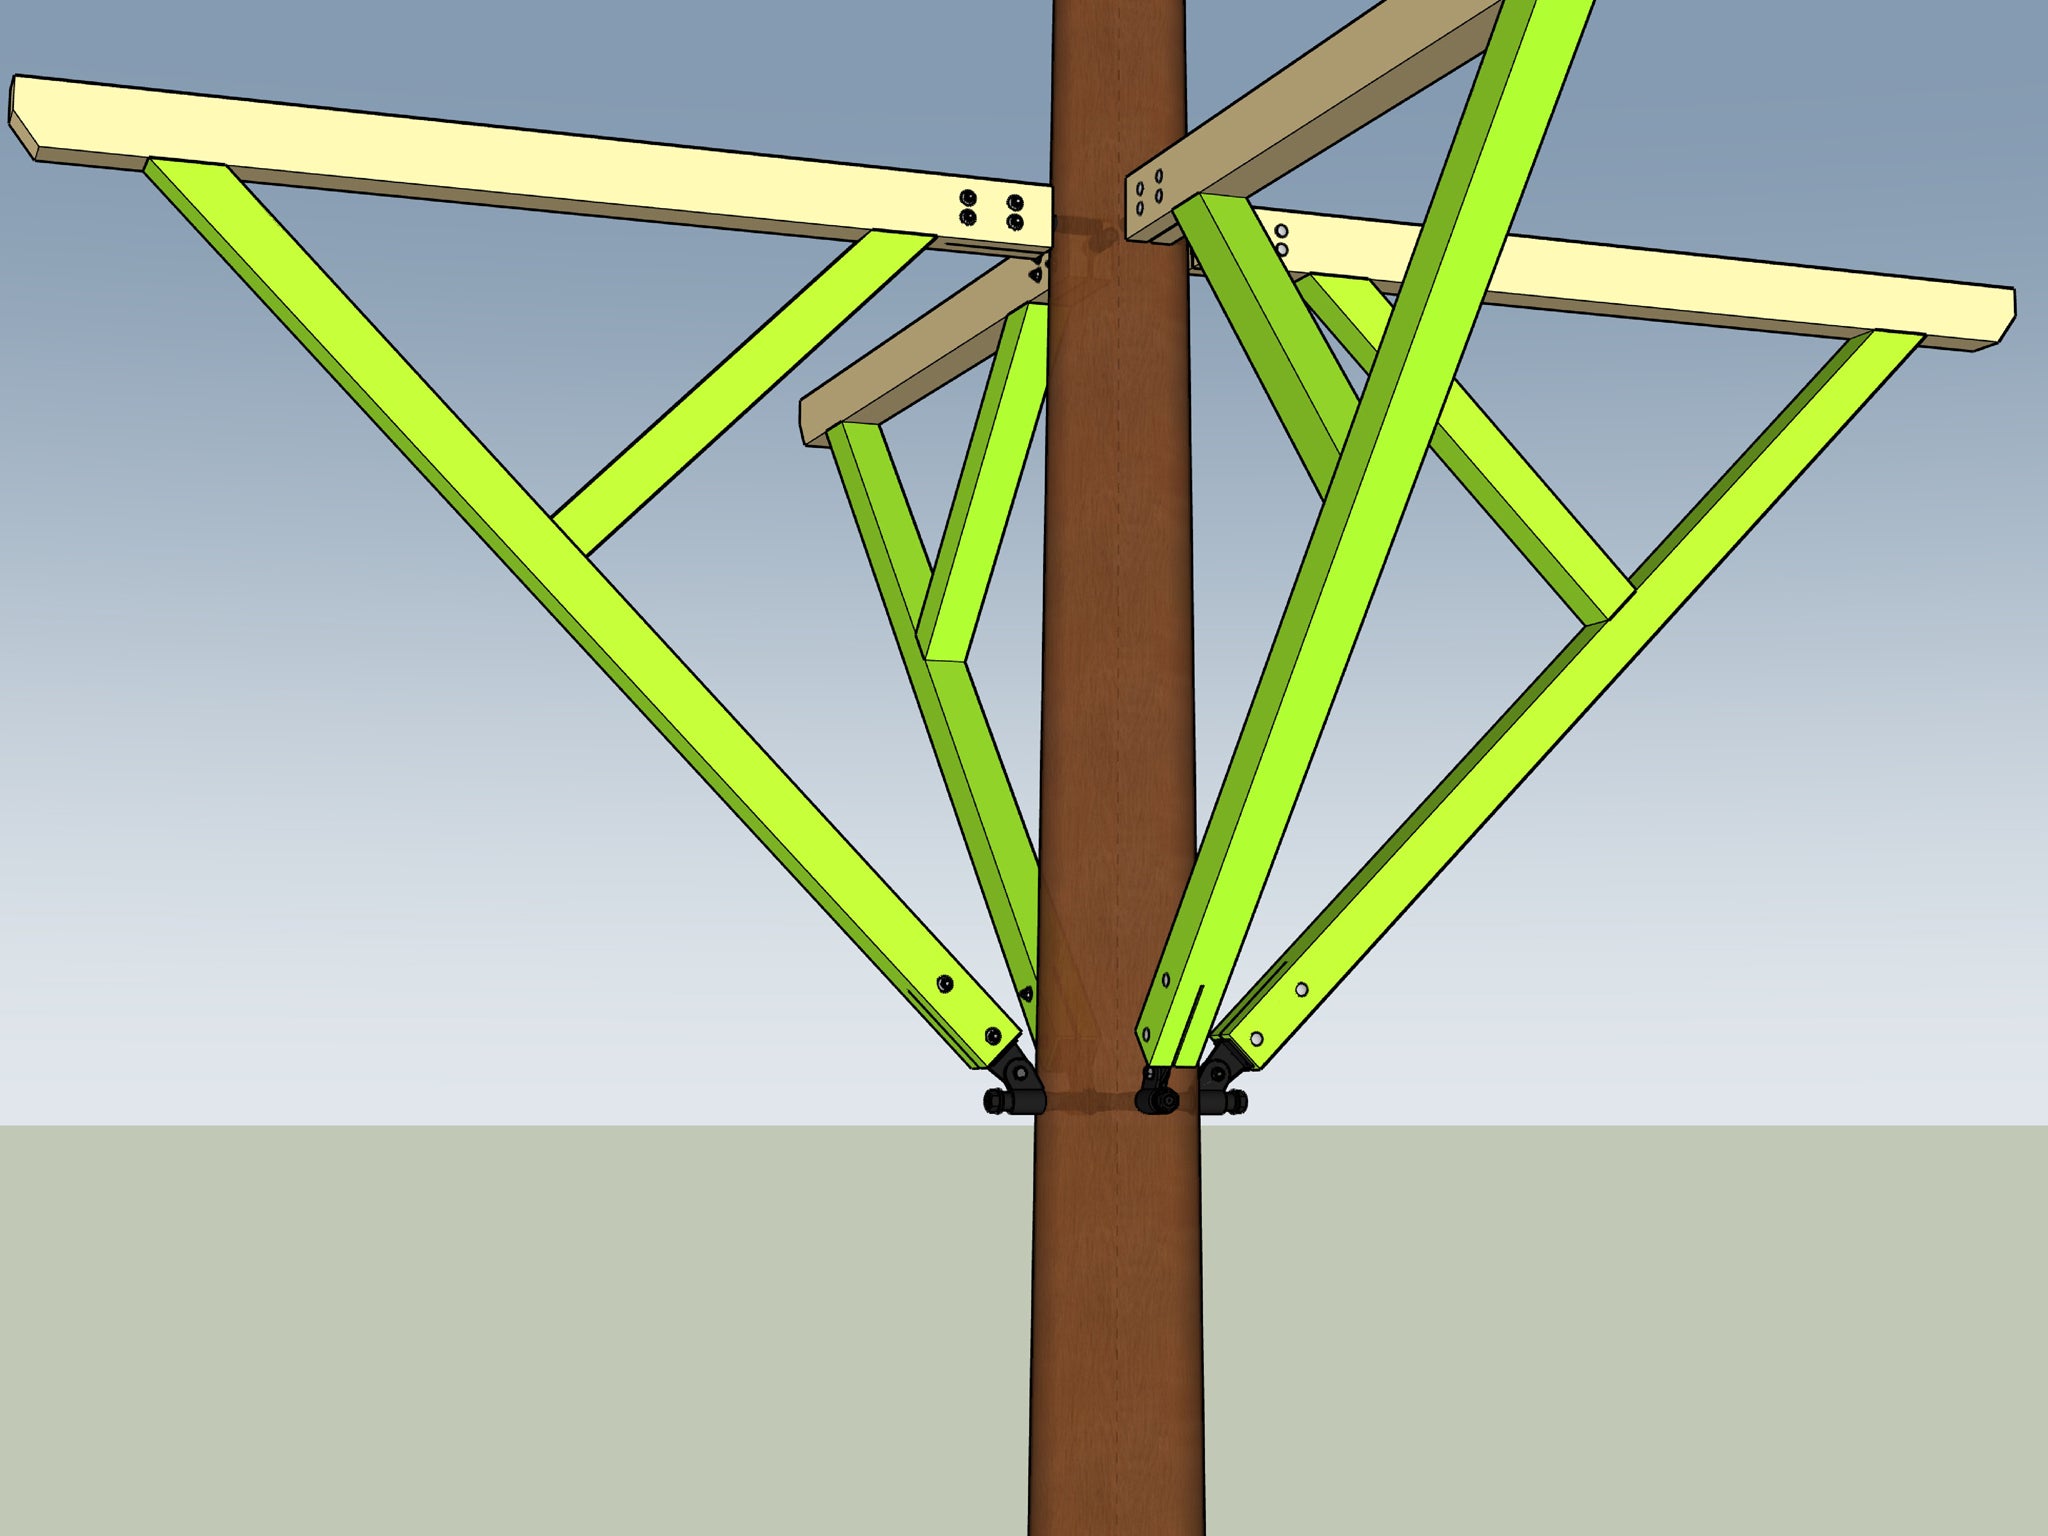
3D-Tribeams with Strut Connector
The GTS Strut Connectors are a clever solution for building 3D-Tribeams or retrofitting individual struts.
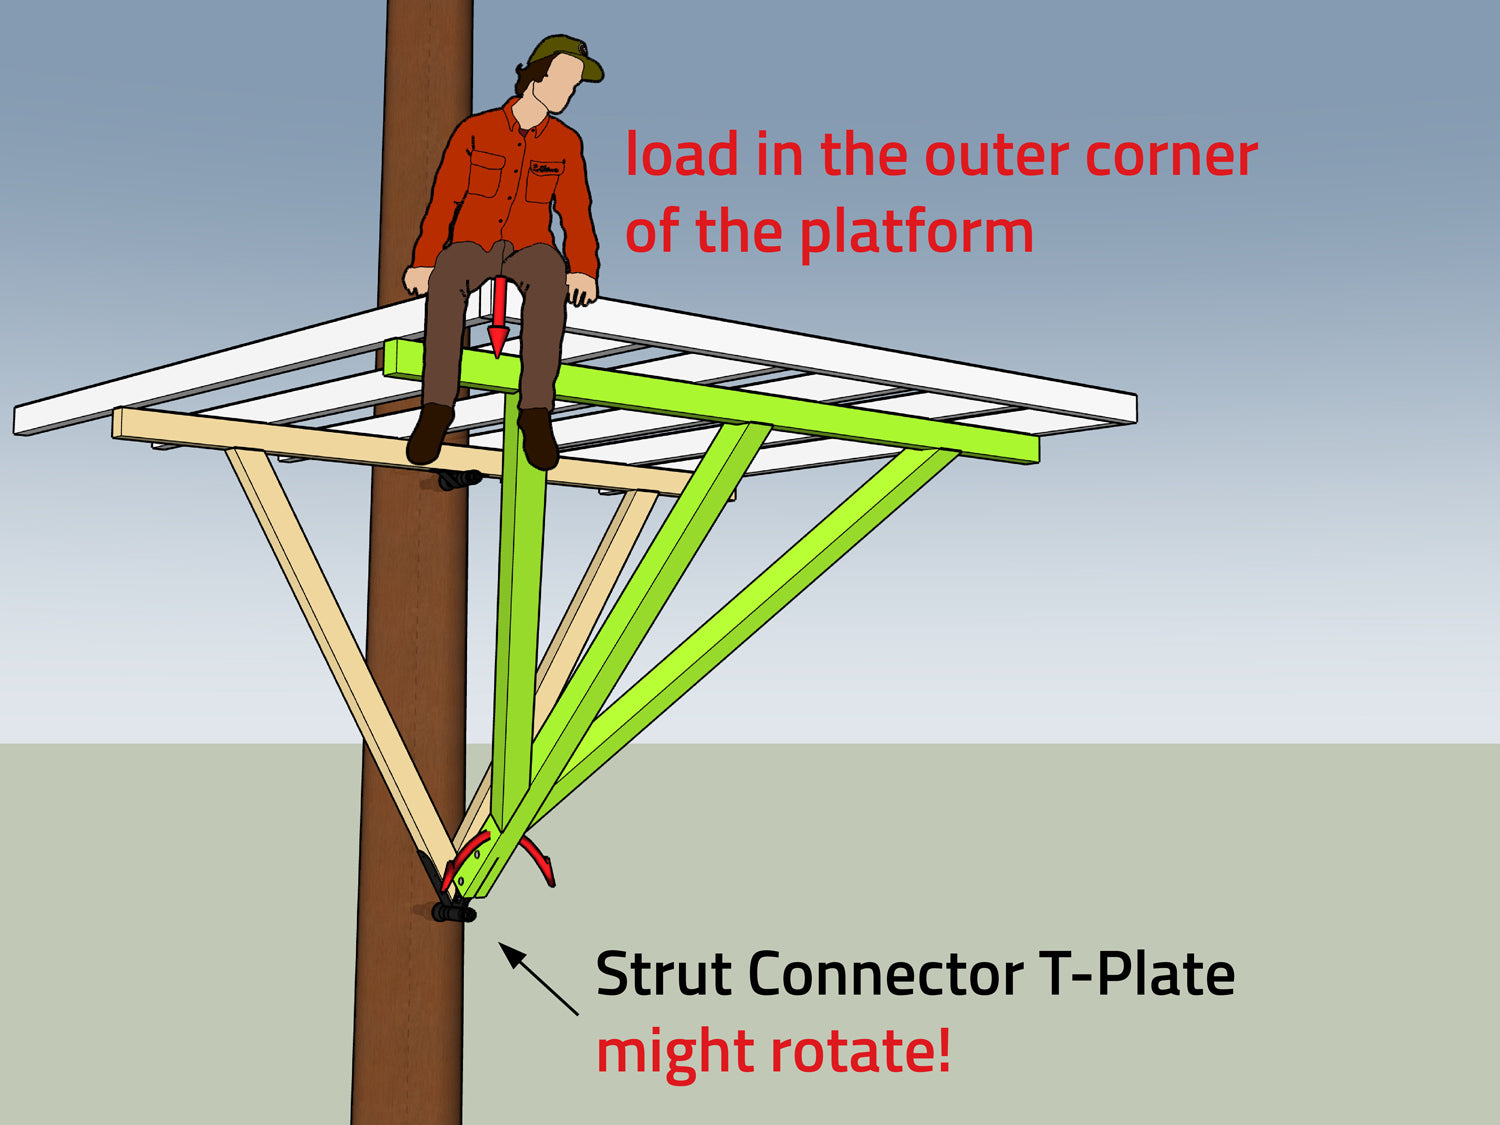
1 strut - may be unstable!
Important: The struts can rotate around the shaft of the GTS, i.e. care must always be taken to ensure that this rotation does not act uncontrollably on the support structure.
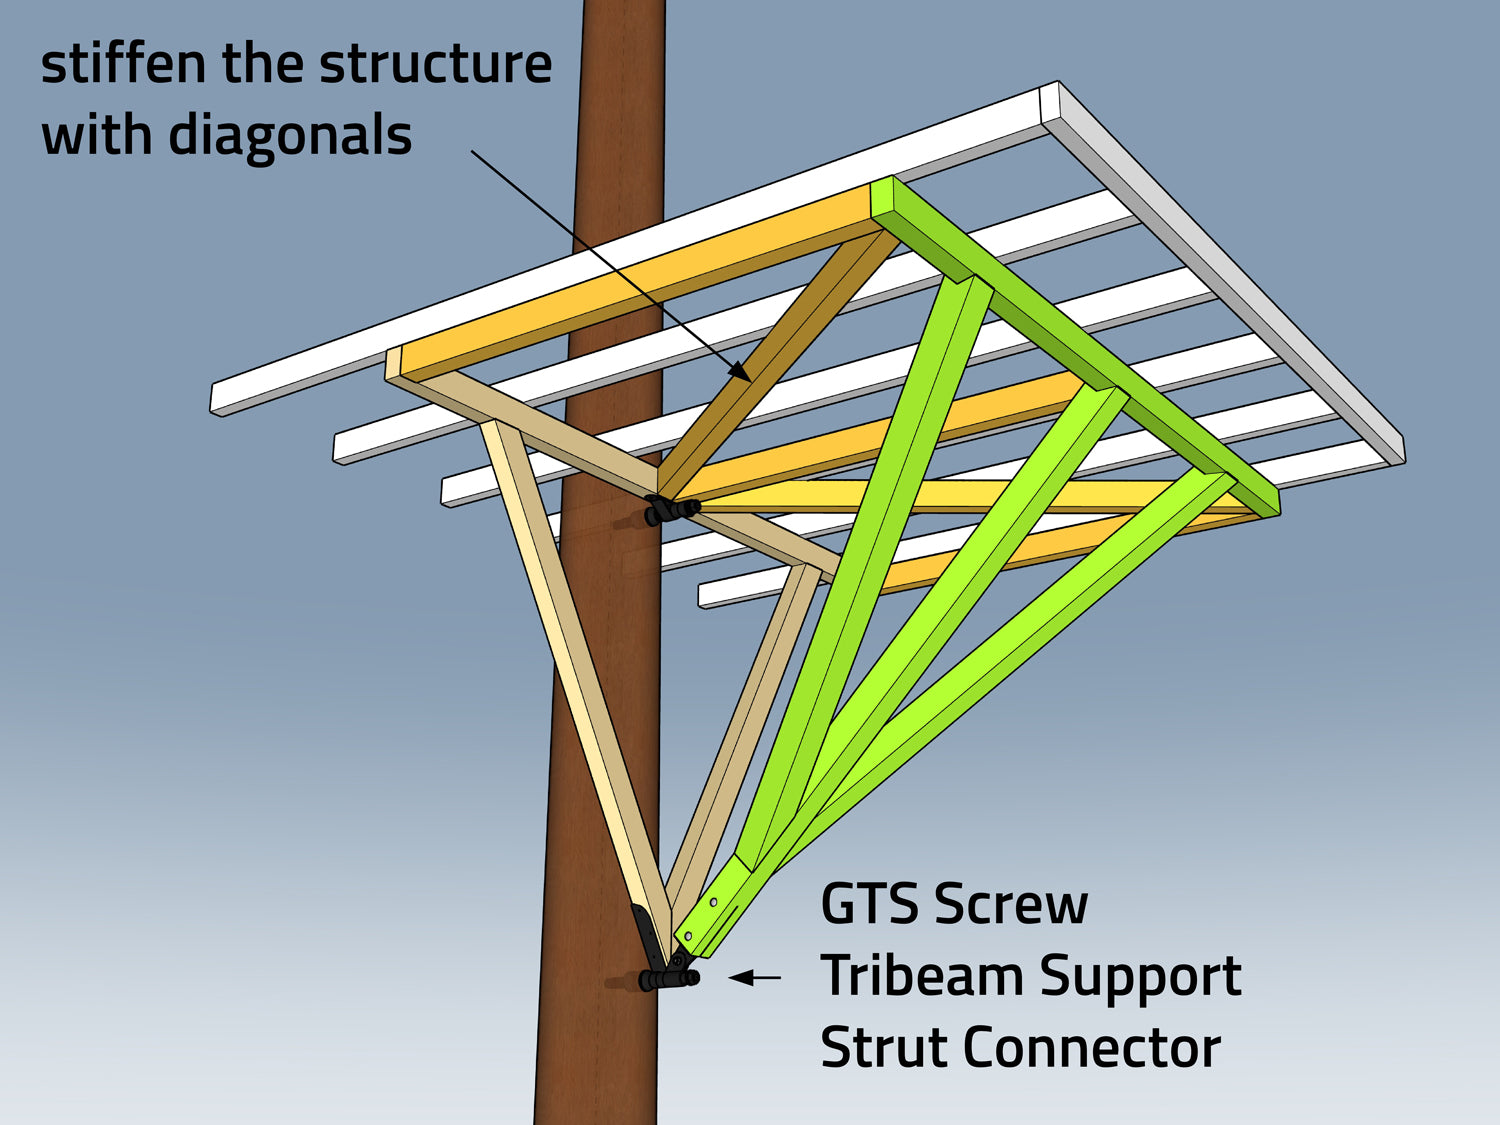
Stiffen the support structure
To prevent your platform from wobbling, brace the strut construction (green) and the platform (white) properly! The diagonal braces (yellow) and the resulting ‘triangles’ help to stabilize your construction.

Multiple struts on a GTS
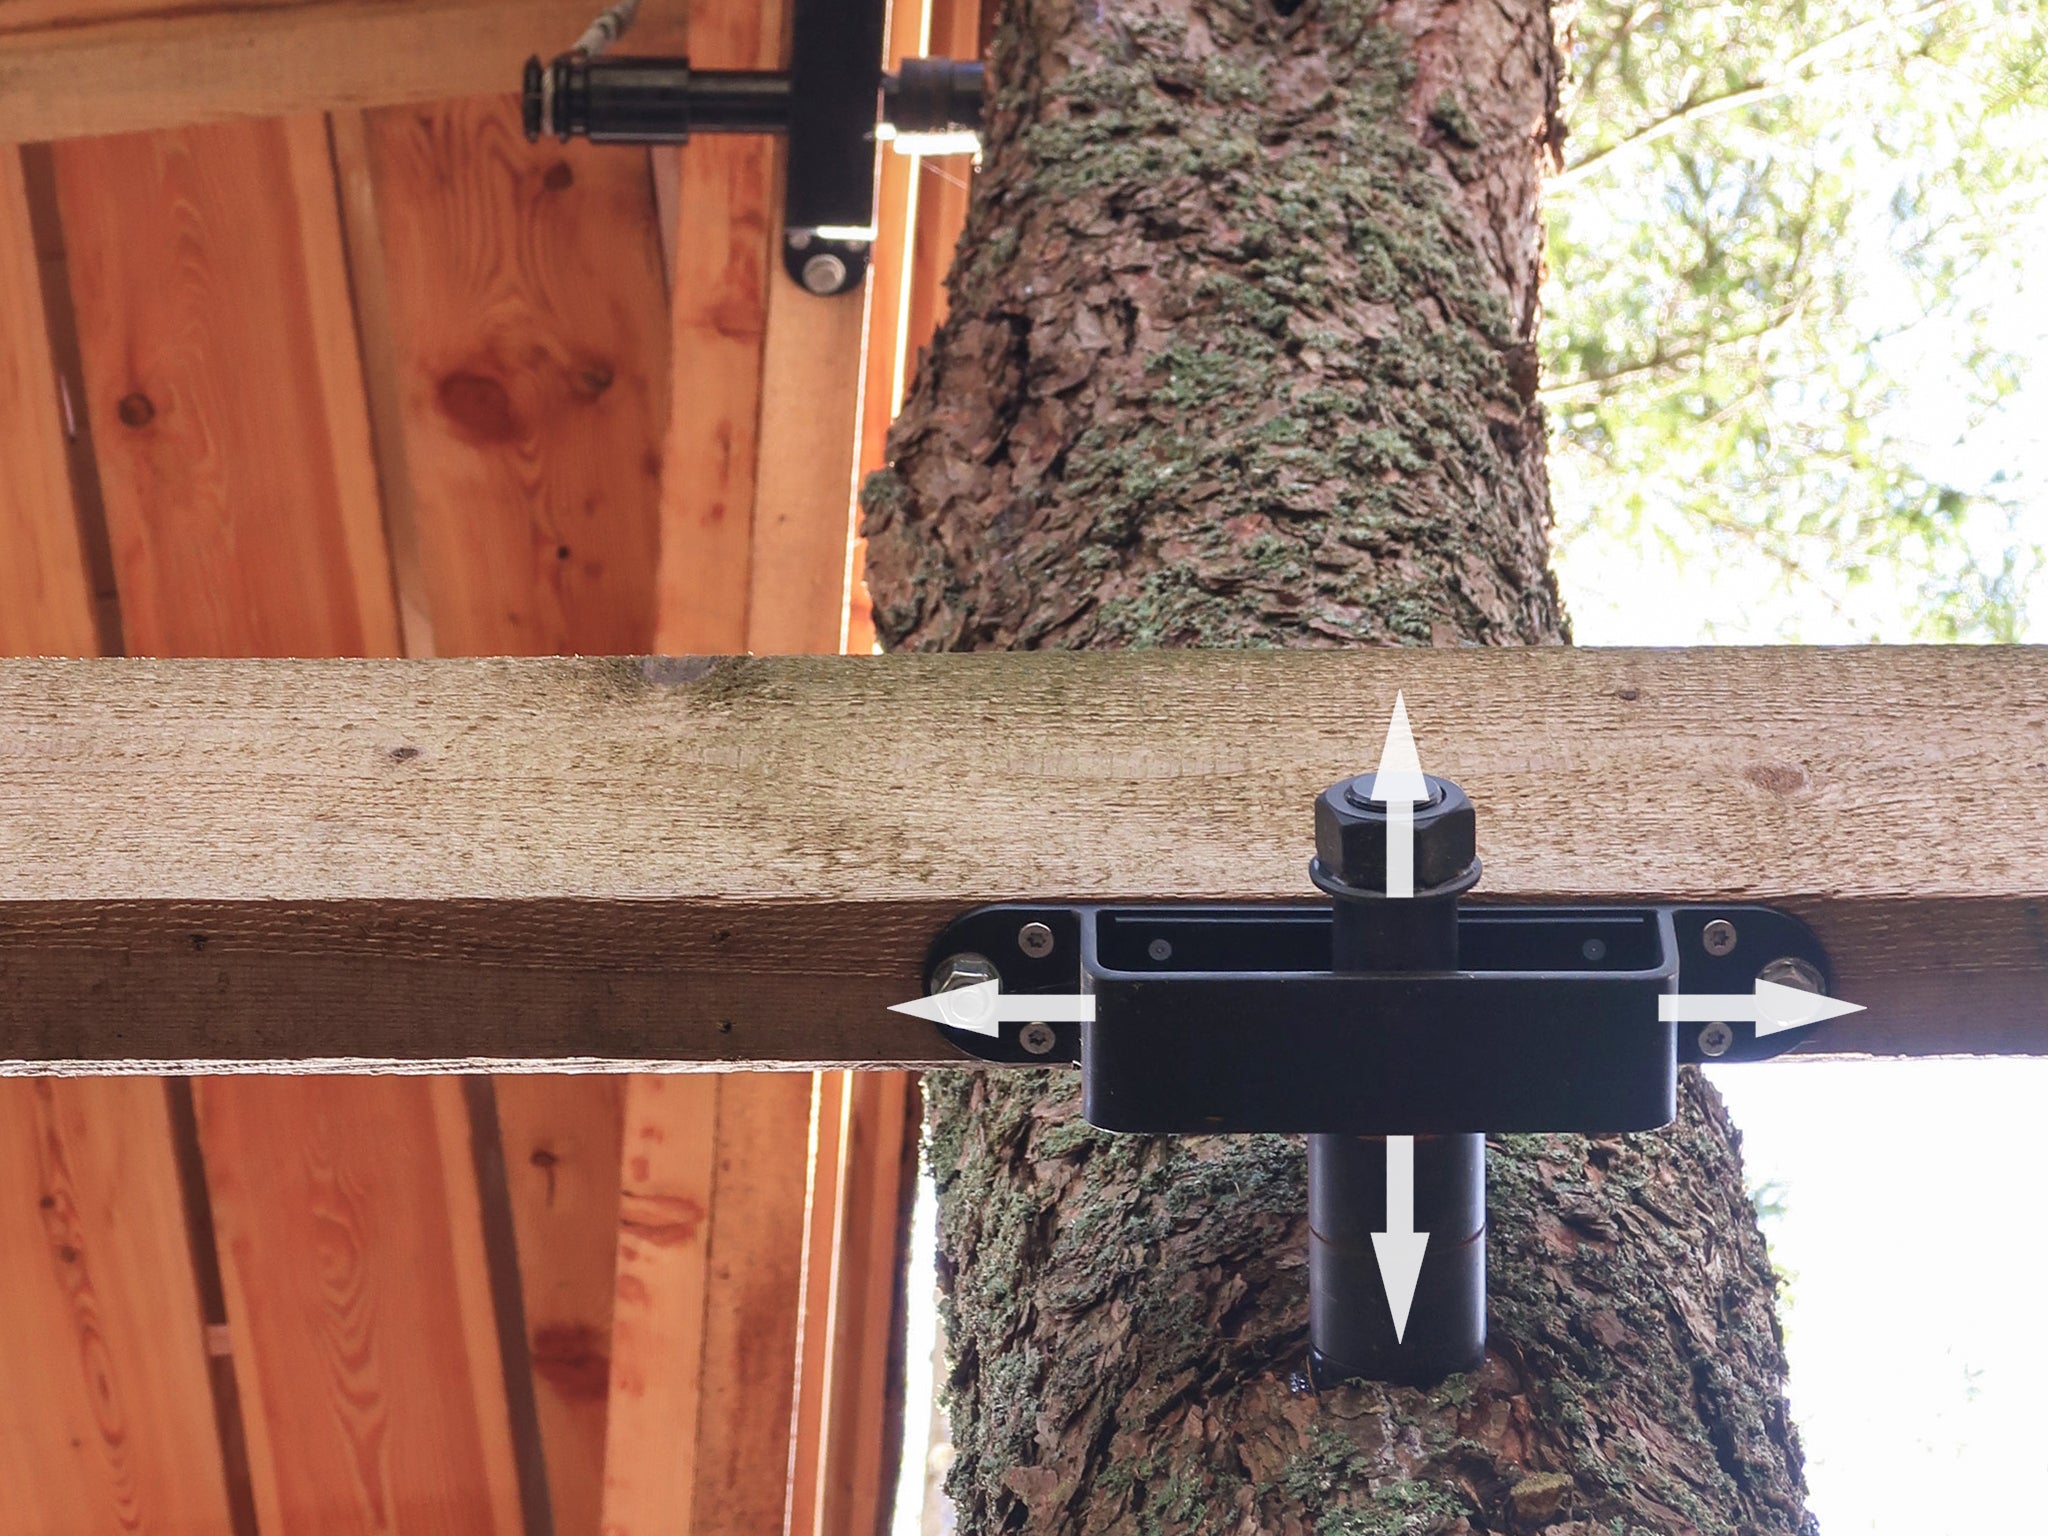
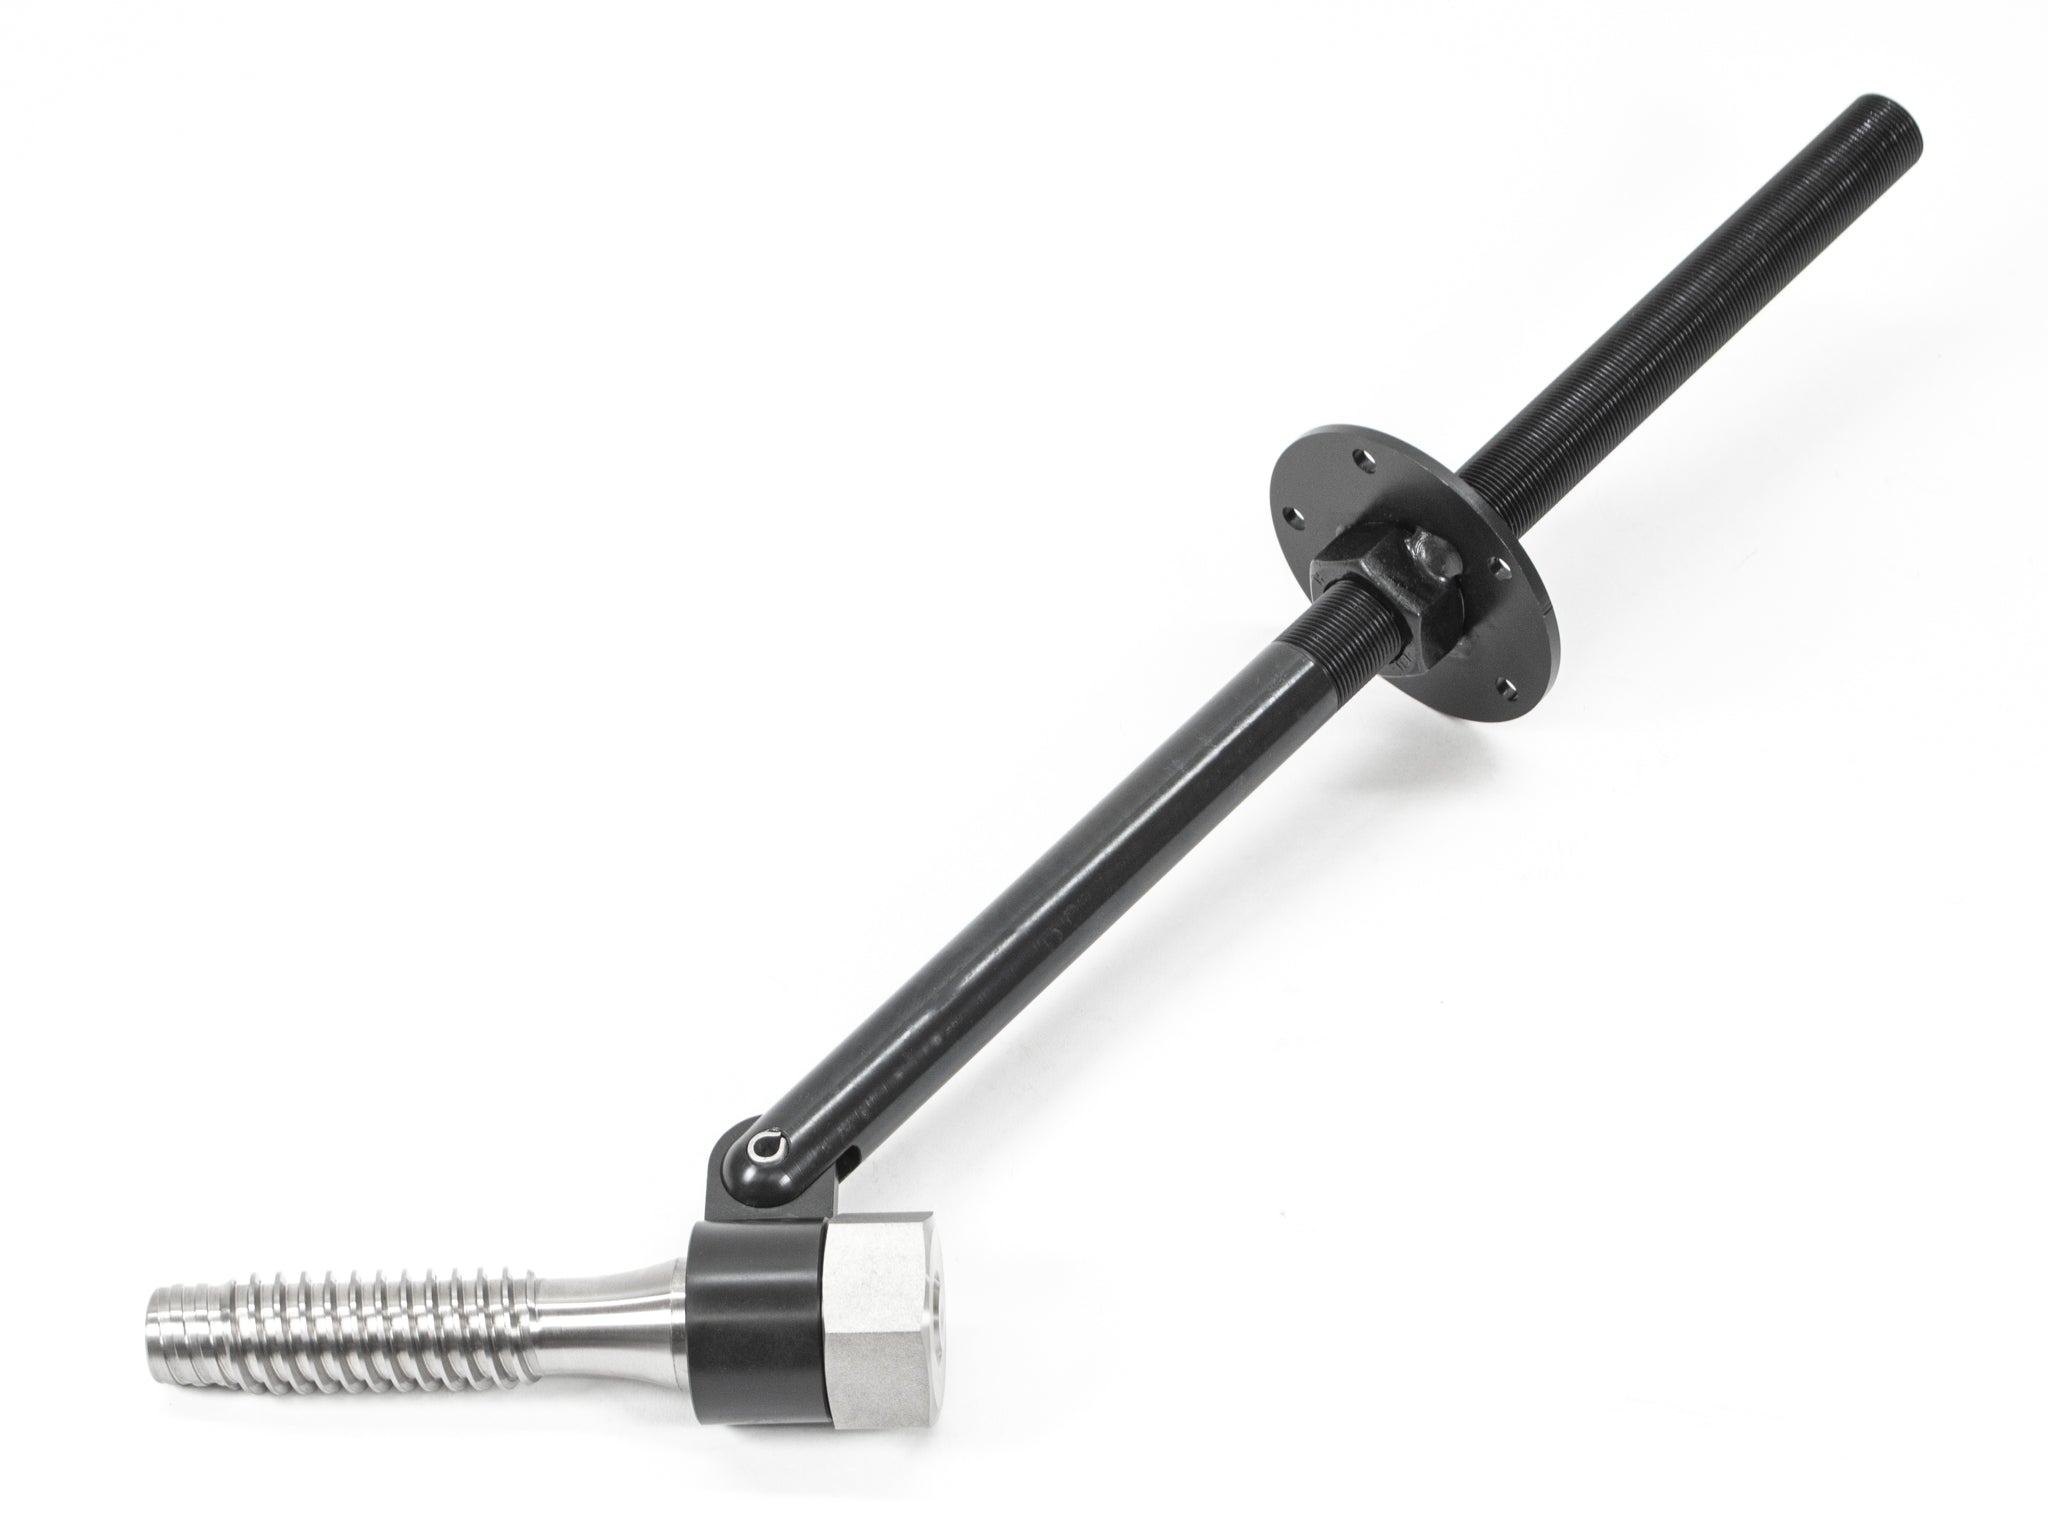
One triangular extension and up to three Strut Connectors can be mounted on the shank of the GTS Allstar. The height-adjustable Strut Connectors make it easy to level the platform.
Our customers celebrate the triangles
4. Triangle mounting in crooked trees
A treehouse can also be securely fastened to sloping or inclined trees – please note:
✔ No additional tilting load: The construction must not push the tree further in the direction of its inclination.
✔ Avoid lever arms: The greater the distance from the ground anchoring, the greater the load – therefore build as close to the ground as possible.
✔ Test the triangle made of slats in advance: Before assembly, build a wooden triangle out of slats and check how and where it can be attached to the tree.
Instructions: Triangle in a crooked tree
Adjust the triangle to the shape of the tree
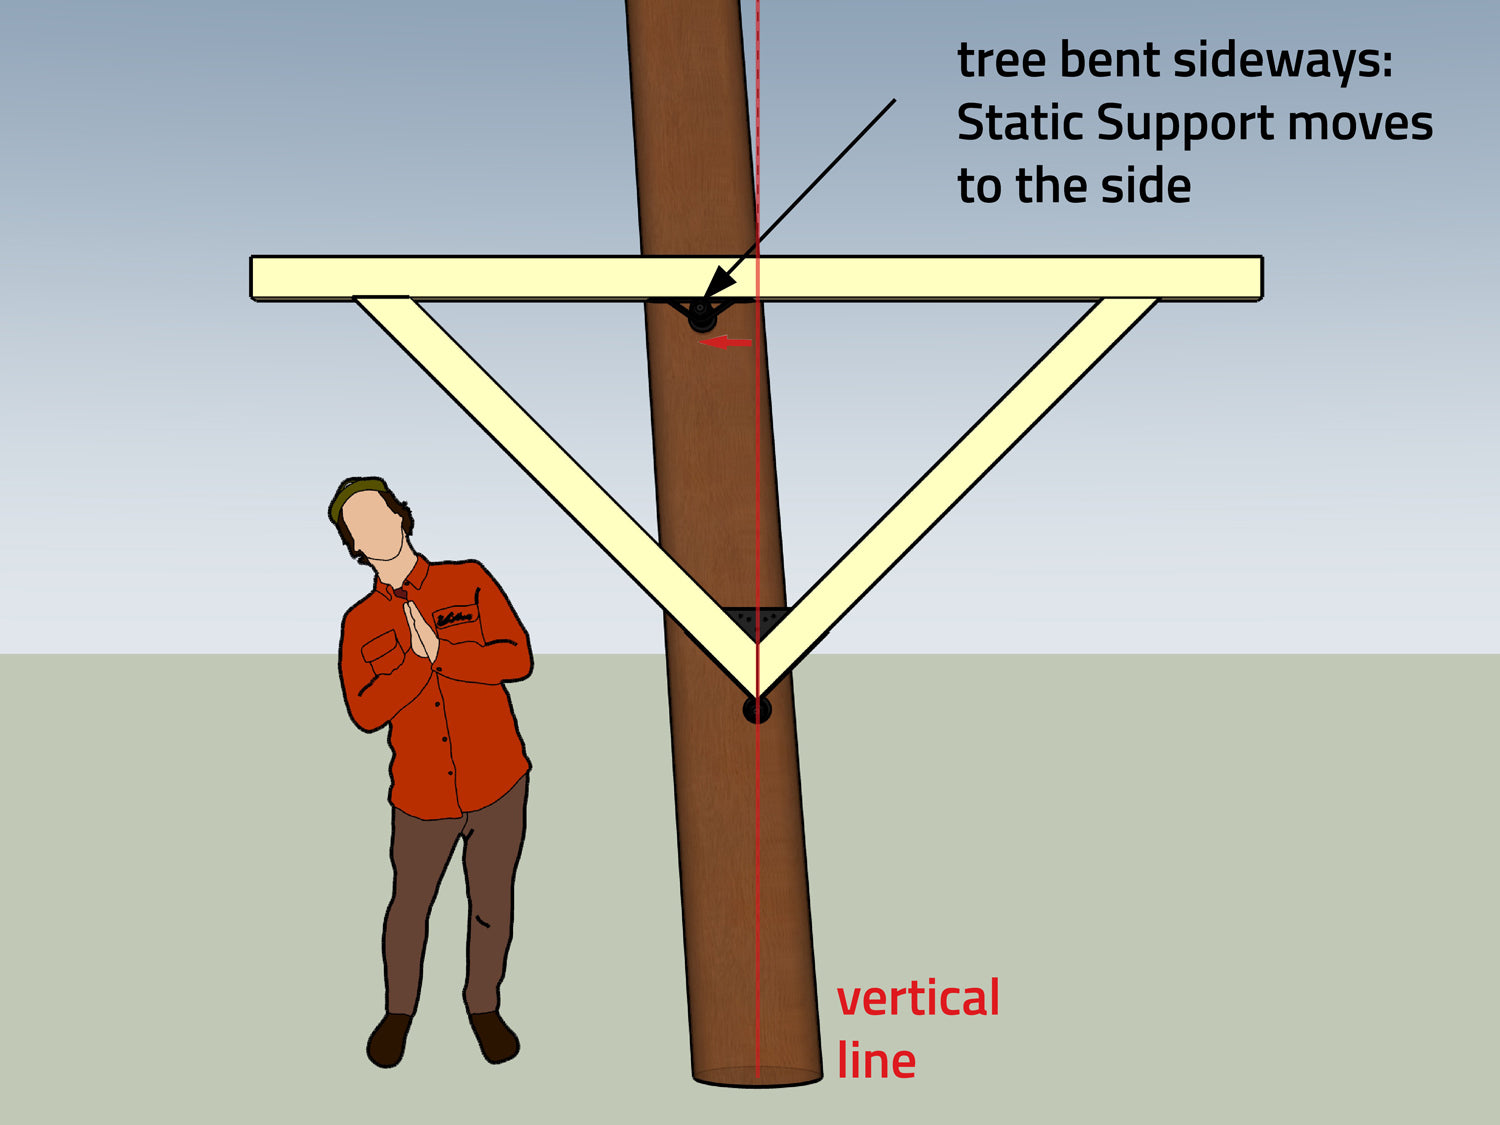
Tree leaning to one side
If your tree is leaning to one side, don't worry – just make sure that the upper joist is in the water and move the Beam Bracket (top) to the left or right.

Tree leaning forward
If the tree is leaning forward, you must ensure that the triangular support still fits onto the shaft of the GTS. If the tree is leaning too much, the lower support will be suspended in the air!
Tip: The GTS Allstar has the longest shank and offers the most leeway.
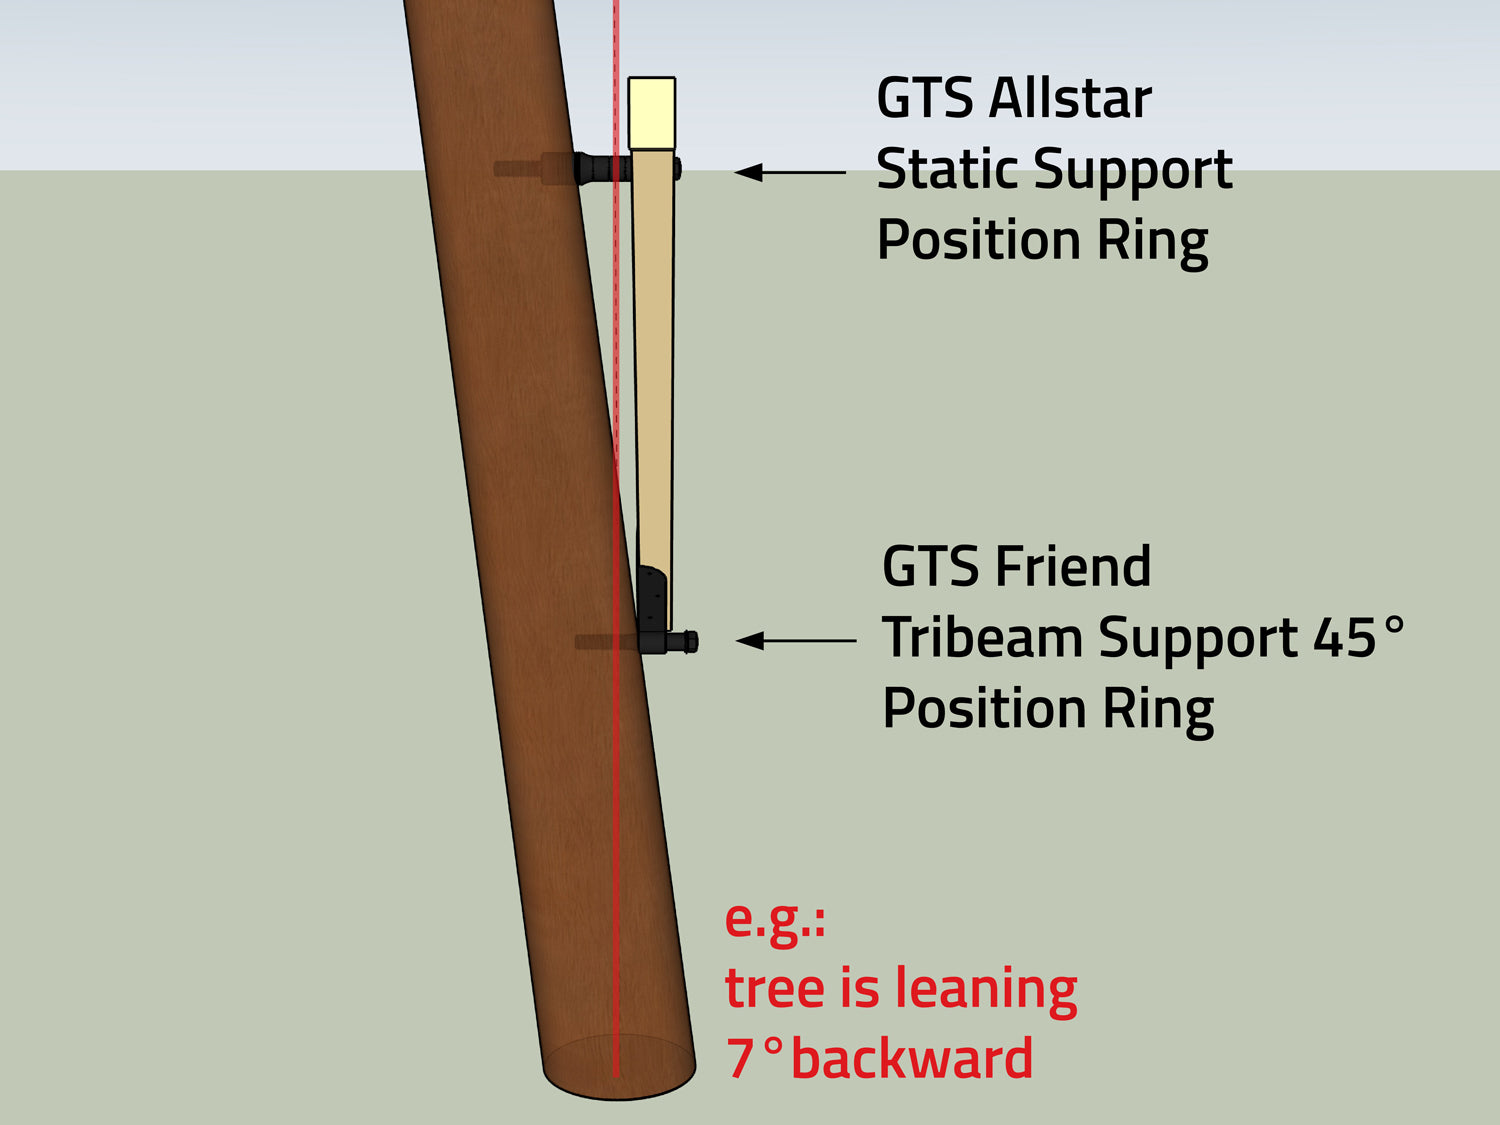
Tree leaning backwards
If the tree is leaning backwards, the shaft of the upper GTS Screw must be as long as possible (GTS Allstar). At the bottom, you can get as close to the tree as possible with a GTS Friend, for example.
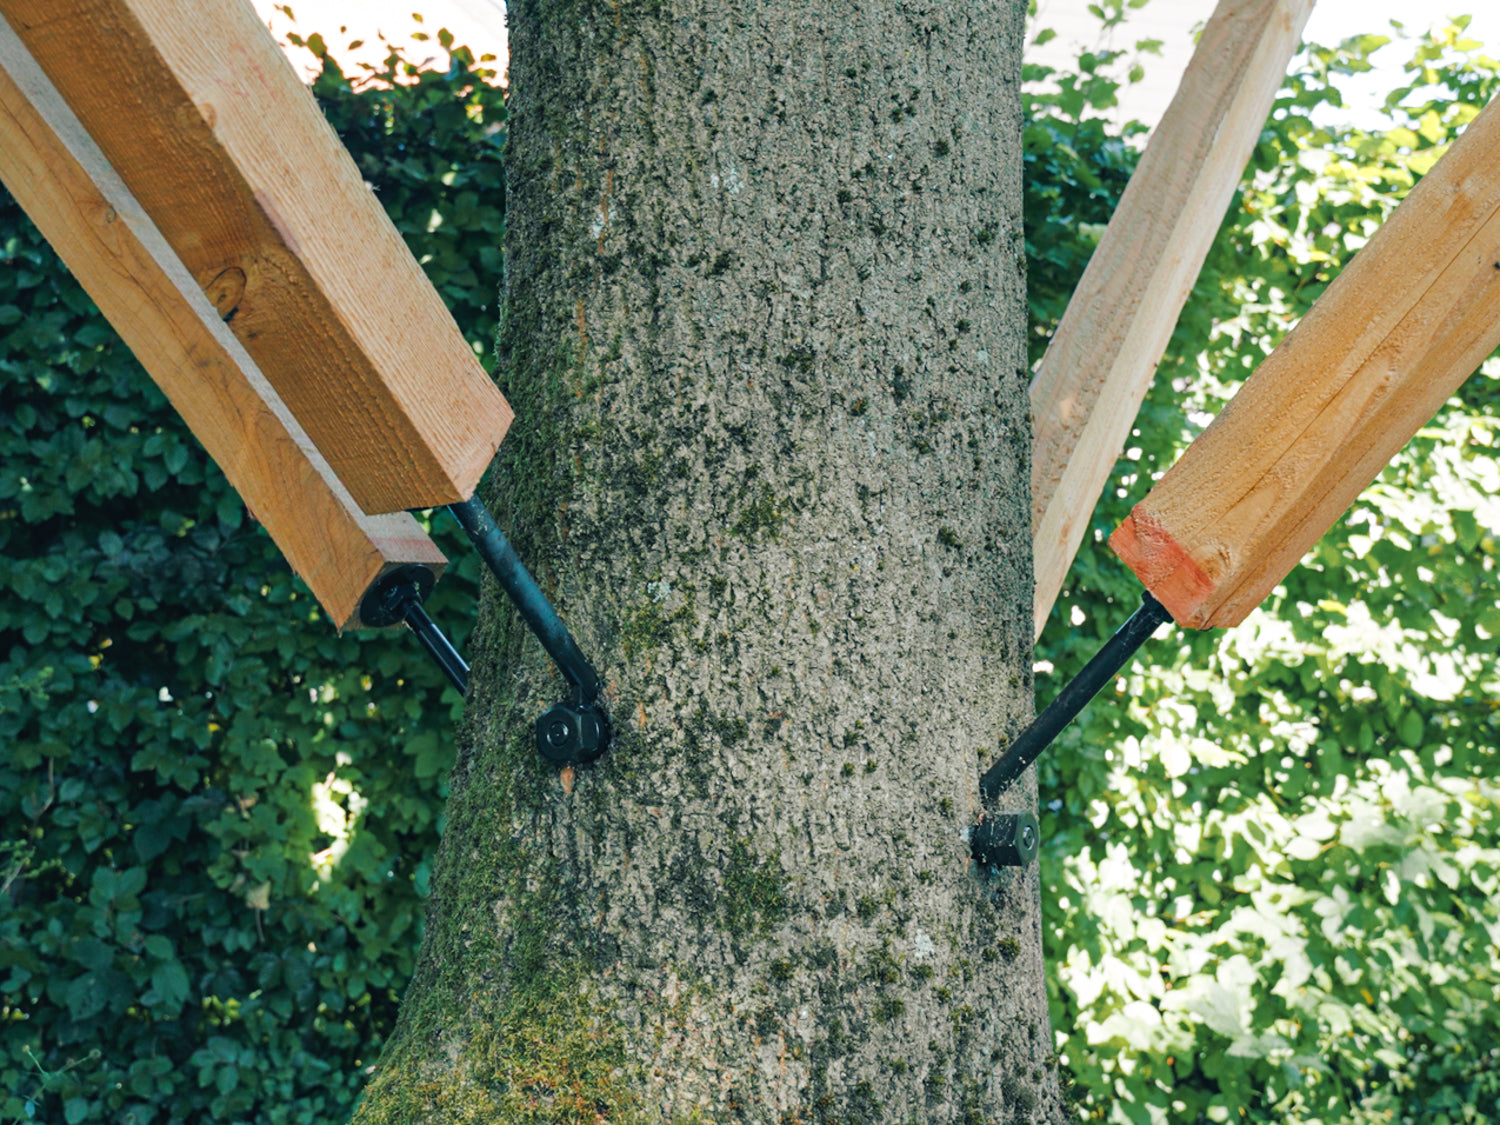
5. Side Tree Braces
Tree Braces are particularly suitable for smaller and lighter support structures or support constructions. Unlike triangles, they are more flexible and offer more design freedom in certain situations:
✔ Tree Bolts and Struts can be placed freely on the tree
✔ The angle can be selected individually
✔ Ideal for responding to trunk shapes or thick branches
✔ Uncomplicated installation with the GTS Side
When and where are Tree Braces used?
Tree Braces are not part of the standard Treehouse Hardware Kits – and that's exactly what makes them so interesting. Their strength really comes into its own when classic constructions reach their limits:
✔ as a clever addition when space is tight or uneven
✔ as a flexible solution for awkward corners where standard components are no longer sufficient
Tree Braces as a clever addition
✔ Highly flexible fastening system
✔ Ideal for stairs and small platforms
✔ For small and medium loads
✔ For targeted support of wobbly platform parts
Beam dimensions for Tree Braces
Here are a few guidelines for normal loads:
Joists & struts:
- Up to 2 m (6,6 ft) in length: 8x8 cm
- Up to 3 m (9,8 ft) in length: 10x10 cm
- Up to 4 m (13,1 ft) in length: 12x12 cm
For joist lengths over 3 m (9,8 ft), we recommend installing additional intermediate struts to reduce the buckling length and improve load distribution.
You can find more detailed information on calculating the wooden beams in step 11.
Assembly instructions
- 8 mm notch in wood (e.g. with a hand-held circular saw or chainsaw)
- The upper screw GTS Side is sensitive to tensile loads and lateral rotation with a large lever arm
- It is best to work with opposite Tree Braces / screws so that the construction cannot tip over!
Instructions: Attaching the side Tree Brace Attachments
Examples and tips for assembly

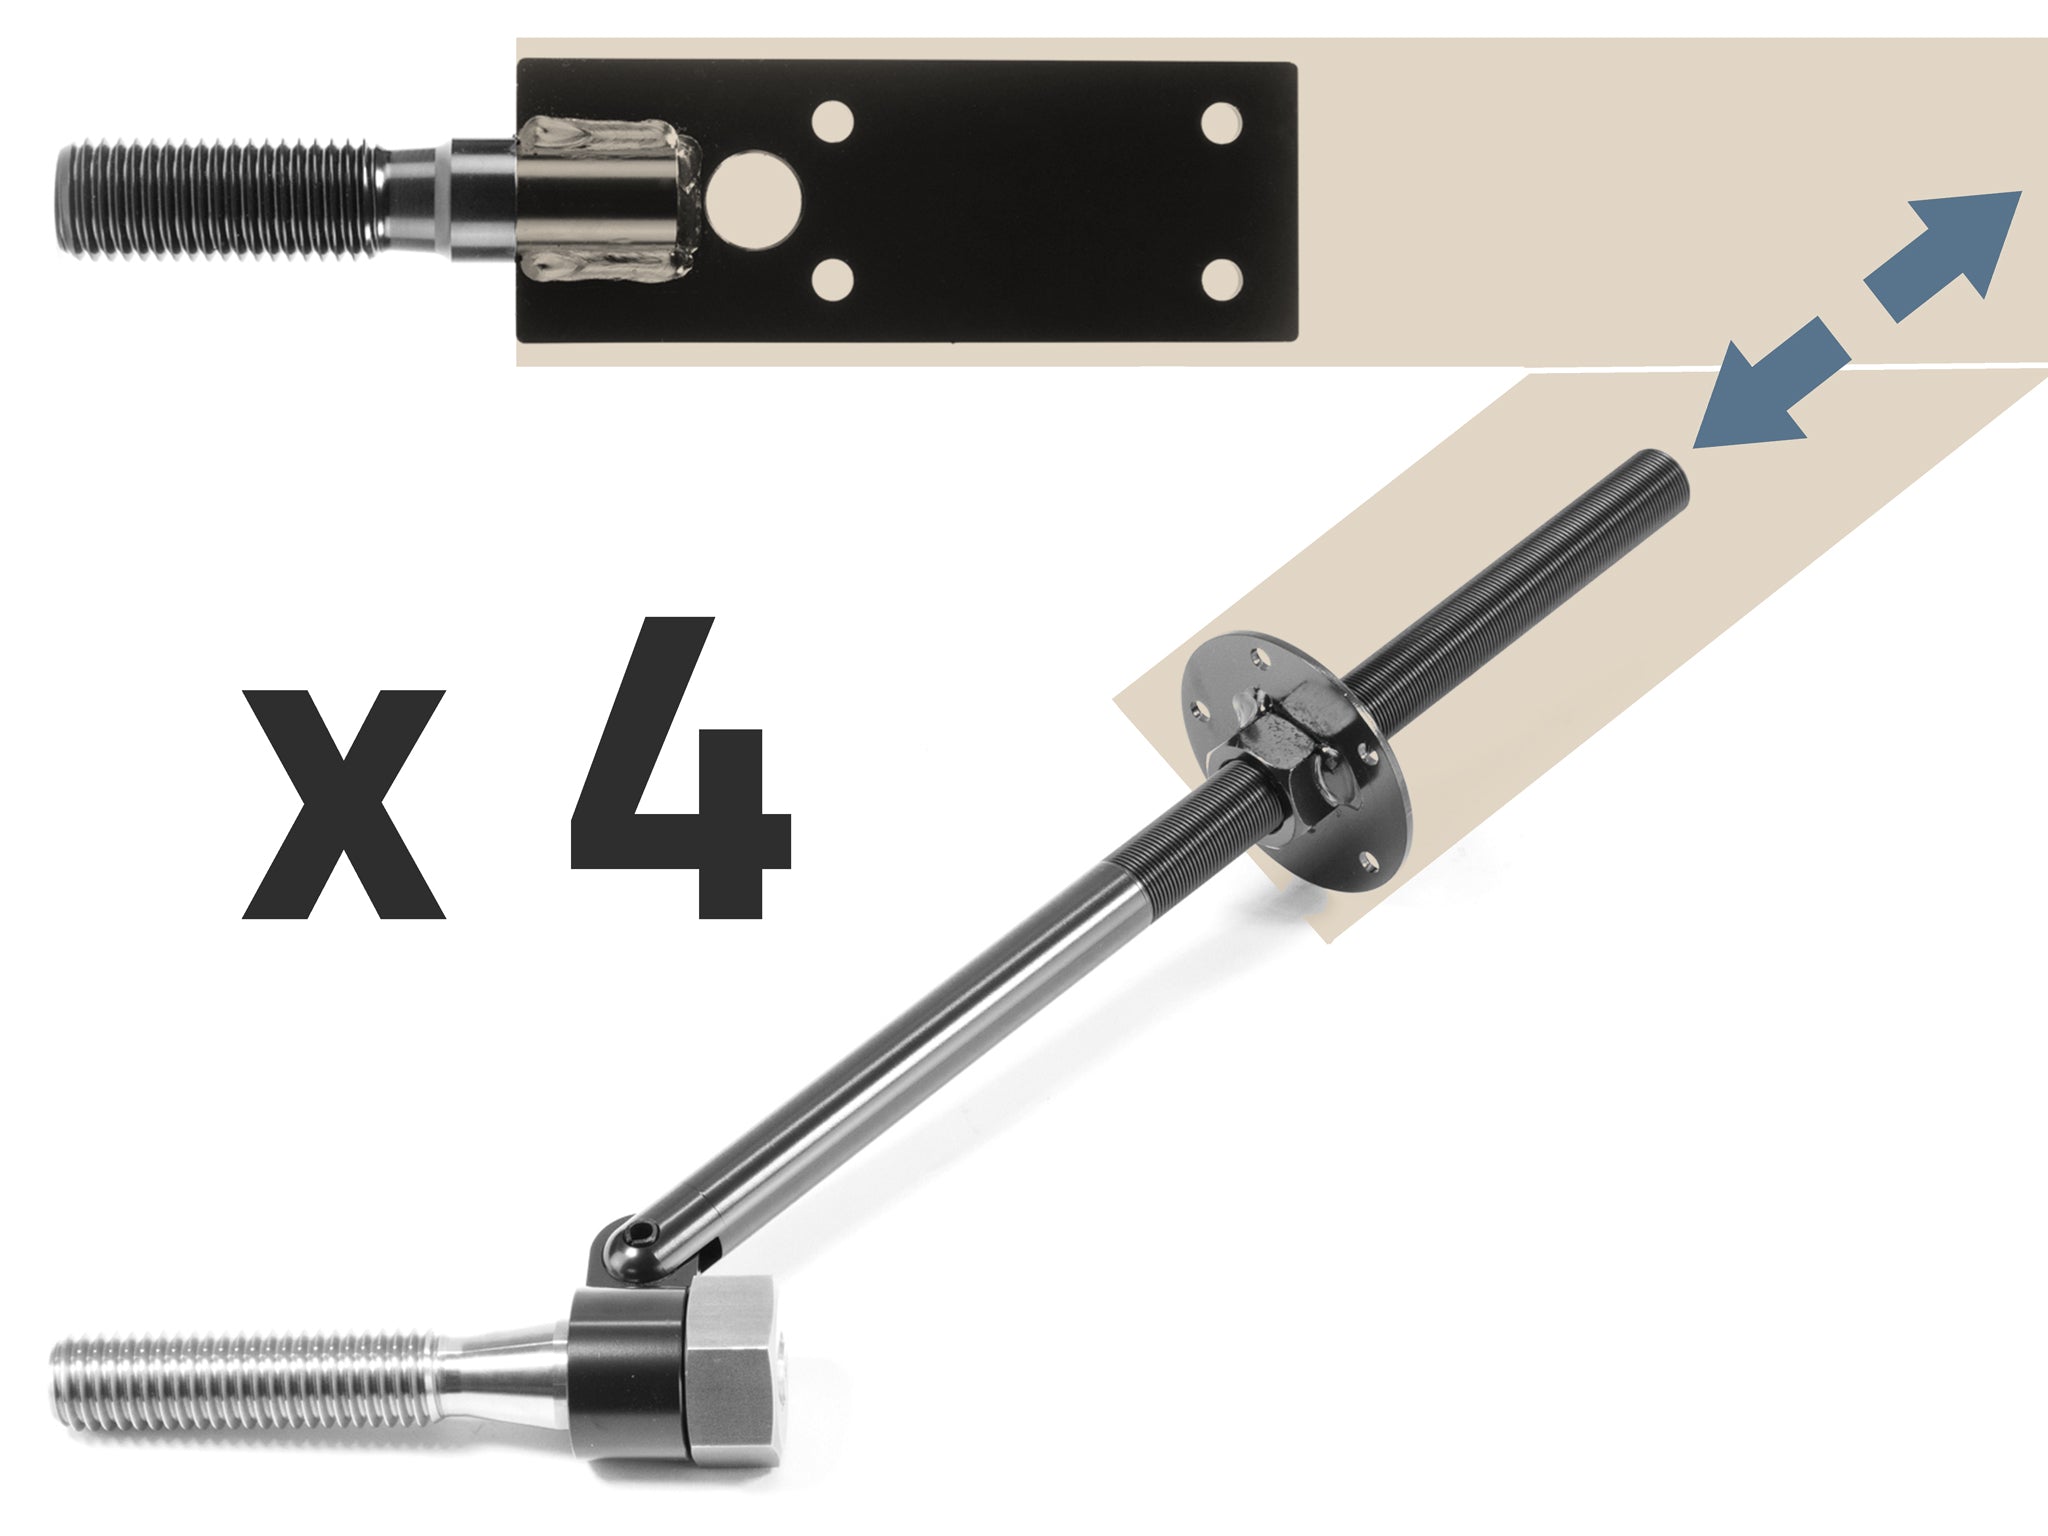
Height-adjustable struts
Some Strut Connectors are height-adjustable via a turntable, allowing you to align the platform perfectly! The end of the strut only needs to be sawn off at an angle of approximately 90° – quick and easy assembly!
Be aware of leverage!
Tree Braces that are loaded far outwards tend to tip – forces act on the GTS Side, pulling the screw out of the tree. With large lever forces, a counter bearing is therefore always required, e.g. an opposite Tree Brace that prevents the tipping movement.
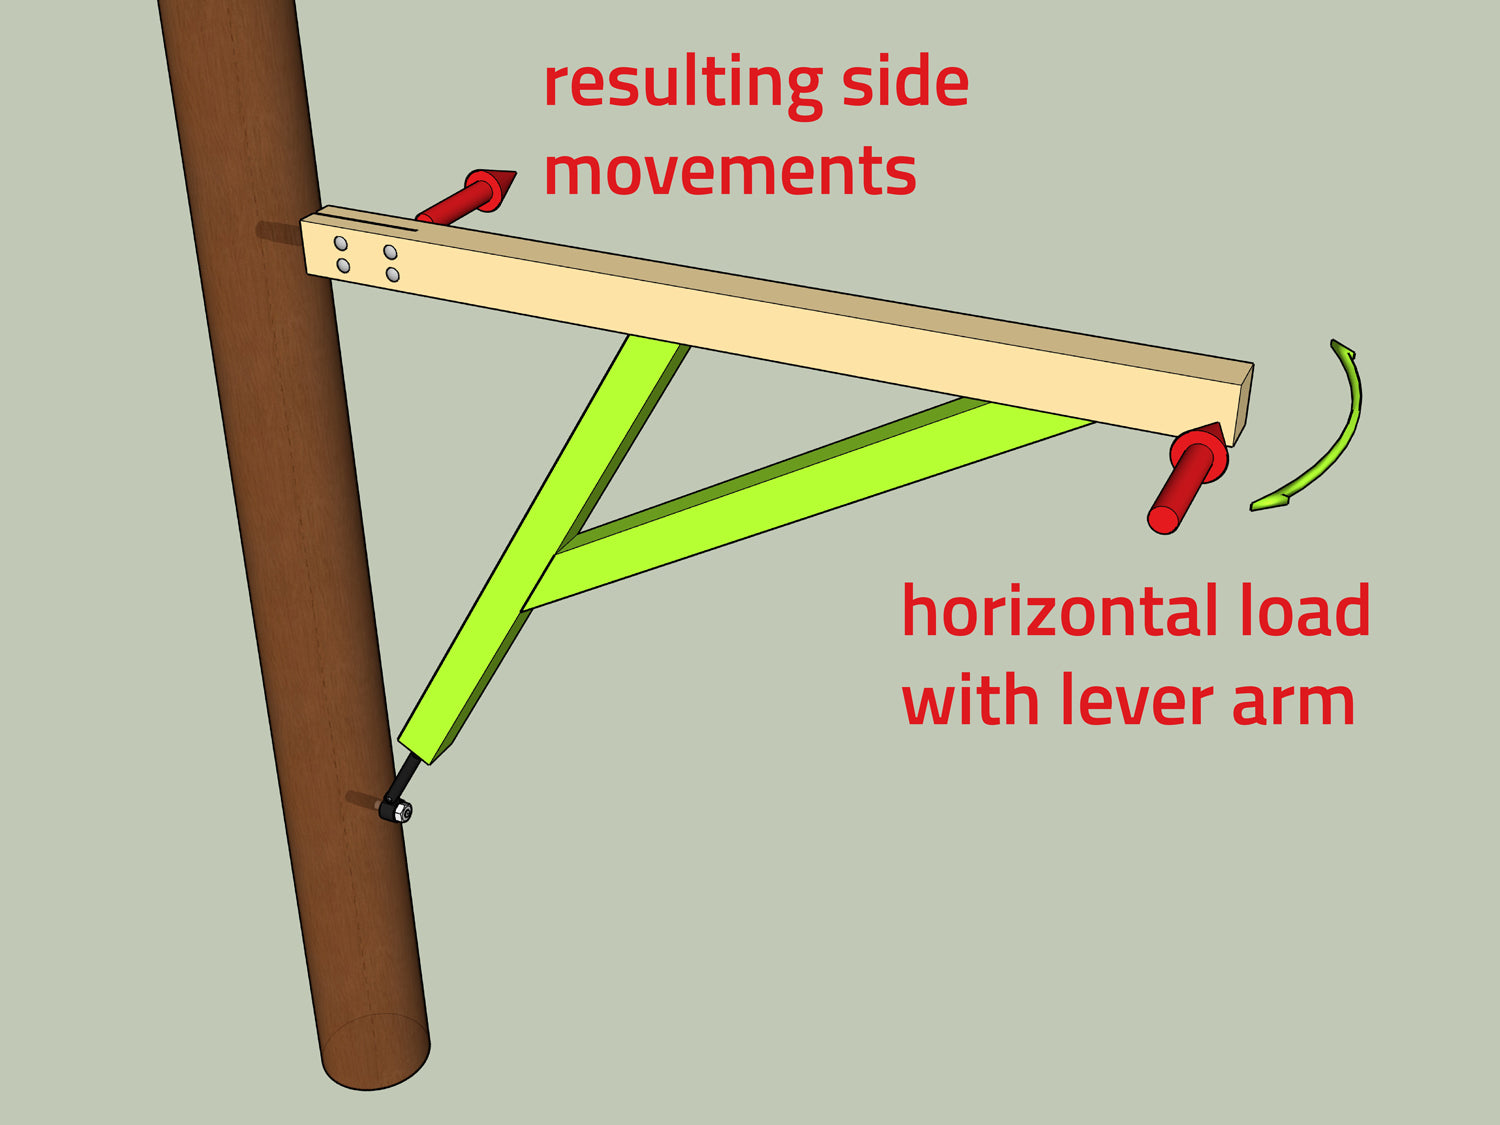
Horizontal load & rotation
Repeated lateral loads with a long lever arm should be avoided. The GTS Side can widen the drill hole in the tree and reduce its load capacity in the long term.


Our online shop for treehouse builders
Now you know what you can do with our hardware – so head over to the shop and put together your own customised set for your treehouse project!